Elements of image quality...

Well, there used to be the f/64 group and many photographers use camera movements to manage focus. Photographers have different needs.
Some of your readers may have forgotten that f/64 on an 8x10 is equivalent to f/10 on a 33x44 camera on the basis of image height.
:-)

I thought the f/64 group used 4"x5" and I calculated f/17 for 24x36 as equivalent.

Thanks for the info!

Best regards

Erik
 
Well, there used to be the f/64 group and many photographers use camera movements to manage focus. Photographers have different needs.
Some of your readers may have forgotten that f/64 on an 8x10 is equivalent to f/10 on a 33x44 camera on the basis of image height.
:-)

I thought the f/64 group used 4"x5" and I calculated f/17 for 24x36 as equivalent.
Thanks for the info!
EW used an 8x10 for most things, but as I remember, had a 4x5 Graflex SLR. AA used 4x5, 5x7 8x10, 6.5x8.5, and other sizes. In later years he used 35 mm and a 6x6 'blad. Cunningham mostly used a 4x5, I think. The pictures I've seen on Van Dyke how him with what appears to be an 8x10. The prototypical Group f.64 (note the dot in place of the slash) was the 8x10, maybe because it was the smallest format that produced comfortably large contact prints.
Jim,

Thanks for the info.

Interesting that you mention 8"x10" contact prints.

Best regards

Erik
 
Last Sunday, I was in a river canyon with my camera+tripod, photographing water flowing through the rocks carved over thousand years. I tried the theory from that thread: I opened up the lens aperture to f/9 / 30mm on FF, more than I'd usually do (f11 <> f16), to avoid diffraction according the diffraction curves from Matlab. In addition, I made several other exposures of the same composition at f/13 and f/16. Distances from 2m to 22m (20m depth), focused at 4m.

So, what was the result? With f/9 (to avoid theoretical diffraction, at f2 we could have 800Mpixels!) the foreground shows more blur, and the background doesn't show any improvement in sharpness over the f13 and f16 exposures. The reason why the recommendations don't work, is because the loss of detail out of the focus plane , is much larger than the loss of detail from diffraction when stopping down the lens further.

The matlab theory, while showing nice curves from a lens/camera model of choice, just didn't work in practice. Worse, the matlab simulation theory produced less optimal images. So, I'm glad I shot at f/13 and f/16 even if there is diffraction that doesn't seem noticeable at all. Practically, depth of field blur impact between the focus plane and the camera is much much greater than diffraction blur. It's just that the Matlab sim was run for a subject distance of 10m with a 55 lens (if I remember correctly).

We would be to bring a notebook and run a matlab simulation before each exposure, inputting the focal length, foreground distance, background distance, focus distance , to make sure we include in the model the right distances, and camera and lens settings, but that would be so impractical in a canyon, I can hardly imagine the mess. I much prefer to do three exposures, and select the best after a side by side comparison.
 
Well, there used to be the f/64 group and many photographers use camera movements to manage focus. Photographers have different needs.
Some of your readers may have forgotten that f/64 on an 8x10 is equivalent to f/10 on a 33x44 camera on the basis of image height.
:-)

I thought the f/64 group used 4"x5" and I calculated f/17 for 24x36 as equivalent.
Thanks for the info!
EW used an 8x10 for most things, but as I remember, had a 4x5 Graflex SLR. AA used 4x5, 5x7 8x10, 6.5x8.5, and other sizes. In later years he used 35 mm and a 6x6 'blad. Cunningham mostly used a 4x5, I think. The pictures I've seen on Van Dyke how him with what appears to be an 8x10. The prototypical Group f.64 (note the dot in place of the slash) was the 8x10, maybe because it was the smallest format that produced comfortably large contact prints.
Jim,

Thanks for the info.

Interesting that you mention 8"x10" contact prints.

Best regards

Erik
How did they do to take pictures with 4x5 and 8x10 without matlab to simulate theoretical models of 4x5 and 8x10 systems?
Hi,

Many times photographers use limited depth of field as a creative tool. Doing that the photographer observes the image on the ground glass and tries to find the optimal look. In most cases, they may find that medium aperture yields the optimum. After that it is easy, you just decide that most important point and focus at that point on the ground glass with your 15X loupe.

Large format cameras allowed for tilt and swing, so if photographers needed long depth of field, they would use tilt (or swing):

See this:

Tilt/swing doesn't solve all problems. So there is still cause to do a decent amount of stop down.


This was shot at around 135 mm at f/11 on a Sony A7rII using tilt.

This was shot at around 135 mm at f/11 on a Sony A7rII using tilt.


This was shot with the Hasselblad 555/ELD and the P45+ back, using a Sonnar 180/4 at f/11, focus is on the gravestone at the center. I have not tried f/22, sorry.

This was shot with the Hasselblad 555/ELD and the P45+ back, using a Sonnar 180/4 at f/11, focus is on the gravestone at the center. I have not tried f/22, sorry.

So, my guess would be they focused on the subject, used tilt or swing optimally and stopped down for good visual look.

DoF with large format was very thin on large format.

Best regards

Erik

--
Erik Kaffehr
Website: http://echophoto.dnsalias.net
Magic uses to disappear in controlled experiments…
Gallery: http://echophoto.smugmug.com
Articles: http://echophoto.dnsalias.net/ekr/index.php/photoarticles
 
Well, there used to be the f/64 group and many photographers use camera movements to manage focus. Photographers have different needs.
Some of your readers may have forgotten that f/64 on an 8x10 is equivalent to f/10 on a 33x44 camera on the basis of image height.
:-)

I thought the f/64 group used 4"x5" and I calculated f/17 for 24x36 as equivalent.
Thanks for the info!
EW used an 8x10 for most things, but as I remember, had a 4x5 Graflex SLR. AA used 4x5, 5x7 8x10, 6.5x8.5, and other sizes. In later years he used 35 mm and a 6x6 'blad. Cunningham mostly used a 4x5, I think. The pictures I've seen on Van Dyke how him with what appears to be an 8x10. The prototypical Group f.64 (note the dot in place of the slash) was the 8x10, maybe because it was the smallest format that produced comfortably large contact prints.
Jim,

Thanks for all the info. I knew only vaguely about Group f.64.

Interesting that you mention contact prints and 8"x10" originals,

Best regards

Erik
 
Last Sunday, I was in a river canyon with my camera+tripod, photographing water flowing through the rocks carved over thousand years. I tried the theory from that thread: I opened up the lens aperture to f/9 / 30mm on FF, more than I'd usually do (f11 <> f16), to avoid diffraction according the diffraction curves from Matlab. In addition, I made several other exposures of the same composition at f/13 and f/16. Distances from 2m to 22m (20m depth), focused at 4m.

So, what was the result? With f/9 (to avoid theoretical diffraction, at f2 we could have 800Mpixels!) the foreground shows more blur, and the background doesn't show any improvement in sharpness over the f13 and f16 exposures. The reason why the recommendations don't work, is because the loss of detail out of the focus plane , is much larger than the loss of detail from diffraction when stopping down the lens further.

The matlab theory, while showing nice curves from a lens/camera model of choice, just didn't work in practice. Worse, the matlab simulation theory produced less optimal images. So, I'm glad I shot at f/13 and f/16 even if there is diffraction that doesn't seem noticeable at all. Practically, depth of field blur impact between the focus plane and the camera is much much greater than diffraction blur. It's just that the Matlab sim was run for a subject distance of 10m with a 55 lens (if I remember correctly).

We would be to bring a notebook and run a matlab simulation before each exposure, inputting the focal length, foreground distance, background distance, focus distance , to make sure we include in the model the right distances, and camera and lens settings, but that would be so impractical in a canyon, I can hardly imagine the mess. I much prefer to do three exposures, and select the best after a side by side comparison.
Hi,

What the original posting suggested was:

'We may need to keep things in balance. To get best image quality, it makes sense to use base ISO and expose as high as possible without burning out highlights.

We would also try to keep aperture near medium, to keep diffraction at bay.

After that we need to manage sharpness. There is only one plane of focus. Placing the main object in focus may make a lot of sense. After that we may need to stop down to get acceptable sharpness.
But stopping down to much we will lose some sharpness and perhaps we need high ISO to keep motion blur at bay.'


It doesn't say that the photographer should not stop down for DoF. But it says that sharpness need to be managed.

Best regards

Erik
 
Thanks for all the info. I knew only vaguely about Group f.64.

Interesting that you mention contact prints and 8"x10" originals,
I have several such prints, some by Morley Baer. I even have a Michael Smith 8x20 contact print of a negative made in Tuscany. 8x10 contact prints have a sharpness that can't be duplicated in an 8x10 inkjet print.

Jim
 
Last Sunday, I was in a river canyon with my camera+tripod, photographing water flowing through the rocks carved over thousand years. I tried the theory from that thread: I opened up the lens aperture to f/9 / 30mm on FF, more than I'd usually do (f11 <> f16), to avoid diffraction according the diffraction curves from Matlab. In addition, I made several other exposures of the same composition at f/13 and f/16. Distances from 2m to 22m (20m depth), focused at 4m.

So, what was the result? With f/9 (to avoid theoretical diffraction, at f2 we could have 800Mpixels!) the foreground shows more blur, and the background doesn't show any improvement in sharpness over the f13 and f16 exposures. The reason why the recommendations don't work, is because the loss of detail out of the focus plane , is much larger than the loss of detail from diffraction when stopping down the lens further.

The matlab theory, while showing nice curves from a lens/camera model of choice, just didn't work in practice. Worse, the matlab simulation theory produced less optimal images. So, I'm glad I shot at f/13 and f/16 even if there is diffraction that doesn't seem noticeable at all. Practically, depth of field blur impact between the focus plane and the camera is much much greater than diffraction blur. It's just that the Matlab sim was run for a subject distance of 10m with a 55 lens (if I remember correctly).

We would be to bring a notebook and run a matlab simulation before each exposure, inputting the focal length, foreground distance, background distance, focus distance , to make sure we include in the model the right distances, and camera and lens settings, but that would be so impractical in a canyon, I can hardly imagine the mess. I much prefer to do three exposures, and select the best after a side by side comparison.
This is a great example of someone misapplying theory, and blaming the theory rather than the -- in this case, stubbornly obtuse -- application of the theory.

For the record, here's what I've been saying about image sharpness in this thread and elsewhere. Blur comes from four main sources: defocusing (DOF), sensor pixel aperture, lens aberrations, and diffraction. A photographer wishing to minimize blur should balance these against each other in order the sharpest image. Selecting the best lens aperture for sharpness is often not the optimal strategy. I covered that in great detail in the series of blog posts about sharpness optimization, but you seem to have not understood the point.

In your "test" you neglected an important variable in a three-dimensional scene: focus distance. Often, the best focus distance is not obvious at all, and if you're going to operate by spray and pray, you should explore various focus distances at all the apertures you try.

Jim
 
I think your approach to photography is way too analytical, which probably hinders the other side (and most interesting) of photography: creativity.
I've seen several people say something like that, and I don't buy it at all. Besides AA -- who has already been brought up as a counterexample -- I, with a certain amount of immodesty, offer myself as such.

I think my analytical bent is well-known on this forum, so I won't go into it. To see my photography, look at these galleries:

https://www.kasson.com/gallery/

Notice that many of the series employ techniques and produce looks that are well outside the usual photographic gamut, and that these galleries push the envelope in different directions. You can decide for yourself if those galeries are evidence of creativity or not.

I am an amateur photographer, but I have enjoyed some success in exhibiting my work.

Before I get into what I consider to be the positive effects of analysis on creativity, I will acknowledge one negative consequence: time spent doing analytical work is not time spent making art. But setting that aside, I think that the two reinforce each other, at least in my case.

In the early 1990s, I attended a lecture by Fred Brooks (of Mythical Man-Month fame), the title of which was something like "Design is Design". Fred compared the design process in many different disciplines, and found a lot of commonality. I find that designing a photograph can have a lot in common with designing an experiment, designing a house, or designing a computer system. I've done the second of those once, and the first and third many times over many years.

Knowledge gained and questions contemplated during creative photography teaches me what technical issues are important, and informs my testing. Knowledge gained during testing helps be be more efficient when I am trying to do creative photography. Knowing my equipment in detail means that I waste less time getting that equipment to produce the results I want. Even more directly, knowledge and computer routines developed for testing have proven useful to me in programming computers to manipulate photographs for artistic purposes.

Some of the ideas for the programs I wrote to produce this image came fro programs that I wrote to test cameras.

This is the result of knowledge gained during testing of the GFX 50S electronic shutter

Jim
Jim,

You have shared many great images the not so few years I was following your blog.

Just to say, I much admired your stills of flowers stand alone and in what I think was a block of ice. The present series of images I also like, but it may be that they may be based on photography than photographic images.
Is distortion through manipulation of the captured file in any artistic sense different from distortion through a quirk in the way the camera's shutter works? That's the difference between the two images above.

Aren't these images photographs?

On the other hand, you still project the image trough a distortion device, it is just that the distortion device is built on algorithm and not transparent silica.
--
 
Well, there used to be the f/64 group and many photographers use camera movements to manage focus. Photographers have different needs.
Some of your readers may have forgotten that f/64 on an 8x10 is equivalent to f/10 on a 33x44 camera on the basis of image height.
:-)

I thought the f/64 group used 4"x5" and I calculated f/17 for 24x36 as equivalent.
Thanks for the info!
EW used an 8x10 for most things, but as I remember, had a 4x5 Graflex SLR. AA used 4x5, 5x7 8x10, 6.5x8.5, and other sizes. In later years he used 35 mm and a 6x6 'blad. Cunningham mostly used a 4x5, I think. The pictures I've seen on Van Dyke how him with what appears to be an 8x10. The prototypical Group f.64 (note the dot in place of the slash) was the 8x10, maybe because it was the smallest format that produced comfortably large contact prints.
Thanks for the info.
How did they do to take pictures with 4x5 and 8x10 without matlab to simulate theoretical models of 4x5 and 8x10 systems?
This snarky sentence is a complete non sequitur. It serves only to demonstrate the poster's lack of understanding to the issues under discussion, and of which tools are appropriate to which tasks.

--
https://blog.kasson.com
 
Last edited:
..
In your "test" you neglected an important variable in a three-dimensional scene: focus distance. Often, the best focus distance is not obvious at all, and if you're going to operate by spray and pray, you should explore various focus distances at all the apertures you try.

Jim
I've consciously selected where to focus in order to balance near and far focus. I used a DoF calculator for that. Between 2m and 22m, the DoF calculator gave approx. 4m .

Like you, I know that sharpness (or lack of it) comes from 4 sources: sensor pixel pitch, pixel micro-lens aperture, lens aberrations and diffraction. What remains camera and lens specific, and unknown by theory, is how much of these 4 ingredients contribute to the actual image. And so, using my camera+lens combination, my observation was that my system wasn't so much limited by sensor res. + pixel aperture diff. + lens ab. + lens diffraction , as much as it was limited by DoF.

Question left open: What CoC value should be used by the DoF calculator, based on other system parameters so that the DoF calculator provides meaningful values DoF (hyperfocal, near and far distances). If my case, I used CoC = 0.014 (as opposed to the standard 0.028 CoC for FF), but it seems that the near focus was still much more out of focus than at the far end of the frame.
 
Last Sunday, I was in a river canyon with my camera+tripod, photographing water flowing through the rocks carved over thousand years. I tried the theory from that thread: I opened up the lens aperture to f/9 / 30mm on FF, more than I'd usually do (f11 <> f16), to avoid diffraction according the diffraction curves from Matlab. In addition, I made several other exposures of the same composition at f/13 and f/16. Distances from 2m to 22m (20m depth), focused at 4m.

So, what was the result? With f/9 (to avoid theoretical diffraction, at f2 we could have 800Mpixels!) the foreground shows more blur, and the background doesn't show any improvement in sharpness over the f13 and f16 exposures. The reason why the recommendations don't work, is because the loss of detail out of the focus plane , is much larger than the loss of detail from diffraction when stopping down the lens further.

The matlab theory, while showing nice curves from a lens/camera model of choice, just didn't work in practice. Worse, the matlab simulation theory produced less optimal images. So, I'm glad I shot at f/13 and f/16 even if there is diffraction that doesn't seem noticeable at all. Practically, depth of field blur impact between the focus plane and the camera is much much greater than diffraction blur. It's just that the Matlab sim was run for a subject distance of 10m with a 55 lens (if I remember correctly).

We would be to bring a notebook and run a matlab simulation before each exposure, inputting the focal length, foreground distance, background distance, focus distance , to make sure we include in the model the right distances, and camera and lens settings, but that would be so impractical in a canyon, I can hardly imagine the mess. I much prefer to do three exposures, and select the best after a side by side comparison.
This is a great example of someone misapplying theory, and blaming the theory rather than the -- in this case, stubbornly obtuse -- application of the theory.

For the record, here's what I've been saying about image sharpness in this thread and elsewhere. Blur comes from four main sources: defocusing (DOF), sensor pixel aperture, lens aberrations, and diffraction. A photographer wishing to minimize blur should balance these against each other in order the sharpest image. Selecting the best lens aperture for sharpness is often not the optimal strategy. I covered that in great detail in the series of blog posts about sharpness optimization, but you seem to have not understood the point.

In your "test" you neglected an important variable in a three-dimensional scene: focus distance. Often, the best focus distance is not obvious at all, and if you're going to operate by spray and pray, you should explore various focus distances at all the apertures you try.

Jim
I would agree with Jim, but in almost any image there is a main subject. In most cases, it makes sense to focus on the main subject and compromise the rest.

Compromising the rest, it is a piece of art, but may also take some knowledge.

Just as an example, and I may be completely wrong, most lenses are optimized for producing a nice background blur. Considering that, selecting a subject that has lot of blur in the foreground may not be optimal.

Best regards

Erik
 
..

In your "test" you neglected an important variable in a three-dimensional scene: focus distance. Often, the best focus distance is not obvious at all, and if you're going to operate by spray and pray, you should explore various focus distances at all the apertures you try.

Jim
I've consciously selected where to focus in order to balance near and far focus. I used a DoF calculator for that. Between 2m and 22m, the DoF calculator gave approx. 4m .
Using what CoC?
Like you, I know that sharpness (or lack of it) comes from 4 sources: sensor pixel pitch, pixel micro-lens aperture, lens aberrations and diffraction. What remains camera and lens specific, and unknown by theory, is how much of these 4 ingredients contribute to the actual image.
Square root of the sum of the squares of included energy diameters is a good place to start. Greater accuracy requires Fourier optic calculations, which are impractical in the field.
And so, using my camera+lens combination, my observation was that my system wasn't so much limited by sensor res. + pixel aperture diff. + lens ab. + lens diffraction , as much as it was limited by DoF.
If DOF is the long pole in the tent, optimize for DOF. That's because in a sum of squares calculation, the largest term dominates.
Question left open: What CoC value should be used by the DoF calculator, based on other system parameters so that the DoF calculator provides meaningful values DoF (hyperfocal, near and far distances). If my case, I used CoC = 0.014 (as opposed to the standard 0.028 CoC for FF), but it seems that the near focus was still much more out of focus than at the far end of the frame.
Don't calculate the CoC that way. Calculate the CoC as a function of distance. Then you can compare it with the other blur circles.

Or, for maximum practical sharpness set the CoC to the combination of the aberrations, diffraction, and pixel aperture. That will give a blur circle of about 1.4 times the CoC.

Jim
I've tried to use the DoF calculator by changing f-number, CoC and focus distance, with CoC value set by segment, pixel pitch more or less 5um:

- CoC = f-number/1000 for f-numbers >> pixel pitch in um, assuming diffraction and DoF are the main contributors to blur. e.g for f-numbers f/11, f/16, f/22 etc.. CoC = 0.011, 0.016, 0.022 respectively. Balance DoF blur and diffraction blur.

- CoC = 0.01 constant for all f-numbers <= 10 (lens optical BW + sensor res. become dominant). e.g CoC = 0.01 for f/8, f/5.6, f4, f2.8 etc. This is under the assumption that the lens optical bandwidth + sensor res. are dominant, and that lens optical bandwidth is consistent with 5um pixel pitch, ignoring pixel aperture side effects.

The approximation works quite well, with the advantage that it is usable in the field, just using a DoF calculator on a smartphone.
 
Last edited:
Question left open: What CoC value should be used by the DoF calculator, based on other system parameters so that the DoF calculator provides meaningful values DoF (hyperfocal, near and far distances). If my case, I used CoC = 0.014 (as opposed to the standard 0.028 CoC for FF), but it seems that the near focus was still much more out of focus than at the far end of the frame.
Don't calculate the CoC that way. Calculate the CoC as a function of distance. Then you can compare it with the other blur circles.

Or, for maximum practical sharpness set the CoC to the combination of the aberrations, diffraction, and pixel aperture. That will give a blur circle of about 1.4 times the CoC.

Jim
I've tried to use the DoF calculator by changing f-number, CoC and focus distance, with CoC value set by segment, pixel pitch more or less 5um:

- CoC = f-number/1000 for f-numbers >> pixel pitch in um, assuming diffraction and DoF are the main contributors to blur. e.g for f-numbers f/11, f/16, f/22 etc.. CoC = 0.011, 0.016, 0.022 respectively. Balance DoF blur and diffraction blur.

- CoC = 0.01 constant for all f-numbers <= 10 (lens optical BW + sensor res. become dominant). e.g CoC = 0.01 for f/8, f/5.6, f4, f2.8 etc. This is under the assumption that the lens optical bandwidth + sensor res. are dominant, and that lens optical bandwidth is consistent with 5um pixel pitch, ignoring pixel aperture side effects.

The approximation works quite well, with the advantage that it is usable in the field, just using a DoF calculator on a smartphone.
Lens quality probably also plays a role, and most lenses have field curvature.

I have bought, but never really used, LumaRiver DoF.

LumaRiver DoF varies the CoC depending on aperture, it also has two definitions of CoC, SHARP and SOFT. As default SHARP is CoC = AiryDiameter and SOFT = 2 X Airy diameter.

Using SHARP as criteria and DoF requirement of 2-20 m that would give:

f/13, focused at 3.5m, with near limit at 1.93 m and far limit at 20.3 m.

Two points to keep in mind may be that:
  • Loss of from diffraction can be recovered mostly with sharpening, until a certain limit where MTF drops to zero at the pixel level.
  • The peak performance on good lenses occurs likely around f/4 - f/5.6, going past that differences may reduce.
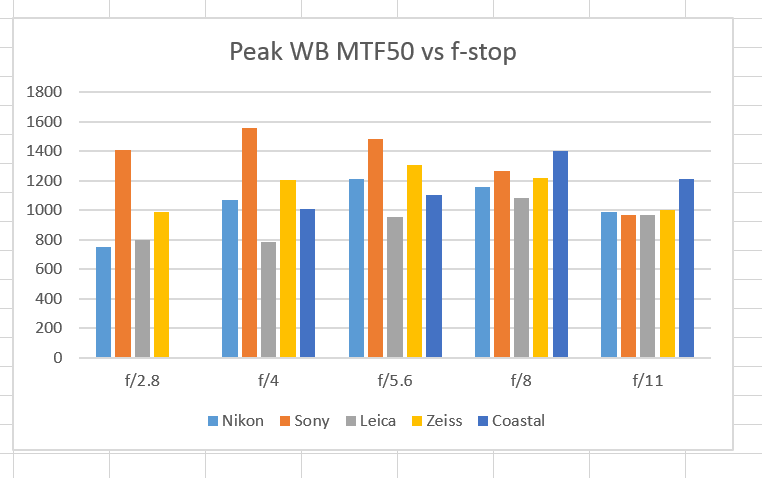
https://blog.kasson.com/the-last-word/resolution-and-loca-comparisons-with-the-coastal-604-macro/


You can see that the differences at f/4 are huge, but all lenses all close at f/11. Exception is the Coastal Optics macro. In a later test Jim found out that the physical aperture on the Coastal Optics at the f/11 setting is pretty close f/8.

As a side note, it is feasible to think macro lenses are always used stopped down, quite true, DoF at macro distances is incredibly thin. Still, large apertures can have a charm in macro also:


This was shot at f/8, only the stamens are in sharp focus.

This was shot at f/8, only the stamens are in sharp focus.


This is at f/2.8. The background has now a softer blur, but the stamens are still sharp.

This is at f/2.8. The background has now a softer blur, but the stamens are still sharp.

Best regards

Erik

--
Erik Kaffehr
Website: http://echophoto.dnsalias.net
Magic uses to disappear in controlled experiments…
Gallery: http://echophoto.smugmug.com
Articles: http://echophoto.dnsalias.net/ekr/index.php/photoarticles
 
Last edited:
I have bought, but never really used, LumaRiver DoF.

LumaRiver DoF varies the CoC depending on aperture, it also has two definitions of CoC, SHARP and SOFT. As default SHARP is CoC = AiryDiameter and SOFT = 2 X Airy diameter.

Using SHARP as criteria and DoF requirement of 2-20 m that would give:

f/13, focused at 3.5m, with near limit at 1.93 m and far limit at 20.3 m.
Yes, I also found the f/13 was the optimal aperture for 2 to 20m range.
Two points to keep in mind may be that:
  • Loss of from diffraction can be recovered mostly with sharpening, until a certain limit where MTF drops to zero at the pixel level.
  • The peak performance on good lenses occurs likely around f/4 - f/5.6, going past that differences may reduce
https://blog.kasson.com/the-last-word/resolution-and-loca-comparisons-with-the-coastal-604-macro/

Some diffraction correction can be applied. When comparing images captured with different settings, it is important to be aware if diffraction correction is applied or not.
You can see that the differences at f/4 are huge, but all lenses all close at f/11. Exception is the Coastal Optics macro. In a later test Jim found out that the physical aperture on the Coastal Optics at the f/11 setting is pretty close f/8.
I could observe that fast lenses are often sharpest around f/4 - f/5.6 in the center, but sharpness may vary considerably at edges & corners. I could see that fast prime lenses with focal length of 35mm or more can be very good corner to corner, especially macro lenses, some macro lens are evenly sharp across the frame, that's good to know for selecting the lens when aiming at big enlargements (prints) is all is in focus.
As a side note, it is feasible to think macro lenses are always used stopped down, quite true, DoF at macro distances is incredibly thin. Still, large apertures can have a charm in macro also:

This was shot at f/8, only the stamens are in sharp focus.

This was shot at f/8, only the stamens are in sharp focus.

This is at f/2.8. The background has now a softer blur, but the stamens are still sharp.

This is at f/2.8. The background has now a softer blur, but the stamens are still sharp.

Best regards

Erik
When edges/corners are out of focus, using larger apertures f4 - f5.6 range with stacking potentially deliver the most definition. Relaxing the DoF constrain allow to max out of possible print enlargement. High pixel pitch such as on the GFX100 and Sony A7RIV is especially good for stacked macros, that's a particular case.
 
Aha! So I have been right for the past 22 months!

DOF calculators are bogus no matter what - especially with our GFX shots when viewed at pixel res on a great IPS 4K pro monitor. That always proves how bogus they really are.

Jim and I are going to win a Nobel prize for this. I said it and now you guys are going to prove it.
 

Keyboard shortcuts

Back
Top