Post your macro rig.

Martin.au

Forum Pro
Messages
14,435
Solutions
12
Reaction score
14,304
Location
Tasmania, AU
I thought it might be nice to see the other side of the lens for once. Post a photo of your rigs and some examples.

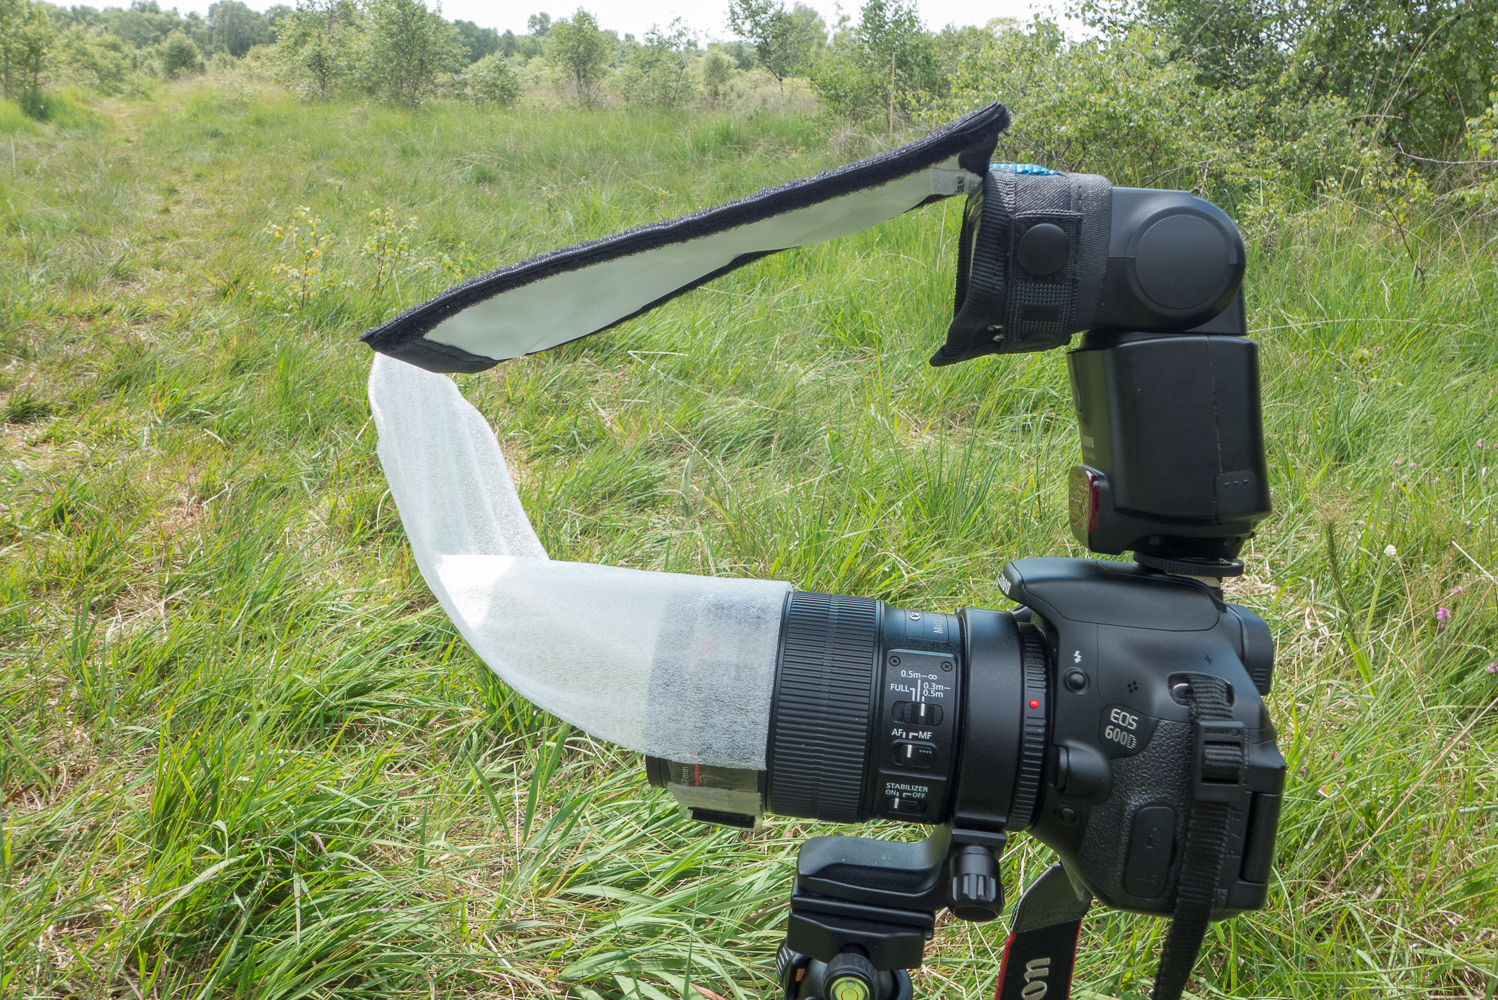
I keep mine very simple, as I wanted something small enough I could chuck in with the rest of my kit "just in case".

View attachment 1166875

Example


Simple is always best. The above rig is a good way of getting reliable soft light.

I work from first principles when it comes to designing macro flash rigs. The rigs themselves are simple, but the thinking behind them is more complex. I use a principle I called Concave Diffusion, a term I invented and defined in early 2010 and explained with these diagrams. I had already been using these principles before 2010, but this is when I defined how it works. The essential principle is to wrap the light around the subject using a diffuser with a concave face. These diagrams explain how light from diffusers and light modifiers work. Blue is the least bright part, yellow is brighter, and red is concentrated light which causes blown highlights.

https://www.flickr.com/photos/steb1/sets/72157623486703625

This year just gone I was using two rigs. The first is very simple, and adaptable because both the reflector and diffuser can be bent into different positions for different lighting. It uses a bounce flash card to bounce light from a hot shoe flash down onto a thin concave diffuser (as the light is already diffused from the bounce card. With clever positioning it can replicate daylight in look.

On the link below, the other positions the flash can be put in can be seen, along with it's components

On the link below, the other positions the flash can be put in can be seen, along with it's components

https://www.flickr.com/photos/steb1/sets/72157659522041169

This is a good illustration of the type of photograph it can take. This is completely full flash, and there is no daylight contribution at all, as the light levels were very low. But I straightened the diffuser, and lifted the bounce card up, so light was reflected over the subject on the background, to illuminate the background, even though it was some distance off, and would normally have been black with flash.

No other macro flash set up I know of is so versatile, and can also illuminate the background some distance away.

No other macro flash set up I know of is so versatile, and can also illuminate the background some distance away.

It can be used like a normal macro flash

It can be used like a normal macro flash

Whereas here I twisted it diffuser up so it was like a soft box, and only used it for fill in. The blue background is the sky. You can do all this quickly without having to take anything on or off. Or if the natural light is good, you can just switch off the flash, and take a natural light shot.

Whereas here I twisted it diffuser up so it was like a soft box, and only used it for fill in. The blue background is the sky. You can do all this quickly without having to take anything on or off. Or if the natural light is good, you can just switch off the flash, and take a natural light shot.

On this set up I modified a Yongnuo Macro Lite, a bit like a ring flash but with 2 semi-circular tubes to give incredibly soft light without the usual ugly reflections. This is more for real close range or high magnification stuff such as with the Canon MP-E 65 f2.8 1-5X macro lens.

Other views and the components can be seen on the link below

Other views and the components can be seen on the link below

https://www.flickr.com/photos/steb1/sets/72157660593958210

It's described on Kurt's blog (Orionmystery)

http://orionmystery.blogspot.co.uk/2015/11/diffusing-macro-lite-flashes-or-ring.html

This is the sort of light and image you can get from this set up. Remember this is a very cheap and affordable flash, and it is the best value set up for the quality of light.

Azure Damselfly portrait

Azure Damselfly portrait


A pair of 14-spot Ladybirds. These are very shiny little beetles and illustrate the control of specular reflections this rig gives.

A pair of 14-spot Ladybirds. These are very shiny little beetles and illustrate the control of specular reflections this rig gives.
 
Very nice. I did ponder how to get some concavity or "surround" lighting when I was investigating diffusion options, but I couldn't think of any way to do so and maintain the size of rig I was after.
 
Camera: A77ii; Sigma 105mm f2.8 OS HSM macro; Meike MK-320 flash

Common flatwing; Austroargiolestes icteromelas

Orange threadtail; Nososticta solida

Female Black-faced percher; Diplacodes melanopsis

The diffuser is the side of a plastic milk bottle. I need a better material as the milk bottle is changing the color temperature of the flash.
 
Very nice. I did ponder how to get some concavity or "surround" lighting when I was investigating diffusion options, but I couldn't think of any way to do so and maintain the size of rig I was after.
The rig you use gives good and very reliable light. You can make the light wrap around the subject a bit more by bending the card forward and making it effectively more convex. Obviously this can be more difficult to do, and can make the rig less portable. With both the rigs I show all the pieces are stored flat between to foil covered reflective cake boards I use as reflectors. Square cakeboards make great macro reflectors, because they tend to have textured surfaces which prevent hotspots. Plus being square they don't roll away. I carry a silver and gold one. The gold ones are useful for warming up cooler light in the shadows. As I make sure all the diffusers and the parts fold up flat, I can easily store them in the side pockets on my camera bags. So I do realise that a diffuser that packs flat is the easiest to carry. In fact I've used diffusers more or less the same as yours for the same reason.

The videos below show similar diffusers to yours but the top is bent forward.


I think the diffuser you are using is a great design for carrying around, because it is so simple and easy to slot in any pocket. I've also gone back to just using flashes in the hotshoe position rather than brackets, because they are so much quicker to put on. Often if you are walking around with all your kit in a bag, by time you get a bracket on and all the connecting cables and bits, your opportunity is lost. Whereas the diffusers I use now can be put on in a minute or less.
 
Pictures of new (and old) setup from my article here - http://beingmark.com/macro-illustrated/ - about 1/5th the way down the page.

Panasonic G6 body with a Olympus 60/f2.8 macro lens. With a +8 dioptre achromat attached this setup does nearly everything the old one did only better, especially the AF (auto focus). I have used a lighter diffusion material, crimped elasticated cotton, stapled to the plastic. The black line you see crossing the green is elasticated nylon to help control the positioning of the diffusing disc of cotton - it can still be flipped left or right to vary direction of light, albeit less than before.


p1090938-002.jpg


The snoot is lined with creased – to aid in breaking up the path of the light – plastic foil and 1/3rd the way down the tube I have added a pad for pre-diffusion. It’s basically a disc of loose weave filler suspended about 1/2 inch from the sides using gaffer tape – so the flash isn’t producing a hot spot in the middle. It’s still a work in progress.


p1090948-002.jpg


Here’s that little black focus assist lamp clipped on another kind of lamp I have also used for AF assist. The small one gets more use these days. Both can be found online.


p1090942_filtered-mark-berkery-001.jpg


And a few pictures from the new setup.


p1040190_filtered-mark-berkery.jpg


p1050726_filtered-mark-berkery.jpg


p1060468_filtered-mark-berkery.jpg


--
Mark - http://beingmark.com/ - http://beingmark.com/macro-illustrated/
 
Video of my diffusers and rig. I've been using the EF-S 60mm + extension tubes (usually when I'm mixing natural light for the background and flash for the subject) and the MP-E 65mm (mostly when the flash is the only light source). The EF-S 60mm is lighter and easier to control when going after active subjects, and it is about a 37mm lens at minimum focusing distance (so it only takes 37mm of extension to get to 2x). Here's some samples of my light quality across a range of magnifications.

About .6x. EF-S 60mm + tubes.

About .6x. EF-S 60mm + tubes.

About .75x. EF-S 60mm + tubes.

About .75x. EF-S 60mm + tubes.

2x with the MP-E 65mm

2x with the MP-E 65mm

2x with the EF-S 60mm + tubes.

2x with the EF-S 60mm + tubes.


About 3x with the MP-E 65mm and a prototype of my current diffuser.

About 3x with the MP-E 65mm and a prototype of my current diffuser.

As the magnification goes up the diffusion gets better (flash heads get closer to the subject).

I set my camera up so that I'm not doing any in camera processing, and I have the Elements RAW editor configured as "neutral" so when I'm working on a diffuser design I can see how the light quality is changing. Granted I shoot RAW so I have to "develop my film", and as I make changes to my lighting I have to change how I post process, but the color and contrast that I'm getting out of camera is close to what you're seeing in my jpg files. Not that heavy post processing is wrong, I just want the light to do most of the heavy lifting.

--
Also known as Dalantech
My Book: http://nocroppingzone.blogspot.com/2010/01/extreme-macro-art-of-patience.html
My Blog: http://www.nocroppingzone.com
My gallery: http://www.johnkimbler.com
Macro Tutorials: http://dalantech.deviantart.com/gallery/4122501/Tutorials
Always minimal post processing and no cropping -unless you count the viewfinder... ;)
 
The diffuser is the side of a plastic milk bottle. I need a better material as the milk bottle is changing the color temperature of the flash.
It might actually be designed to protect the milk from certain frequencies of light...
 
I thought they were just HDPE, same as my chopping board, but I haven't noticed any colour temp changes with my chopping board. Haven't done any serious testing either though.
Some people seem to have done okay with diffusers made out of milk containers. However, I tried it for the diffuser part of my concave and bounce flash diffuser. Whilst the thin packing foam I used works very well, and can easily be folded up etc, it nevertheless blows about in a strong breeze. Unfortunately in the Summer last year in the UK we had these incessant strong breezes. So as the diffuser part just velcros on I can swap diffusers. I made a stiff one out of a 4 pint (2+ litre) plastic milk container. It looked as if it should work. But when I tried it out it seemed to be absorbing far too much light and giving an odd colour cast.

So I just made one out of "diffuser gel", and whilst not as rigid, but rigid enough it worked much better. Diffuser gel is made for diffuser theatre and film lighting, along with lighting for houses. So it is meant for neutral diffusion, from hot lights. The name gel is misleading as it is not gel like. It looks like thick tracing paper or velum paper. However, it is plastic (I believe polyester) and it's completely water proof. It's not too expensive considering how many diffusers you can make out of a roll of it. It seems to come in 3 grades of density depending how much diffusion you want, but even the densest lets through a lot of light and it diffuses very well. It's now my go to material.

I still use the thin white packing foam for the diffuser part of my end of lens concave diffuser and bounce card, because of the way it easily fold up at the end. This is allows it to be easily re-shaped. You can make it shorter if it is getting in the way. Or if you fold the end up it acts like a softbox for more distant subjects. The great thing about this diffuser is it will light a subject from a few millimetres if I use a powerful close-up lens like the Raynox DCR-250, or gives nice fill-in for a dragonfly nearly a metre away. Usually I had to swap to different types of diffusers for this. Okay with other diffusers you can maybe get softer light, or more creative light, but this one is a very good all rounder that can be adapted to most situations. It's the ideal walk around diffuser where you're not too sure what subject in what context you will come across.
 
The diffuser is the side of a plastic milk bottle. I need a better material as the milk bottle is changing the color temperature of the flash.
It might actually be designed to protect the milk from certain frequencies of light...
I thought they were just HDPE, same as my chopping board, but I haven't noticed any colour temp changes with my chopping board. Haven't done any serious testing either though.
I've tried several different types of food grade plastic and all of them gave my images an odd color cast.
 
I use packing foam sheets and sort of framed it with copper wire that both allows me to reshape the diffuser and helps with wind blowing - all without adding much weight at all. Originally i did this to help solve shadows below the insect, which ot does well - there is additional material below the lens that can be bent back out of the way or bent forward to reflect some light back up.

Helping with wind as you said is an issue was an unintended benefit.
 
Haha. Sorry, I linked here from another thread and didnt realize how old it was
 
57bd7017cd6e405b95140a5479a87b17.jpg

SIgma 180mm f3.5, usually with Sigma 1.4X TC, macro focus rail & flash through 6 X 8 inch diffuser.

Groundsel Bush Beetle (Trirhabda bacharidis)

Asian Lady Beetle
Asian Lady Beetle

Tropical Orb Weaver
Tropical Orb Weaver

Rose leafs with dew drops

--
“The two most common elements in the universe are Hydrogen and stupidity”—Harlan Ellison
 
0a25f219547047bfb9ea8a1c48fdd237.jpg


1d12f4e56c7d46ffbf3c51655c3c9f2c.jpg


088851b0f7244a408f561a71b051d429.jpg


5f9c924518b747b08c47fa98a3c55c85.jpg


--
 
Most of my work is studio based. I use a Canon FD bellows with a 50mm reversed lens that I adapted to my Canon 5D. I use a monolight with a snoot and a hand held flash (not pictured) to light my setup.


1b70ca2fa86f44ef866afaef5408dae5.jpg

,


,


,


.


.


Attachments

  • 3196981.jpg
    3196981.jpg
    58.2 KB · Views: 0
  • 3196987.jpg
    3196987.jpg
    44.7 KB · Views: 0
  • 3196960.jpg
    3196960.jpg
    275.5 KB · Views: 0
I pulled mine together from a mix of things I already had for other uses, including some pieces I already had specifically for macro work. Though I enjoy all areas of photography, I'm a portraitist first and foremost, so I wanted to set up something that would be more akin to a portrait studio, with variable lighting ratios but also more versatility in the placement of the lights.

This particular setup is a Stroboframe flash bracket attached to a Manfrotto macro flash bracket, with three 430EX flashes, an ST-E2 wireless transmitter, a small diffuser/softbox for the overhead flash, and, though not in this picture, often Sto-Fen diffusers on the side flashes. I use a 100mm f/2.8 macro lens on a Rebel T3, because the crop sensor makes for a larger effective magnification, since I don't have to crop as much as I would with a full-frame sensor to fill the space with the subject.

It's clunky and heavy, but it works pretty well. The real challenge is getting bugs not to run away long before you get anywhere near them with this thing. lol But, for those rare times they stay, I think the results are worth the hassle. :)


b85c14e217c4455384675ccbb2992737.jpg


5f8b59e744df416c9c67bfc29631f4dd.jpg


--
Achieving this level of obscurity as an artist required decades of hard work. But, I persevered, and look at me now. I'm practically unheard of!
 

Keyboard shortcuts

Back
Top