Lens adapters and image quality

JimKasson

Community Leader
Forum Moderator
Messages
52,274
Solutions
52
Reaction score
59,059
Location
Monterey, CA, US
Over in the Nikon Z forum, there were more than a handful of posts saying that lens adapters seriously damaged image quality. Since I have about 8 years of experience with adapted lenses (60+ years if you count putting a lens and shutter together with a lensboard) and feel differently, I posted some of my thoughts. One thing led to another, and I ran some experiments and did some math, and, as is often the case when you try to teach something, I ended up learning a lot.

I'm going to post some of my thoughts here in somewhat different form as there as replies to this post. is encouraged.

I will limit the scope of this discussion. I’m talking about adapters that have nothing but air in the optical path. I have no experience with those that use glass there. I’m also not talking about the autofocus performance of smart adapters, which can vary a lot from adapter to adapter and from lens to lens. I’m just talking about the effect – or lack of it – on image quality that arises from the mechanical characteristics of adapters.

Jim
 
Last edited:
All the rest of my initial set of posts here are going to be about the with adapters, so I thought I'd start out with a little motivational piece about why you'd want to use them in the first place.

You can use cheap lenses with character. I define “lens character” as adorable flaws. I think a perfect lens, with no distortion, no aberrations, and, what the hey, no diffraction has no character. The world is full of old lenses made for cameras that are no longer made. You can find them with the Internet. Some are very cheap. Some are uninteresting, but many are diamonds in the hands of the right photographer aimed at the right subject in the right light.

You can slowly transition to a new system. I’m not real good at getting out of systems, but in the past year or two, I’ve exited from Leica M cameras and lenses (mostly in favor of Sony/Zeiss/CV), and Hasselblad H- and V- series cameras and lenses (in favor of the GFX with native and adapted Zeiss and Leica FF lenses). In the case of the Leica gear, I sold the M9 and M240 first. I hung on to the lenses, using them on a7x cameras until I found ones that were a step up (Sony 12-24 instead of WATE, Batis 135 instead of 135 Apo-Telyt), then I sold them off gradually. I kept one Leica-M lens for which I have not yet found an equivalent or better: the 90 Apo-Summicron ASPH. In the case of the ‘blads, I kept the cameras and lenses until I was sure that the native glass was better, using the H-series lenses on the GFX (and the native lenses were far better), and I sold the whole lot as fast as I could before the prices plummeted (as they did).

You can jump into an immature system. In the early days of the a7x, there weren’t a lot of native lenses. But that wasn’t much of a problem, because I could use adapted Nikon, Zeiss, and Leica glass. Now we’re in that same situation with the Nikon Zx cameras, with only three native lenses announced (and one more teased). But the availability of the Nikon F-to-Z adapter means that people can use all their Nikon, Sigma, Zeiss, and CV F-mount lenses, so the cameras’ use envelope is not tiny.

You can use great lenses that aren’t now or weren’t ever made for your system. There are some wonderful Leica R-mount lenses out there; what a treat to be able to use them (unfortunately, the world has figured that out, and since the a7x cameras were introduced, some of the prices are shocking). The CV lenses of the early oughts are petty spectacular.

You can use lenses that weren’t even made for cameras. If you’re into macro, there is a great big world full of top-drawer enlarging, microscope, and process lenses. You may have to MacGyver a way to focus, or you may just be able to adapt a commercial bellows. With microscope objectives, you’ll probably want a relay lens.

You can use view-camera movements. The simple way is to adapt a T/S lens or use a native on if available. The more complex, but more versatile and open-ended way, is to use a T/S adapter with medium format lenses, or go all the way and get one of the tiny tech cameras the mate with your body.

You've got lots of infrared options. One of the challenging aspects to infrared photography is to find lenses that don't have too much LoCA in the infrared region that you're using, and -- especially with the shorter lenses -- don't hot-spot. Hot-spotting is not something that lens designers normally think about, and thus finding acceptable lenses is a hit-and-miss (with the emphasis on the miss) operation. It's great to have choices because the native lenses in your chosen focal length range may or may not .

The whole experience of embracing adapted lenses is like being eight years old and being turned loose in a candy store. You hardly know where to start. And, best of all, there’s no stomach ache afterward, except maybe to your wallet.

Jim
 
If you leave out fitting issues and light leaks (not seen in high quality adapters) there are basically three ways an adapter can damage images.
  • It can be the wrong length.
  • It can be tilted.
  • It can cause flare.
Let’s take these one by one.

Wrong length

Here are some measurements I made of Nikon F to Sony E adapters:


errror-mm.png


As you can see, every one was either pretty close to right on, or too short. I have never found a quality adapter that was too long, and Novoflex, a respected and very expensive supplier, has admitted to making their adapters too short on purpose. I mostly use Kipon adapters, which are pretty close to as long as they should be.

The reason that manufacturers don’t want their adapters to be too long is that they are afraid lenses won’t be able to focus to infinity. In fact, some of them are so afraid of tolerance buildup among the body, the lens and the adapter that they make the adapter aim point to be shorter than correct.


What’s wrong with that? If you have a lens that focuses by moving all the lens elements as a group, not too much. Your distance scale won’t be right anymore, and one of the great things about rangefinder lenses is their distance scales, and you won’t be able to focus on subjects as close as you would were your adapter the right length. But your image quality will be just fine. The problems come when you’ve got a lens that uses internal element motion for either close-focus compensation or for focusing. Many of those lenses are designed to work their best only if the registration distance is correct. The Leica WATE is particularly sensitive to adapter length error and has gotten an undeservedly bad reputation as an adapted lens because of that.

In general, it behooves you to get adapters that are close to the correct length. You can check them by mounting a short lens focusing it on a distant object, and seeing what distance the lens indicates, or you can just measure them with a dial caliper or a micrometer.


2018-05-23-07.51.34.png


Tilted

Ideally, the two flanges on an adapter will be parallel to each other. If they are not, and the lens and camera are perfect (a big assumption), the plane of focus of the image will not be perfectly perpendicular to the lens axis. Things that are in focus will still be sharp, but that plane of sharp focus will be tilted. If you are doing full-frame captures of complex targets, adapters can sometimes be a real PITA, but I have yet to find a quality adapter so tilted that normal photography would be in any way affected unless your chosen subjects are brick walls and test charts. So this is a theoretical problem, but not a practical one. I have found that small field tilts in lenses is more common than in quality adapters.

Flare

Some adapters have shiny bits inside. This is a bad thing because stray light from the lens can bounce off them and find its way to the sensor. Some adapters have inadequate flocking in their barrels. Especially if they don’t have rectangular baffles at the back of the adapter, this can also lead to flare. Good adapters have neither of these problems.

Nikon Z users won’t have this problem, but using an adapter with a baffle intended for an APS-C size sensor on a full frame camera can result in mechanical vignetting.

One last thing. Don't just throw those bare adapters in your camera bag. Put a cap on each end. That's to protect the flanges from dings, but much more important, to prevent dust from getting in the adapter. If there's dust in there, some of it will likely find its way to the sensor after you've mounted the adapter.

Once you know the ropes, adapters aren’t scary at all.

--
Posted as a regular forum member.
 
Even adapters with a slight tilt don't affect the sharpness of a lens; they just affect the orientation of the plane of sharpest focus on both the sensor side (in the image field) and in the photographed scene (in the object field).

The relationship between those planes of focus is well-studied:

The angle between the object field focal plane and the plane orthogonal to the lens axis increases with subject distance, and in a bit of mathematical strangeness that is daunting until you think it through, becomes parallel to the lens axis at infinity, for any amount of tilt at all (yes, for 1 um of tilt, and even for 1 nm of tilt (1/400 the wavelength of blue light.) How can we make landscapes at all? The answer is of field (DOF). The size of the circle of confusion is not directly dependent on the tilt of the plane of best focus in the object field, but of the tilt of the plane of best focus in the image field, and that tilt angle does not change as the lens is focused (OK, OK, I'm eliding lens extension from the focusing helicoid here). But thinking about what's going on in object space is to be unnecessarily complex, and a waste of time. You can get the effect on image sensor blur without even thinking about the object field or dusting off your high school trig. If you just think of the image field, the focal length of the lens doesn't matter, you don't have to do the Scheimpflug thing, and you can compute the circle of confusion (CoC) diameter on the sensor from only the image field focal plane and the f-stop. You get the on-sensor CoC by dividing the image field focusing distance error by the f-stop. If you’ve got a 4um error, and you’re shooting at f/4, you’ve got a CoC of 1 um diameter.

What kinds of tilts do I see on adapters? The Novoflex ones are the best, with about 10 um side to side difference. run a bit higher, at 15 um or so. Say 20 um side to side (10 um center to side) is about as bad as you'd expect to get with quality adapters. At f/4, that would give you a CoC of a bit over 2 um at the corners, assuming you focused in the center. The diameter blur circle of a BSI sensor with no AA filter by with microlenses is about 0.9 times the pitch.

Now a 1 um CoC, being substantially smaller than the pitch of a 40-50 MP FF sensor, isn’t going to be anything to worry about. You can see its effect in the lab, but in the real world, you’d never notice. What amount of blur would you notice? If you were pixel-peeping, you’d certainly notice a CoC on the order of the pixel pitch. Let’s call that 4 um. That means that at f/4 -- about as open as you’d ever use if you were going for edge-to-edge sharpness -- you’d see a 32 um side-to-side tilt (16 um off on each corner), which I would consider a poor adapter. At f/8, you’d notice a 64 um side-to-side tilt. I have yet to see an adapter anywhere near that bad.

When we think about all the sources of lens blur, it is a very rough, but useful way of thinking if you don't want to convert everything to the frequency domain, that blur circles aggregate as the square root of the sum of their squares, so the largest blur circles to dominate (just like with read and photon noise). Once the blur circle from some source, whether it is defocusing or lens aberrations or camera motion or subject motion, gets a fair amount bigger than each of the others, then you can ignore the others. This means if the tilt-induced CoCs are small compared to sensor aperture blur, AA filter blur, camera motion blur, subject motion blur, lens aberration blur, on defocus blur, they are not going to impact image sharpness.

Let’s compare the typical 2 um CoCs and the near-worst case 4 um CoCs that I talked about above with the errors that you see from autofocusing.


d850-fd-fas-58-afs-a7riii-afe-55.png


The D850 errors are substantially above the kinds of adapter-tilt-generated errors we're talking about. The Sony a7RIII errors are not.


gfx-326364-63-110-afs-coc.png


If we look at the Fuji GFX with a bunch of different lenses, we see errors that are in the same ballpark, but greater than most of the adapter-tilt errors I see.

Even precise, aperture by aperture focus tuning for the D850 doesn't bring the errors down to what we can expect from adapters.


d850-58-opt-14-18-28-coc.png


Another thing to consider is what in the image is going to be affected by tilt. Photographers spend a lot of time managing DOF, but in the end (sometimes after a lot of thought) we usually pick something and focus on it. Even if the adapter has -- and the thought makes me shudder -- 1 mm of side-to-side tilt, the thing we focus on is going to be just as sharp as the lens can make it, irrespective of that tilt. That's assuming we manually focus with live view, or autofocus using CDAF or PDAF on the sensor. We say that the compensation for adapter tilt at that point in the scene is "inside the loop".

Jim

--
Posted as a regular forum member.
 
In this one, you get to see me prove myself wrong.

It has been stated by many that adapter tilt affects focus blur more for short lenses than long ones. It's become conventional wisdom, but it has never sat right with me.

I constructed an actual physical experiment. I took a Linhof Master Technika, and two lenses, a Nikkor SW 65 mm f/4 and a Nikkor AM-ED 120 mm f/5.6. I printed out a checkerboard target and applied a boatload of tilt -- I almost used another term, but this is a family-friendly blog. This picture will give you a rough idea, even if the tilt wasn't quite the same for the checkerboard shots:

DSC1861.jpg


I set the camera up with all the movements but tilt centered, and square on to the target. I slipped a Betterlight Super 6K back into the film holder, and lit the target like this:

2018-09-20-14.11.03.jpg


Then I spent 2 hours trying to get the back to run under Windows 10 -- the last time I'd used it was about 3 years ago, and I was using an XP since sold. I couldn't find a USB driver that worked and gave up; I'm going to sell the back.

But I didn't give up and ended up taking pictures of the ground glass. It ain't pretty, but I think it proves the point.

Here's the 120 at indicated f/5.6. The effective aperture is maybe a third of a stop narrower than that because of bellows extension.

120-mm-tilted.jpg


As expected, both the top and the bottom are out of focus, and the center is sharp.

the 65 at the same f-stop, the same reproduction ratio, and therefore the same effective f-stop:


65mm-tilted-correct.jpg


Because it's such a short lens, there's a lot of light fall-off. I tried to even it out:


65mm-tilted-correct-even.jpg


Now you can see clearly that there is more blur at the top and bottom of the image made with the shorter lens. It's possible that at the same distance the two lenses would have blur, but I think the right way to look at the situation is to hold the magnification constant.

Score: one for reality, one for conventional wisdom, and zip for my intuition.

Jim

--
Posted as a regular forum member.
 
The assumption about adapter errors seems to be that they add to the other tilt errors in the camera/lens system. Since the angle of adapter tilt is random, that is not the case. I wrote a program to compute the combined tilt in an assembly with 3 um of sensor-to-mount tilt, 5 um of lens tilt, and 10 um of adapter tilt. I ran 100000 cases. Here's a histogram of the resultant total tilt:

runout-accumulation.png


Then I simulated the case with no adapter tilt:


runout-accumulation-no-adapter.png


The mean for the cases with the adapter was 10.9, and with no adapter, the mean was 5.5. In this case, adding a 10 um wedged adapter to a system with about 5 um mean tilt added about 5 um to the mean tilt.

Jim

--
Posted as a regular forum member.
 
In the last post we saw that, at identical magnifications, adapter tilt affected defocus blur more with short lenses than with long ones. I kept that in mind when I set up the test you'll read about here, a test that stacks the deck against adapters. First off, I used a test protocol that is very sensitive, allowing you to see errors clearly that never would be a problem in real-world photography. Second, I picked the shortest rectilinear prime I own, and it is sharp enough to draw blood: The Zeiss 15 mm f/2.8 Distagon ZF.2. Third, I used the lens wide open, something that you wouldn't do in the field if you wanted corner-to-corner sharpness.

I tested two combinations: the 15/2.8 on a Nikon D850, and the same lens mounted on a Sony a7RIII with a not-very-good adapter which has about 16-18 um of tilt (it's hard for me to measure tilt precisely).

You can read about the test here.

I set up the cameras 20 meters from the target. Here's what it looked like to the Nikon:


8517107.jpg


Here are the crops, magnified to 2000x2000 pixels from a little smaller than 1000x1000, equalized for field of view, which gives the slightly-higher-res Nikon an advantage.


 D850
D850


 a7RIII
a7RIII


The Nikon image is sharper in the corners and sides. But there's still enough resolution in the Sony image to show aliasing in every star. For the great majority of actual photography, as opposed to this kind of contrived test, the Sony a7RIII and the Distagon would do just fine. For star fields, you might prefer the D850. with an adapter with 10 um of tilt, it would be even closer.

Jim

--
Posted as a regular forum member.
 
Flare

Some adapters have shiny bits inside. This is a bad thing because stray light from the lens can bounce off them and find its way to the sensor. Some adapters have inadequate flocking in their barrels. Especially if they don’t have rectangular baffles at the back of the adapter, this can also lead to flare. Good adapters have neither of these problems.
cant you just throw some black paint in there or something?
Kodak used to make a special black paint for that purpose, but fabric is better.

Try a search for "lens flocking".

Jim
 
Thanks for an interesting article series.

I started with my parents Minolta gear in 1980 and went to my own Nikon stuff in 82, but sold all my Nikon gear in 2004 and went digital with a Canon compact camera since I only used my images on the web, it was enough for the time being.

Soon after the release of the Panasonic G1 I got one, and ended up in a mixed Panasonic and Olympus m4/3 system.

In the autumn of 2015 I got me an A7RII and since a year also the A9 and I have some native lenses. I want to go over to the FE system fully but m4/3 still has some tricks that Sony don't do. I have sold what I can and replaced with FE were it was better, but still keep some m4/3 stuff.

Regarding adapted lenses I got all my parents old Minolta SR-mount stuff (MC/MD lenses) some years ago. Tried them via a noname cheap adapter on the m4/3 cameras but it wasn't much fun so I didn't use them much.

When I got the A7RII that changed and the old Minolta lenses suddenly became interesting. Not just that the old lenses fit better in their original field of view vs cropped on m4/3, but also the size compared to FE lenses makes them small, were they are big compared to m4/3 lenses.

Another factor is that it feels like they belong on a Sony since they bought Minolta. The circle is closed and I am again using the very lenses I first shot with at the age of 13 when starting with photography. But getting there wasn't easy.

My first adapter problem with the Sony was with the fairly expensive Metabones FE-SR mount adapter that I bough direct from them since no one here in Sweden had it at the time.

I thought that it was a precision piece since it was a known brand and a high price. The problem is that it draws metal flakes from the SR-mount side that ends up in the adapter tube. Luckily I noted this before using the adapter.

I am an educated mechanical engineer even though I work with it since 25 years, but some old "mech" knowledge still remains.

It took me a lot of research and checking on the Minolta bodys why this happens. And my conclusion is that the Metabones flanges are different than Minoltas original body design mount (which also looks a little different between the old bodys I have, so even they changed around some over time).

The main problem with the Metabones adapter is that the springs are very short and made of standard steel, not flexible spring steel. So they are thick and very heavy bent to add the necessary pressure that is needed and since they are short, all pressure comes on only one small contact point on the lens flange. And from that the metal flakes are drawn. If one bends the springs somewhat and looses them up, they stop draw metal flakes but also the lens starts to sit bad. So a bad construction it seems.

I then looked around at Amazon on other adapters and really studied the images on the SR-side mount side of them and noted that they all had different constructions of the flanges and spring system. I found one noname adapter with long springs that are built into the flanges (they are splitted and works as flange and spring), but the point of contact is long. And that is why I got that one.

It turned out that it worked well from that regard, no metal flakes, but some lenses didn't lock on. So I opened it and remade the locking mechanism that needed some adjustments with a small file and bending the curvature of the arm to position better.

I found the page of phillipreeve.net were there are much info about adapters and they suggested the Novoflex as the best. I emailed with Phillip and he hadn't had any problem with Novoflex so I called the company up in Germany and talked to them and they said that they didn't have any problem with their adapter. So I called the Swedish importer of the Novoflex and asked if I could return it if would cause problems and they said yes. So again I bought an expensive adapter and this time it works great. The lenses goes on like they are made for it and the adapter goes on the body the same way.

I bought some additional old Minolta vintage lenses on auctions to fill some holes in my parents lens line up and happened to get the K&F adapter with one of them. I had read that it was one of the better cheaper ones.

I started to compare my adapters I now had gathered and found that they were very much different made in terms of flare shielding. I test shot them in the same scenarios and every time the Novoflex came out the best.

I even painted the cheaper ones shiny black insides matt black instead, but still they flared some. Less when painted but still. The reason seems to lay in that the Novoflex aside from being matt black from the start also has a tube construction that shields the chrome parts from the SR-mount to be seen by the sensor were the cheaper ones exposes those parts.

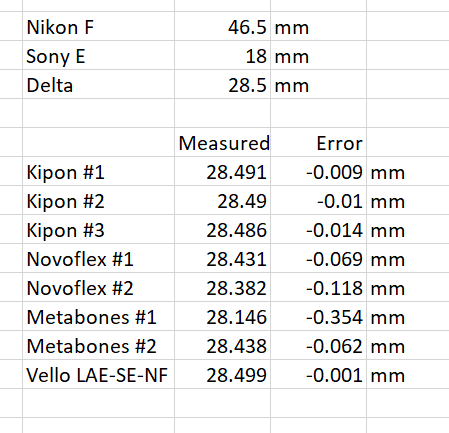
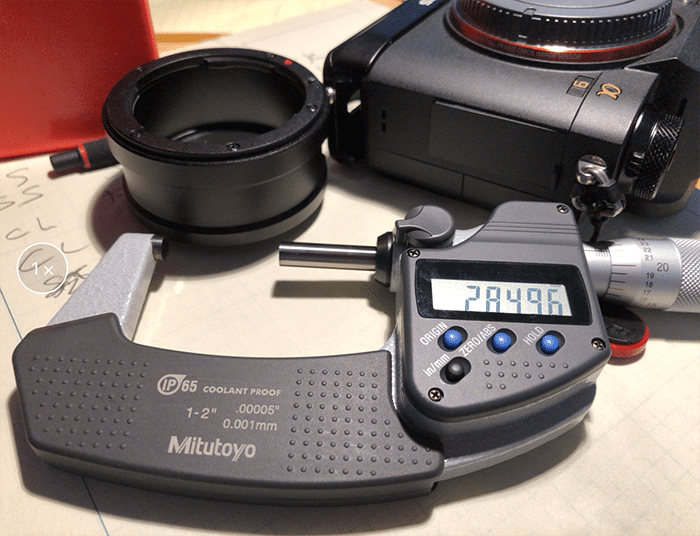
I have checked all my adapters for length and they are all to short. They have all been fairly well in tilt though. I use a digital caliper to measure between the two mounts side all around that they are parallel.

I didn't really care about the shortness until I got a Minolta MD24/2.8 lens that performed bad in the corners. I read that it had a floating element and that it was sensitive to the distance from the image plane. So I shimmed the K&F adapter to the correct length and that improved the corners.

The most given measurement on the net for Minolta SR-mount is 43.50 mm, but some sources say: 43.72 mm. I did my shimmed adapter 43.5 mm and it seems my 24 mm lens hits infinity at the infinity stop. Maybe I will shim the Novoflex as well.

I also got me some M42 screw mount lenses and thought that I could use them on my SR-mount adapters and old film bodys via an M42-SR-mount ring adapter. The problem with those I have found are that they are chromed so they expose more visible chrome to the sensor.

I therefor also got some Fotodiox M42 adapters. The Pro version is good, matt black and shields the mount chrome well. One can't rotate the thread so the lenses can end up not having the scales up but that is a minor problem.

One noname M42 adapter I found could rotate the mount but that part is chromed and can be seen from the sensor and also it doesn't have a stop ring for the aperture pin so the apertures are stuck on wide open on some lenses.

Back to Minolta SR-mount: Fotodiox has an interesting adapter called Stretch which has a built in Helicoid that can be screwed out and used for macro shooting. Works better than extension tubes since it is fully fine adjustable in length and not in large steps. It also came with three different ND-filters that one can pop in in the back. They are held magnetically. Not sure I trust that fully though, don't want to have a filter come loose and hit the sensor. And with the high shutter times available on the FE bodys I don't need them (video people might think different).

I found a similar noname Helicoid adapter construction from FE-M42 which was even longer in the Helicoid so I got that one but it draws grease on the inside of the tube. Bad construction or over greased. One day I need to open it and see if I can solve that and after that start to use it, I don't want grease on my sensor.

So to end this long text, adapters are not just simple tubes.

--
Best regards
/Anders
----------------------------------------------------
42 Megapixels is the answer to life, the universe and everything.
You don't have to like my pictures, but it would help: http://www.lattermann.com/gallery
 
Last edited:
Thanks for the detailed report. You make an excellent point about the mount details being important. I’ve never had issues with those and left that out.

Jim
 
I have not yet experienced any of those steel chips with my Metabones IV. It seems that they have changed their design, over time and as attested to here:

"https://www.dpreview.com/forums/post/42627569

cyberstudio • Contributing Member • Posts: 520

Re: How to fix a too tight Metabones EF to E Mount adapter

- w/PicsIn reply to Carlgo • Sep 30, 2012

Thanks William for the detailed pictures and instructions.

The leaf spring design of the Metabones EF-E Smart Adapter has changed over the months based on end-user feedback. Customers driven a tighter connection, primarily driven by the cinematographic community wanting to use a mechanical follow-focus device in which case a loose mount would interfere with follow-focus operation. It is thus required to be very much tighter than a genuine Canon mount and still photographers may find it to be too tight. It is not easy to satisfy a diverse customer base with a single product but in my opinion it is easier for the end-user to make the mount looser than to make it tighter. If you specifically require a loose mount you may specify the old leaf spring design when you place your order and Metabones will be able to accommodate your needs.
--
Bo-Ming / conurus"
 
Your error measurement chart is interesting. Anecdotally, the (normal) Metabones M- mount adapter I have is way short compared to the (helicoid) Voigtlander one I now have. My main objection is that too much 'focusing beyond infinity' throws the lens distance scale out, which I don't often use but prefer to be able to rely on if needed.

Slightly off-topic, when lens makers set an infinity point/end stop on their lens, what exactly are they doing? Is their lens at that point literally focussed at an infinite point? Or, within manufacturing tolerances, just somewhere very very far away before the, uh, signal breaks up? I mean, the stars in the night sky are really quite close to us compared to the distance that is represented by infinity, let alone compared to the moon. Or the first glimpse of land from far out at sea.

Asking for a friend who for this reason back in his slr days never took even a landscape photo with the lens set at hard infinity.
 
Last edited:
Thanks for the detailed report. You make an excellent point about the mount details being important. I’ve never had issues with those and left that out.


3e96d4fec141450e8d93cc435fa608df.jpg


Here you can see my Metabones adapter. If I put a lens on and off 10 times I have metal debris in the adapter tube like on the image. Enhance to see. Also visible is the extremely short spring. I was in contact with Metabones that sent me thinner springs but in the same ordinary hard metal. So didn't do much good.

44762b846b4e45fc8862d2fb98b5a257.jpg

Here is an old Kenko 2x adapter I have. It too has its own spring system. So even in the old days they didn't copy the original mount fully. But this one has no metal flaking problems, probably since the contact area is fairly large.

e92b33ad09554beea7d857e2ad5e675e.jpg

And here are two Minolta body mounts. Much longer springs but still the mounts are different. To the left 1967 camera and to the right 1990.

ac2a576dc1614e68b846d8c7ddae38da.jpg

My noname adapter I got that works. No springs, just a split in the flange but it works. I have matt painted it but there are shiny parts from the mount that are hard to cover since they move.

5899d344329e41bdaecf39b05eeee828.jpg

The Novoflex adapter is the best I have found, as you can see nothing of the Minolta SR mount is shiny. Everything is nicely covered and matt black.

77ee0d68746e4f889f074a76128f9404.jpg

An M42 screw mount lens.

d3af269bc6064b2cb75c7cc5849455ac.jpg

The same lens with a M42-SR mount adapter ring. Lots of shiny chrome. I have seen adapters like this that at least are black anodized but I haven't found a source. I could probably sand the top most chrome off that doesn't mate and move to anything else and find brass under and then metal prime and matt black paint over that and get a painting that can endure some wear. But I don't know if it is worth the work.

3d160f57989249e199523af8d2110683.jpg

Here the problem with that adapter ring is seen when it is mounted on the Novoflex adapter. Suddenly chrome becomes visible from the sensor.

d0e28a299d86437dbc56a9b254d2bc63.jpg

While if I mount the same lens on the Fotodiox Pro M42-E adapter directly that problem goes away.

337a78cef6004a3689f7da00807a0a59.jpg

Here is my painted K&F adapter. One of the better budget ones but it still has a lot of shiny mount parts visible.

b97075b3feec46ad9f88f2d80089ab29.jpg

And here is the M42 adapter with rotatable mount thread with the same problem. Also it has no stop for the aperture pin on these lenses.

I only have experience with Minolta SR-mount (MC/MD) and M42 screw mount but I guess adapters for other mounts might have the same or similar issues.

Regarding the Metabones EF mount that were to hard as well, I read about that some time ago and that they tried to adjust the tension there. In that case I don't know if the original problem just was that it was hard to get the lenses on or off or if that construction also drew metal flakes. The Minolta lenses are not hard to get on and off so here it is only the flaking debris that is the problem.
--
Best regards
/Anders
----------------------------------------------------
42 Megapixels is the answer to life, the universe and everything.
You don't have to like my pictures, but it would help: http://www.lattermann.com/gallery
 

Attachments

  • 59f9bccd0fc645f8a4c0497a75ff38a6.jpg
    59f9bccd0fc645f8a4c0497a75ff38a6.jpg
    4.2 MB · Views: 0
Last edited:
Your error measurement chart is interesting. Anecdotally, the (normal) Metabones M- mount adapter I have is way short compared to the (helicoid) Voigtlander one I now have. My main objection is that too much 'focusing beyond infinity' throws the lens distance scale out, which I don't often use but prefer to be able to rely on if needed.

Slightly off-topic, when lens makers set an infinity point/end stop on their lens, what exactly are they doing? Is their lens at that point literally focussed at an infinite point? Or, within manufacturing tolerances, just somewhere very very far away before the, uh, signal breaks up? I mean, the stars in the night sky are really quite close to us compared to the distance that is represented by infinity, let alone compared to the moon. Or the first glimpse of land from far out at sea.

Asking for a friend who for this reason back in his slr days never took even a landscape photo with the lens set at hard infinity.
When one adjust back the focus on a 135 mm f2.8 Minolta MC-X lens after tear down, one puts it on the camera without the focus ring and then adjust the image by turning the helicoid directly until it looks correct at infinity and then one put on the focusing ring and fasten the screws. Like in the images below:


b3481118e6ce438ba8c81f13ec1aa3c3.jpg


0cb2596176344756b03c8d58d6e7d913.jpg

Sorry that the camera is different but they are shot at different occasions during the repair of this lens that I made.

I could have set the infinity beyond infinity as well. Or if I wanted I could have put the lens on the Sony with a too short adapter as well and set it after that, but I thought that it was best to set after an original body.

I guess Minolta did something similar at the factory but in some sort of optical rig that was easier to handle, and that they today adjust the lenses in a more advanced rig if there are floating elements and zoom involved as well.

--
Best regards
/Anders
----------------------------------------------------
42 Megapixels is the answer to life, the universe and everything.
You don't have to like my pictures, but it would help: http://www.lattermann.com/gallery
 
Slightly off-topic, when lens makers set an infinity point/end stop on their lens, what exactly are they doing? Is their lens at that point literally focussed at an infinite point?
Not exactely.
Or, within manufacturing tolerances, just somewhere very very far away before the, uh, signal breaks up?
The signal doesn't break up, but the circle of confusion increases.

I mean, the stars in the night sky are really quite close to us compared to the distance that is represented by infinity, let alone compared to the moon.
That makes no sense to me. The closest star in the night sky is about 6 trillion miles away from us, and the moon is "only" a quarter of a million.
Or the first glimpse of land from far out at sea.

Asking for a friend who for this reason back in his slr days never took even a landscape photo with the lens set at hard infinity.
That's a manufacturing tolerance/temperature variation issue.

Jim
 
I wouldn't recommend it, a lot of black paints reflect a surprising amount of light and I'd be concerned about off-gassing damaging lens coatings. You can get the correct flocking materials from the likes of Edmund Optics or Thor Labs for about $30.
 
Slightly off-topic, when lens makers set an infinity point/end stop on their lens, what exactly are they doing? Is their lens at that point literally focussed at an infinite point? Or, within manufacturing tolerances, just somewhere very very far away before the, uh, signal breaks up? I mean, the stars in the night sky are really quite close to us compared to the distance that is represented by infinity, let alone compared to the moon. Or the first glimpse of land from far out at sea.
Essentially you set infinity at the point where collimated light is best focused on the sensor. For your example, the angle of light coming from even the moon is close enough to being collimated to be considered infinity for practical focal lengths. This gets a bit more complicated when you are considering field curvature.

In practice you would use a device with one (or more) of these: https://www.trioptics.com/products/visual-optical-measurement/collimators/collimators/
 
an alternative would be to try Wine in a Linux distro.
By no means perfect, but it works pretty well on quite a variety of Win stuff.
Mint should be fine.
The beauty of this is you can experiment on a USB drive without disturbing anything.
If it works, you can just store the stick with the cam.
 
I use a Sigma 14mm F1,8 lens for nightscapes on my Sony A7r3. I used both a Metabones 3 and an MC11 adapter. I noticed side by side they weren't the same length.

The Metabones created worse coma in the corners as seen in the stars.

The MC11 was noticeably better.

I find UWA lenses more sensitive to adapter length errors than longer focal length lenses.

Greg.
 

Keyboard shortcuts

Back
Top