Digitizing Color Negative with Camera

TJ61

Senior Member
Messages
1,524
Solutions
3
Reaction score
1,039
This recent thread finally got me going on a project that I had been mulling over for a while. Rather than hijacking that thread, I figured I'd post my setup here.

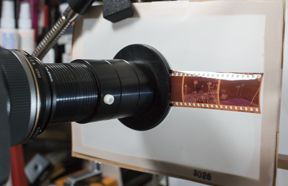
[ATTACH alt="Camera and backlight w/film holder are mounted to a 8" x 22" piece of mdf. The camera is a Sony A6000 with 55-210 zoom lens, with Minolta macro adapter screwed on. At the distance shown, a single negative frame fills about 80% of the camera frame. The manual flash (Yongnuo 560III) is remotely triggered."]media_3057067[/ATTACH]
Camera and backlight w/film holder are mounted to a 8" x 22" piece of mdf. The camera is a Sony A6000 with 55-210 zoom lens, with Minolta macro adapter screwed on. At the distance shown, a single negative frame fills about 80% of the camera frame. The manual flash (Yongnuo 560III) is remotely triggered.


The camera is mounted by 1/4-20 screw from below, and camera body position is registered by two dowels (one can be seen here). A lens support ensures horizontal optical axis while reducing vibration. A cutout in the board allows me to pull the memory card without having to dismount the camera (I actually thought of that in advance!).


I re-purposed this little black project box with light diffuser. I can add filters between the flash and box; currently just using white paper to cut down the power a bit. The platform is captured on the sides to prevent rotation, and easily slides back and forth when unlocked.

So, enough of the hardware, now comes the challenging part. I used a fully exposed piece of negative to set the camera's white balance, though I'm also shooting in raw. But, the first test shots were coming out with a lot of green (after inverting). So, while maintaining the color temperature it chose (3200K), I tried dialing back the green. And, it started looking much better. Playing around with exposure was really important, too, as I learned in the thread referenced above. A nice tell-tale is that the frame border should be black.

Using those tweaks, I got the following shot (Lake Louise), which is SOOC jpeg, and inverted in GIMP:


Starting with SOOC jpeg (white balance custom set in camera), then inverted colors in GIMP.

Then, I opened the raw photo in Sony IDC, and selected a portion of the orange frame border to set the "Gray Point". I exported this alternative WB photo to GIMP, and inverted colors, which yielded this:


Starting with RAW, white balance chosen by Sony IDC using orange negative frame border as guide, then inverted colors in GIMP.

This sky looks a little more "true", so it looks like I still had more green to lose. But, if I compare these shots to a print, the print looks like a combination of the two (the print has the bluer sky and greener lake). If I had to choose one, though, I'd be quite satisfied with the second one. In that case, each raw photo I have has the rosetta stone of color correction in it (a part of the negative frame), and it's just a matter of doing a good job with the exposure.

Hopefully I can convince myself that shooting raw with this setup will allow me to get decent results. Then, I can start cranking through the negatives. One question remaining though, is how important is it to invert colors while still working with the raw file? I don't have the capability to test that at present. If it was a big deal, I could pay for a few months of Lightroom, I suppose.

OK, another question: How important is it to filter my flash rather than apply so much color correction in processing. Do I lose a lot of dynamic range if I don't?
 

Attachments

  • 3057067.jpg
    3057067.jpg
    378.5 KB · Views: 0
  • 3057069.jpg
    3057069.jpg
    395.7 KB · Views: 0
  • 3057068.jpg
    3057068.jpg
    382.6 KB · Views: 0
  • 3057071.jpg
    3057071.jpg
    1.4 MB · Views: 0
  • 3057072.jpg
    3057072.jpg
    1.4 MB · Views: 0
Looks like a very well-designed setup that you have there!

Initial results look good and I can see why you say that the print is a combination of both shots.

First off, instead of paying for Lightroom in the cloud, I'd actually buy a copy of Lightroom 4 or 5 even used. It's good software and using LR or PS is the way to edit in RAW. And secondly, yes, I would say that you do ALL your editing in RAW if you can and only export to TIFF or JPG when you're completely done. Your edits and colour correction will not turn out as well if you convert first and then do any processing. I think your methodology is good, though. Set WB in camera to a very low colour temp and adjust hue to remove green, then fine-tune WB in a RAW converter simply by picking grey tones, invert colours, and then adjust exposure/sharpening/contrast to taste. Sounds longer than it really takes and only really spend a lot of time on the images worth spending time on.

I hope to see more results here!
 
Be careful with distance of flash and power of flashes. It could burn or distort the film.

I test WB on snow and moving of the curves:

159d75e5d79e4f19806fa99efb44e0ff.jpg
 
That looks like a very well made setup. Thanks for showing it. The neg carrier is especially neat.

The lens seems an odd choice. I use the Olympus 80mm macro lens, which is specifically designed for 1:1 copying of film. It is still very good at half life size (as when copying full frame film to an APS-C sensor). I use it on a bellows, but the lens does have a short focussing screw so you could probably use cheap extension tubes. Focus at f/4, shoot at f/8.

The other point is that it is easier to adjust colour balance etc after the image is cropped to remove the film borders.

If you take the cropped, inverted image into Curves in Photoshop, with Snap Neutrals enabled under Options, the Auto will get you quite close to a good final colour balance.

I don't know what the GIMP has by way of curves.
 
Last edited:
Looks like a very well-designed setup that you have there!
Thanks!
Initial results look good and I can see why you say that the print is a combination of both shots.

First off, instead of paying for Lightroom in the cloud, I'd actually buy a copy of Lightroom 4 or 5 even used. It's good software and using LR or PS is the way to edit in RAW.
Yes, the further I get into this, the more this seems like the thing to do. Interesting idea to buy LR 5 used -- I just looked at ebay, and the price isn't too bad.

Recently I tried downloading Capture One. They have a sweet deal (at least for Sony camera owners), but I wasn't able to get it to run on my Windows machine.
 
Last edited:
Be careful with distance of flash and power of flashes. It could burn or distort the film.

I test WB on snow and moving of the curves:

159d75e5d79e4f19806fa99efb44e0ff.jpg
Hey, that looks pretty good! One thing I can't do with my current software setup is do WB adjustment on the inverted colors. I can only do it on the negative. Another point in favor of getting better software.
 
That looks like a very well made setup. Thanks for showing it. The neg carrier is especially neat.
Thanks!
The lens seems an odd choice. I use the Olympus 80mm macro lens, which is specifically designed for 1:1 copying of film. It is still very good at half life size (as when copying full frame film to an APS-C sensor). I use it on a bellows, but the lens does have a short focussing screw so you could probably use cheap extension tubes. Focus at f/4, shoot at f/8.
Pretty much every aspect of this project could be described as "an odd choice". <sigh> It's all a hodge-podge of stuff I had around (and I don't have a whole lot of photographic equipment around). The lens setup is based on the fact that I had the 55-210, and then I heard about the macro add-on which, together, gives a long working distance (which I wanted for general macro photography). I'm hoping that by not filling the full frame (staying away from optically poor corners), and being appreciably stopped down, the overall optical quality will be good enough for my purposes.
The other point is that it is easier to adjust colour balance etc after the image is cropped to remove the film borders.

If you take the cropped, inverted image into Curves in Photoshop, with Snap Neutrals enabled under Options, the Auto will get you quite close to a good final colour balance.

I don't know what the GIMP has by way of curves.
GIMP does have curve adjustment, but so far I haven't been doing any auto-adjustments across the whole file. If/when I do that, I can see how including frame borders would be problematic.
 
very quickly.

Leaving you free to detail out the tonal values.
 
Have a look here: http://www.dpbestflow.org/camera/camera-scanning

They have a video about color negatives scanning with DSLR
Lots of good info there -- thanks for pointing it out!

I think I understand a little better the advantage to pre-filtering the light source. I guess any move towards neutralizing the orange cast from the film prior to digitizing is going to result in more dynamic range to work with.
From what I have done on this subject is I used a cheap Rosco sampling book that contained all the possible color correction combinations that I could possibly need. They are just about the right size for my flash, and they can balance out the negative's color. The most useful sampler book Rosco has I think is the Cinegel book, it has color balancing and neutral density filters, and just as important, is that it comes with detailed descriptions saying what exactly each filter can do.
I was just looking up color correction filters on the B&H website, as I know next to nothing about them. I see the Rosco Strobist 55-pack -- would that have what I need in it? I'm guessing I need the Cinegel cooling filters(?), and it appears to have the full complement of those.

I thought pre-filtering my light source would be much more daunting (and expensive), but it looks doable (and cheap!).
 
Last edited:
Have a look here: http://www.dpbestflow.org/camera/camera-scanning

They have a video about color negatives scanning with DSLR
Lots of good info there -- thanks for pointing it out!

I think I understand a little better the advantage to pre-filtering the light source. I guess any move towards neutralizing the orange cast from the film prior to digitizing is going to result in more dynamic range to work with.
From what I have done on this subject is I used a cheap Rosco sampling book that contained all the possible color correction combinations that I could possibly need. They are just about the right size for my flash, and they can balance out the negative's color. The most useful sampler book Rosco has I think is the Cinegel book, it has color balancing and neutral density filters, and just as important, is that it comes with detailed descriptions saying what exactly each filter can do.
I was just looking up color correction filters on the B&H website, as I know next to nothing about them. I see the Rosco Strobist 55-pack -- would that have what I need in it? I'm guessing I need the Cinegel cooling filters(?), and it appears to have the full complement of those.

I thought pre-filtering my light source would be much more daunting (and expensive), but it looks doable (and cheap!).
I'm looking at the filters the Strobist has, it doesn't look comprehensive enough.
OK, now I see the cinegel swatchbook -- is that the one? Lots of color correction in there, assuming it has all the cinegel series.
 
OK, now I see the cinegel swatchbook -- is that the one? Lots of color correction in there, assuming it has all the cinegel series.
Yeah the Cinegel swatchbook is the one I got from BH. The cheap one for 2.50, not the more expensive 24.50 booklet.

One note of caution, I have seen some blog posts that have said that the Rosco gels can melt if they are placed directly on the flash.

I tested that out on a gel by placing it in my flash head's filter holder slot, and it did indeed melt when I test fired the flash at full power.

I improvised making a small gel holder out of a sleeve of a clear plastic, not sure what the application was, but I think it was the kind they use to hold ID cards in. I taped it to the front of the flash, it seems to hold up better to the heat of the flash and it keeps the gels from warping.
 
I'm looking at the filters the Strobist has, it doesn't look comprehensive enough.
OK, now I see the cinegel swatchbook -- is that the one? Lots of color correction in there, assuming it has all the cinegel series.
Yes. The # 3202 Full Blue CTB Color Conversion tungsten to daylight filter is a good start.

Except... I've done a lot of camera scanning. When I started, I had exactly the same thought: it would be best to filter out the orange mask optically. I got two Cinegel Swatchbooks, took one apart (and kept the 2nd one untouched) and tried the filters. #3202 did work as far as making the RGB histogram on the back of my camera look more balanced (with the camera locked to "daylight" color balance.) I got a sheet of #3202 and made larger filters (so I could put the filter several inches in front of the film. So that any dust and scratches on the filter weren't in focus.)

I then converted a bunch of camera scanned negatives using the Rosco filter. But one day I wondered if prefiltering was doing what I thought it was doing. So I did a bunch of tests; shooting both with and without the #3202 filter.

And found out that I got better results without the Rosco filter. I had more chroma noise in skies (after inverting and doing color correction) when I used the Rosco filter. Which was counter-intuitive to what I thought I was doing. I thought that it would be the other way around--that filtering out the orange mask before digitizing would reduce noise. Nope. But YMMV.

FWIW, I put up several pages describing how I convert color negatives.

Wayne
Are you putting the filter in between lens and film? I've seen a small decline in sharpness when I put a screw on cc filter on the lens.

I didn't realize that prefiltering the light would produce more noise, I'm comparing the jpegs against the raws. Of course there is more noise in the raw file, but I don't see much in my jpegs because the camera does a pretty good job doing its own NR. There must be a certain amount of NR that can be done on the raw to closely match the jpeg without losing too much detail.
 
Last edited:
And found out that I got better results without the Rosco filter. I had more chroma noise in skies (after inverting and doing color correction) when I used the Rosco filter. Which was counter-intuitive to what I thought I was doing. I thought that it would be the other way around--that filtering out the orange mask before digitizing would reduce noise. Nope. But YMMV.

FWIW, I put up several pages describing how I convert color negatives.

Wayne
Are you putting the filter in between lens and film? I've seen a small decline in sharpness when I put a screw on cc filter on the lens.
My camera + macro lens + Xtend-a-Slide is mounted on a tripod. The negative/slide is mounted at the front of the Xtend-a-Slide. I use CFLs mounted in a softbox for illumination (because I've found that manual focus is much more accurate for camera scanning than auto-focus) I have severasl layers of additional white neutral filters mounted in between the softbox and the front of the Xtend-a-Slide.

020-extend-a-slide-and-negative.jpg


See my setup on this page. The softbox is in front of the white filters.

When I used the Rosco #3202 blue filter, it was sandwiched between the white neutral density filters. (I found that I needed about three stops of neutral density diffusion material--one stop with the diffusion panel on the front of the soft box. Two more stops of diffusion with Rosco #3026 Tough White filters.)

Do not screw anything onto the front of the lens except for a negative carrier (like the Xtend-a-Slide)! Any filters go in between the film/slide and the light source.
I didn't realize that prefiltering the light would produce more noise, I'm comparing the jpegs against the raws.
This is the results I got with my particular setup. Try it both ways. I really thought that optical filtering with blue filters would reduce chroma noise, but this wasn't the case.
Of course there is more noise in the raw file, but I don't see much in my jpegs because the camera does a pretty good job doing its own NR. There must be a certain amount of NR that can be done on the raw to closely match the jpeg without losing too much detail.
The best (and only) filtering I found that works is to turn down the default sharpening in ACR. After turning down sharpening in ACR I got a lot less grain overall, with no decrease in image sharpening.

Current RAW converters aren't optimized for negative conversions. "Photoshop", indeed! Good for everything except for processing real film photos.

One really good test is doing what I did: go out with a film camera loaded with negative film and a good digital camera and shoot the same scenes with both cameras. Use the digital images as references for your negative conversions. I adjusted my negative conversion procedures until I could convert negatyives so they matched the digital images. This eliminates a lot of guessing (if you only have negatives with no digital versdion of the same scene.)

Wayne
 
I'm looking at the filters the Strobist has, it doesn't look comprehensive enough.
OK, now I see the cinegel swatchbook -- is that the one? Lots of color correction in there, assuming it has all the cinegel series.
Yes. The # 3202 Full Blue CTB Color Conversion tungsten to daylight filter is a good start.

Except... I've done a lot of camera scanning. When I started, I had exactly the same thought: it would be best to filter out the orange mask optically. I got two Cinegel Swatchbooks, took one apart (and kept the 2nd one untouched) and tried the filters. #3202 did work as far as making the RGB histogram on the back of my camera look more balanced (with the camera locked to "daylight" color balance.) I got a sheet of #3202 and made larger filters (so I could put the filter several inches in front of the film. So that any dust and scratches on the filter weren't in focus.)

I then converted a bunch of camera scanned negatives using the Rosco filter. But one day I wondered if prefiltering was doing what I thought it was doing. So I did a bunch of tests; shooting both with and without the #3202 filter.

And found out that I got better results without the Rosco filter. I had more chroma noise in skies (after inverting and doing color correction) when I used the Rosco filter. Which was counter-intuitive to what I thought I was doing. I thought that it would be the other way around--that filtering out the orange mask before digitizing would reduce noise. Nope. But YMMV.

FWIW, I put up several pages describing how I convert color negatives.

Wayne
Wow, there's a lot of information here! I'm not sure what to make of your observation of chroma noise, especially since it's counter to what I (and you) thought originally. I think I'll get the filters anyway (for fun, if nothing else), and see if my results corroborate yours. But, it's hard to argue the results of someone who's actually experimented with the print film alongside digital versions of the same scene!
 
Nice work and a cool set up.

I recently found that I could use my recently acquired FF with a 25 year old slide tube duplicator. Before my crop camera was wrong size.

I did this for diffusing the light


cd7a22681aa64f2ab267ba708f0ce40b.jpg


6148c48b33814631971c60581d8a4c9d.jpg

The light diffused off the card stock and the TTL of the camera did well with the flash.

I know a good macro lens is better, but I do not have one and this is for old family slides and pictures where the IQ and focus is not the best anyway.

Is there any way I could put negatives in this set up other than cut them up and put in slide mounts?

thanks

whvick
 

Keyboard shortcuts

Back
Top