SteB
Senior Member
Please note, whilst illustrating a particular diffuser, for a particular purpose, this illustrates a general principle for diffusing light from Macro Lites and Ring Flashes. The principles can be adapted for different purposes, and very different looking light modifiers and diffusers can be constructed from these principles.
Whilst the diffuser shown is for the Yongnuo YN-14EX, the principle will work on all similar types of flashes, and even on Ring Flashes with modification. An important thing to bear in mind with my diffusers, is that they are not merely randomly designed diffusers, but general ideas and principles about light modification, from which many diffuser designs can be derived. The reason I make this point here, is that the diffuser shown is just one of many actual diffuser designs which could be made on these principles.
I did originally describe these principles in depth on Juza Nature in early 2010, but neither the articles/threads or this version of the website is still on the internet. You will still find links to it on reviews and blogs about my “concave diffusion” ideas. I actually coined the term “concave diffuser” to separate it from the convex diffusers other people were using. Whilst convex diffusers will work if they are big enough, they are not what you really want in macro lighting, and are derived from ideas about diffusion in normal flash lighting in rooms, which do not work in macro flash lighting. In essence a convex diffuser fires light all over the place so it bounces off walls and ceilings which don't exist in macro flash diffusion. Most reflective surfaces in a macro context, with the exception of flowers and very nearby foliage are too far away to contribute to the image lighting, with reflected light
As a note, “concave diffusion” refers to 2 principles. One is the round end of lens light tent. It actually operates not just like a diffuser, but a mini room where the flash bounces around inside it. The reason it is tightly curved, concave, is so it wraps around the subject. This wrap around effect means the surfaces of the diffuser are equidistant from the subject, unlike with a flat diffuser face where the edges of the diffuser are much further from the subject, which in macro distances means a drop in light intensity due to the inverse square law of light drop off. Whilst the inverse square law is for point sources of light, it is applicable to diffuser faces. You just need to think of a diffuser face being composed of a massive number of discrete point sources. I won't go any further into the technical bits and the thinking behind it. I would need a separate in depth article to explain this.
This Flickr set of illustrations explains these principles of macro light diffusion for anyone interested. Yellow represents bright light, which doesn't necessarily blow the highlights, and red is intense light which will blow highlights on light or reflective surfaces. Angled arrows indicate diffuse scattered light, and parallel lines indicate focused light (this is how the other “concave diffuser”, an inverted dome works).
https://www.flickr.com/photos/steb1/albums/72157623486703625
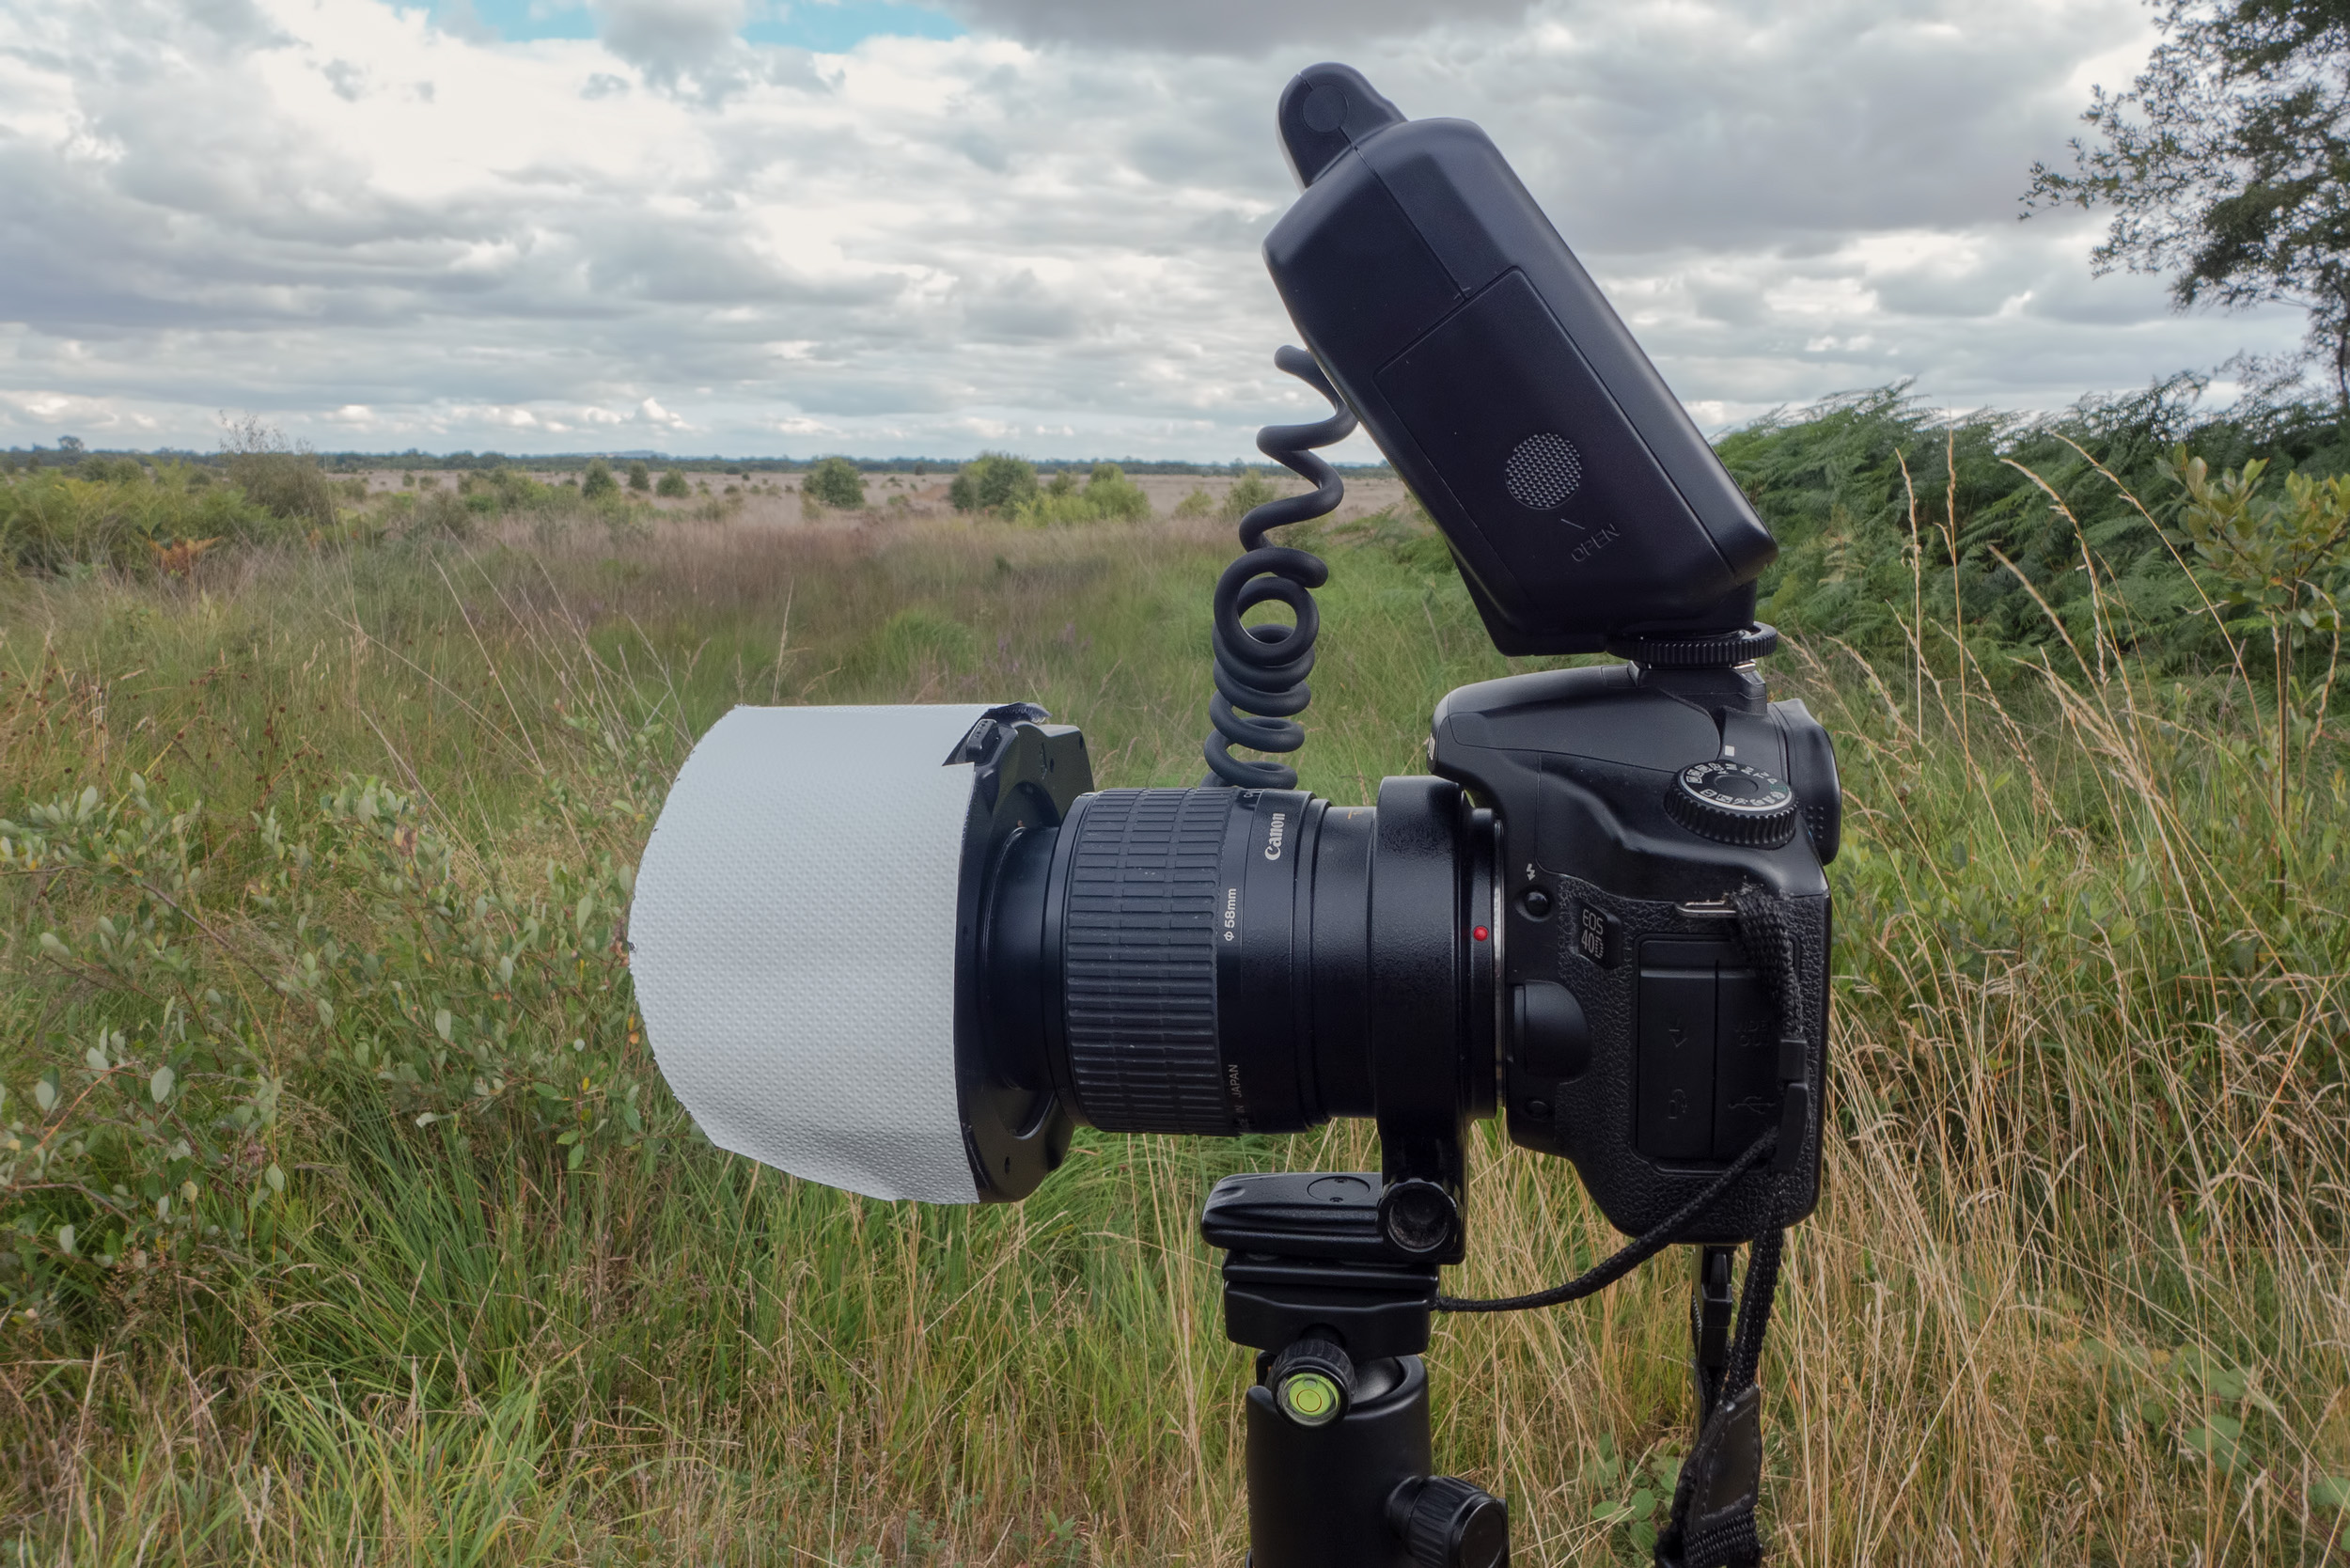
The diffuser illustrated uses 4 types of material. The inner diffuser is made from “diffuser gel”, although velum paper will work. The outer reflective hood is made from “reflective mylar sheet” with an embossed surface. I believe it is sold for use in hydroponics, and it's embossed surface is designed to avoid hotspots and to diffuse light. It is a much more effective material for reflective light from oblique angles than aluminium foil. It is fairly tough and tear resistance, and when curved as shown does no need extra support or blow around in the wind. You can find it on eBay etc.
In the illustrations the centre disc is cut from expanded polystyrene, but I've since discovered that the foam from cheap and thin camping or gym mats is a better material. It's cut use a compass circle cutter. With these thick materials, make a hole right through it with a thick needle, then just cut from each side. It is attached to flash with self-adhesive hook and loop (Velcro) strips. The Manfrotto RC2 plate in the photo gives a scale most photographers will be familiar with. I initially used longer reflective hoods, but settled on the shorter hood as it was the least obstructive.
This version uses only one half of the flash tubes for the major light source. This gives some modelling, and prevents the light from being flat (flat lighting is strictly speaking frontal lighting with no micro shadows, and is not just low contrast light). The light from this diffuser is very soft, but not flat. The reflective hood means the light comes from above the subject. The other half of the ring flash is either left off, or used on the lowest power ratio. When the bottom tube is used it provides fill-in from below, which is valuable on Beetles with dark undersides. I have a version of the hood not illustrated, which forms a slight lip underneath the bottom tube.
It's possible to make a design of this diffuser which uses both tubes on full power. I'm perfecting this design although rough prototypes demonstrates it works. To make it work on an actual ring flash you would just cover the lower half of the flash with several layers of diffuser gel to attenuate the light. You could also diffuse ring LED lights for microscopes using these principles.
The bent reflective material in the photos attached by velcro tabs, are to reflect the light from the focusing lights inwards. The LED lights are on the Yongnuo YN-14EX are very powerful, but the shine to far in front, and don't illuminate things close to the lens well. I also have small white foam blocks I can use in place of them.
A further modification to one of the reflective hoods I use (I have different sized and shaped ones) is an end piece that folds over to stop direct light being projected. This is created by having the reflective hood about 1.5cm longer, then folding it over with a crease. If you then cut into it in spaces of about 1-2cm apart, when the hood curves around, these pieces overlap (other wise the reflective hood won't bend around. The only other modification is that rather than jamming the diffuser gel in with the centre reflective piece, they are now attached with double-sided tape. The diameter of the centre hole depends on the front element of the lens diameter, and the format you are using. I have used this on my Canon 100mm f2.8 L IS, without vignetting on Canon 1.6x crop bodies, but it has a bigger hole. In fact with the camping mat foam, I have made it the right size to take a Raynox close-up lens, which just pushes in, and is held securely in place.


This illustrates the components, and their relative sizes. The Manfrotto RC2 plate gives the scale. Please note this particular centre piece is made for the Canon MP-E 65mm. For lenses with a large front element, you will need a larger centre hole. I have used this diffuser on a Canon 100mm f2.8 L IS lens, and a Canon APS-C body with a slightly larger centre hole, and have had no vignetting. In addition, if you use the foam rubber I recommend, you can actually cut it to fit a Raynox close-up lens, and it will hold the lens firmly in position.
I will post a few sample images taken with this set-up up. It is by far the most effective macro flashgun and diffuser set up possible. The whole thing costs less than a Canon 270EX flashgun, and is better than the most expensive undiffused macro flash units you can buy.
I am posting it hear because this type of diffused Macro or Ring Lite flash has far more applications than for insect photography.
Whilst the diffuser shown is for the Yongnuo YN-14EX, the principle will work on all similar types of flashes, and even on Ring Flashes with modification. An important thing to bear in mind with my diffusers, is that they are not merely randomly designed diffusers, but general ideas and principles about light modification, from which many diffuser designs can be derived. The reason I make this point here, is that the diffuser shown is just one of many actual diffuser designs which could be made on these principles.
I did originally describe these principles in depth on Juza Nature in early 2010, but neither the articles/threads or this version of the website is still on the internet. You will still find links to it on reviews and blogs about my “concave diffusion” ideas. I actually coined the term “concave diffuser” to separate it from the convex diffusers other people were using. Whilst convex diffusers will work if they are big enough, they are not what you really want in macro lighting, and are derived from ideas about diffusion in normal flash lighting in rooms, which do not work in macro flash lighting. In essence a convex diffuser fires light all over the place so it bounces off walls and ceilings which don't exist in macro flash diffusion. Most reflective surfaces in a macro context, with the exception of flowers and very nearby foliage are too far away to contribute to the image lighting, with reflected light
As a note, “concave diffusion” refers to 2 principles. One is the round end of lens light tent. It actually operates not just like a diffuser, but a mini room where the flash bounces around inside it. The reason it is tightly curved, concave, is so it wraps around the subject. This wrap around effect means the surfaces of the diffuser are equidistant from the subject, unlike with a flat diffuser face where the edges of the diffuser are much further from the subject, which in macro distances means a drop in light intensity due to the inverse square law of light drop off. Whilst the inverse square law is for point sources of light, it is applicable to diffuser faces. You just need to think of a diffuser face being composed of a massive number of discrete point sources. I won't go any further into the technical bits and the thinking behind it. I would need a separate in depth article to explain this.
This Flickr set of illustrations explains these principles of macro light diffusion for anyone interested. Yellow represents bright light, which doesn't necessarily blow the highlights, and red is intense light which will blow highlights on light or reflective surfaces. Angled arrows indicate diffuse scattered light, and parallel lines indicate focused light (this is how the other “concave diffuser”, an inverted dome works).
https://www.flickr.com/photos/steb1/albums/72157623486703625
The diffuser illustrated uses 4 types of material. The inner diffuser is made from “diffuser gel”, although velum paper will work. The outer reflective hood is made from “reflective mylar sheet” with an embossed surface. I believe it is sold for use in hydroponics, and it's embossed surface is designed to avoid hotspots and to diffuse light. It is a much more effective material for reflective light from oblique angles than aluminium foil. It is fairly tough and tear resistance, and when curved as shown does no need extra support or blow around in the wind. You can find it on eBay etc.
In the illustrations the centre disc is cut from expanded polystyrene, but I've since discovered that the foam from cheap and thin camping or gym mats is a better material. It's cut use a compass circle cutter. With these thick materials, make a hole right through it with a thick needle, then just cut from each side. It is attached to flash with self-adhesive hook and loop (Velcro) strips. The Manfrotto RC2 plate in the photo gives a scale most photographers will be familiar with. I initially used longer reflective hoods, but settled on the shorter hood as it was the least obstructive.
This version uses only one half of the flash tubes for the major light source. This gives some modelling, and prevents the light from being flat (flat lighting is strictly speaking frontal lighting with no micro shadows, and is not just low contrast light). The light from this diffuser is very soft, but not flat. The reflective hood means the light comes from above the subject. The other half of the ring flash is either left off, or used on the lowest power ratio. When the bottom tube is used it provides fill-in from below, which is valuable on Beetles with dark undersides. I have a version of the hood not illustrated, which forms a slight lip underneath the bottom tube.
It's possible to make a design of this diffuser which uses both tubes on full power. I'm perfecting this design although rough prototypes demonstrates it works. To make it work on an actual ring flash you would just cover the lower half of the flash with several layers of diffuser gel to attenuate the light. You could also diffuse ring LED lights for microscopes using these principles.
The bent reflective material in the photos attached by velcro tabs, are to reflect the light from the focusing lights inwards. The LED lights are on the Yongnuo YN-14EX are very powerful, but the shine to far in front, and don't illuminate things close to the lens well. I also have small white foam blocks I can use in place of them.
A further modification to one of the reflective hoods I use (I have different sized and shaped ones) is an end piece that folds over to stop direct light being projected. This is created by having the reflective hood about 1.5cm longer, then folding it over with a crease. If you then cut into it in spaces of about 1-2cm apart, when the hood curves around, these pieces overlap (other wise the reflective hood won't bend around. The only other modification is that rather than jamming the diffuser gel in with the centre reflective piece, they are now attached with double-sided tape. The diameter of the centre hole depends on the front element of the lens diameter, and the format you are using. I have used this on my Canon 100mm f2.8 L IS, without vignetting on Canon 1.6x crop bodies, but it has a bigger hole. In fact with the camping mat foam, I have made it the right size to take a Raynox close-up lens, which just pushes in, and is held securely in place.
This illustrates the components, and their relative sizes. The Manfrotto RC2 plate gives the scale. Please note this particular centre piece is made for the Canon MP-E 65mm. For lenses with a large front element, you will need a larger centre hole. I have used this diffuser on a Canon 100mm f2.8 L IS lens, and a Canon APS-C body with a slightly larger centre hole, and have had no vignetting. In addition, if you use the foam rubber I recommend, you can actually cut it to fit a Raynox close-up lens, and it will hold the lens firmly in position.
I will post a few sample images taken with this set-up up. It is by far the most effective macro flashgun and diffuser set up possible. The whole thing costs less than a Canon 270EX flashgun, and is better than the most expensive undiffused macro flash units you can buy.
I am posting it hear because this type of diffused Macro or Ring Lite flash has far more applications than for insect photography.


