Reading mode:
Install the app
How to install the app on iOS
Follow along with the video below to see how to install our site as a web app on your home screen.
Note: This feature may not be available in some browsers.
-
Welcome to the new forums! Please read this first. For known issues we are working to resolve, click here.
You are using an out of date browser. It may not display this or other websites correctly.
You should upgrade or use an alternative browser.
You should upgrade or use an alternative browser.
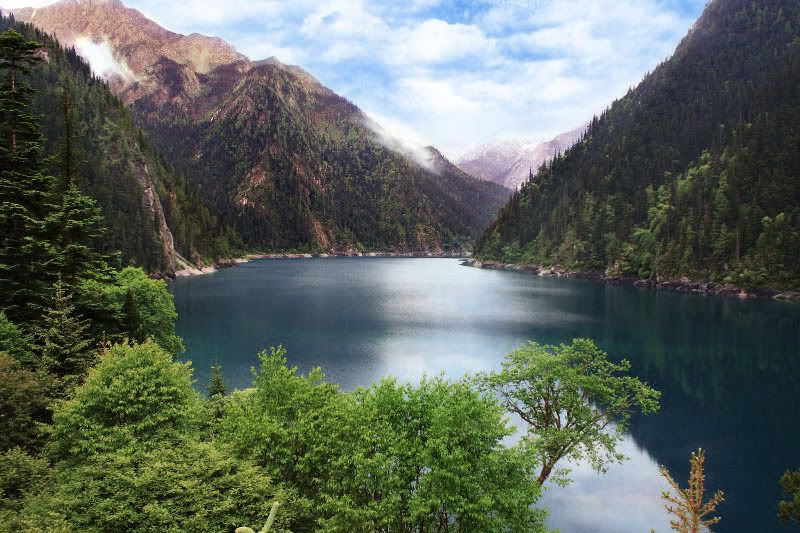
Add blue sky!
- Thread starter My300D
- Start date


P
Peano
Guest
If you just want a plain blue sky, select the current white sky (magic wand) and open a selective color adjustment layer. Click "absolute" method at the bottom, then go the the whites and increase black levels until the sky turns very light gray. Then, while still in the whites, decrease the yellow level (increases blue) and increase cyan. Just a little on each to get a sky blue.
You can also add a blank layer in soft light mode and apply a black gradient (from the top down) to darken the sky near the top and taper into lighter blues toward the horizon.
I also added some clouds and played with the colors, which I think are a bit bright and over-saturated ... but that's a matter of personal taste.


--
~ Peano
PinoC
Senior Member
Went for a different look, but I think I screwed up the water.

--
Pino

--
Pino
Ronny Harris
Veteran Member
Stunning photo! I tried to raise the barometric pressure a bit. Some PWL and just masked in the sky....at the expense of a few tree tops. ") )
)
Ronny

)Ronny

Magic results. I reduced green saturation as you did, but how ever I tried to sharpen it, I would get your effect: filter> sharpen> sharpen more. How did you sharpen it and make it more contrasty. Also what did you do to the hills? Could you please be a little spefic?nice pic
reduced green saturation and sharpened
for the sky I created a blank layer and used a light blue gradient
changed the blend mode to darken and used the history brush on the
hills
used a cloud brush

--
Will
Cigar
Senior Member
Replaced the sky by masking it out, velvia look in Channel mixer, and framed it with Mike's frame.

--
**** http://www.fototime.com/ {6C00EF89-F9D6-4CF6-A5AD-45D92E61E8F3} picture.GIF

--
**** http://www.fototime.com/ {6C00EF89-F9D6-4CF6-A5AD-45D92E61E8F3} picture.GIF
Wonderful results. Thanks for your great suggestions. I used your method and did create the blue sky. But how did you know: go to the whites, etc., so as to create light blue? Is it just experience? Most importantly, how did you add the cloud? Could you please be a little specific?If you just want a plain blue sky, select the current white sky
(magic wand) and open a selective color adjustment layer. Click
"absolute" method at the bottom, then go the the whites and
increase black levels until the sky turns very light gray. Then,
while still in the whites, decrease the yellow level (increases
blue) and increase cyan. Just a little on each to get a sky blue.
Thanks!
Daviskw
Senior Member
Butch

F
Francesco
Guest
wow... perfect... i am particularly amazed by how you have managed fixing the obvious spill of light on the mountains that was in the original...
--
Francesco Gallarotti
-----------------------------
photo portfolio: http://www.greenteaphoto.com
photo gallery: http://www.gallarotti.net/px
blog: http://www.gallarotti.net
--
Francesco Gallarotti
-----------------------------
photo portfolio: http://www.greenteaphoto.com
photo gallery: http://www.gallarotti.net/px
blog: http://www.gallarotti.net
Ronny Harris
Veteran Member
Peano, If you used a cloud brush, I like how you added the black. Much more realistic.
Ronny
Ronny
P
Peano
Guest
Using selective color to fix a white sky is a technique that's been bouncing around on this forum for quite a while.Peano wrote:
Wonderful results. Thanks for your great suggestions. I used your
method and did create the blue sky. But how did you know: go to the
whites, etc., so as to create light blue? Is it just experience?
Most importantly, how did you add the cloud? Could you please be a
little specific?
For the clouds, Google "nagel cloud brushes" without the quote marks. There are several sets of them you can download for free. Some are also good also for smoke, mist, fog, etc.
--
~ Peano
For sharpening I enhanced contrast locally by going to filter> sharpen> usm. Amount 20 Radius 40 Threshold 0. You can do this for most pics but in this one I overdid it as you can see the shadows on the left tree are too dark and there is slight oversharpening of the leaves. After the sky gradient I used a history brush on the top of the hills because there was some blue leaking down. The history brush reverts the image back to its original state thus 'erasing' the blue. As for the clouds, if you do a search for cloud brushes there are a ton of them out there for free which let you paint clouds.Magic results. I reduced green saturation as you did, but how evernice pic
reduced green saturation and sharpened
for the sky I created a blank layer and used a light blue gradient
changed the blend mode to darken and used the history brush on the
hills
used a cloud brush
I tried to sharpen it, I would get your effect:
filter> sharpen> sharpen more. How did you sharpen it and make it
more contrasty. Also what did you do to the hills? Could you please
be a little spefic?
--
Will
P
Peano
Guest
Most of the Nagel cloud brushes are set to jitter between foreground and background color. So you just put white on top and some shade of gray below, and the brush does the rest. You can adjust those brush settings, of course.Peano, If you used a cloud brush, I like how you added the black.
Much more realistic.
--
~ Peano
Daviskw
Senior Member
Hi My300D I used the same cloud brushes as Peano
Butch
Butch
Very nice work. Did you mask in another sky and brushed the fog over the hill? If you could also briefly list your workflow for this image particularly on getting more color and detail in the hills I would appreciate it.Butch
--
Will
Daviskw
Senior Member
Hi Will
I duplicated the photo…on the duplicate file I changed the color space to CMYK. I adjusted each channel increasing contrast particularly the black channel, in order to recover some detail in the distant mountains. I copied the CMYK file and overlaid the RGB file then masked the foreground out. That way I did not loose too much color range in the foreground from converting the color space.
I used selective color for the sky but grouped a Hue/saturation layer to further adjust the sky color. Then applied clouds with cloud brushes.
I thought the colors were a little too bright and strong so I reduced saturation and brightness with a curves layer.
Butch
Ronny Harris
Veteran Member
And all this time I had been trying to add by hand. Never thought about using jitter! Thanks. Will definitely play with the brush settings.
Ronny
Ronny
P
Peano
Guest
I generally find that the default settings in the Nagel brushes do the trick. I rarely have to fool with them.And all this time I had been trying to add by hand. Never thought
about using jitter! Thanks. Will definitely play with the brush
settings.
--
~ Peano
Keyboard shortcuts
- f
- Forum
About
Editorial content
Cameras & Lenses
All content, design, and layout are Copyright © 1998–2025 Digital Photography Review All Rights Reserved.
Reproduction in whole or part in any form or medium without specific written permission is prohibited.
When you use DPReview links to buy products, the site may earn a commission.
©GPS Media - Guides, Products, Services.
Reproduction in whole or part in any form or medium without specific written permission is prohibited.
When you use DPReview links to buy products, the site may earn a commission.
©GPS Media - Guides, Products, Services.