Build your self a cable switch F / CS-205 for your Pentax camera

pb908

Forum Enthusiast
Messages
332
Reaction score
4
Location
Balikpapan, ID
I finished the testing of my home built cable last night, so I wrote a simple html file to share knowldge of a simple project that can help you a lot..

please visit my website in this address below, drop me an email or just ask if you have question..

http://www.geocities.com/a_ov_c/cablef.htm

BK
======
..MX is Beauty, KX is Reliability..
..DS ??? Cool !!!
 
Thanks for sharing that with us. I'm sure there are lots of innovative people that'll go forward with your design and even add other functions. One should note that that 'stereo' type plug is very common and you can use commercial extension cords to get different length cords.
--
Ron Johnson
'The only stupid question is that which goes unasked!'
http://www.pbase.com/ronk7uv

 
Now what was said a couple of weeks ago regarding people that read posts, and people that reply?

This one now has two replies but in two hours your bandwidth has been exceeded :)
--
Ben
Nth NSW Australia
 
Thanks for this - I have already adapted a proper Z1-P cable so it will work on the *istD. But I hadn't realised the connector for the Z1-P and others was the same as the CD lead within a PC - useful if I need to replace the original!
Andy
 
Thanks for the info. I have a cable switch F so I think I'll have a go at building a digital extension to it. I'll have to wait until Saturday though so that I can buy a jack plug.
 
I think you have exceeded your bandwidth, your site is unreachable.
--
Pentax ist DS+Pentax 18-55mm+Pentax 50mm 1.7+Sigma 28-200mm


(Editing disabled while spellchecking)
Stop spell checking
 
Seems to be available now.
--
Pentax ist DS+Pentax 18-55mm+Pentax 50mm 1.7+Sigma 28-200mm

 
I finished the testing of my home built cable last night, so I
wrote a simple html file to share knowldge of a simple project that
can help you a lot..
Can't wait for your site to allow access (still "exceeded its allocated data transfer" message). Could you post instructions here somehow (text at least just to estimate what would be involved)?

-= Ivan =-
 
from html file :
====================

I was searching with google about where I can buy this cable until I got some page that show me how easy to build a cable switch by your self. I forgot where the pages are (my very thanks to the people who start tweaking their cable switch F)

But you can find easily with google. I think you can find some information on these pages

http://www.hobbymaker.narod.ru/English/Articles/cable_sw_eng.htm
http://www.digicaminfo.btinternet.co.uk/fswitch.htm
http://www.kajko.wdb.pl/wezyk/e_wezyk.html

The parts you need to prepare :
  • two “push on” button switch but not latching, (for metering and shutter switch)
  • one “push on” switch, latching type (for Bulb), latching means it keep ON in one position, you need to click to the other position to set it OFF – this switch is replacing the locking mechanism in the cable switch F/CS-205
  • one analog audio cable, SOUND CARD cable to your CD/DVD drive (should be easy to find)
  • if you want to build a cable switch for *ist D/DS (or a CS-205 cable), try to get a stereo adapter 2.5mm type (usually use for phone cell headset. At least my nokia phone use it, just cut the headset and buy another one J). It is smaller compare to standard stereo adapter in your MP3/CD player (3.5mm type).
  • Film plastic tank, as you got when you buy a film. You can use other type of tube/box to suit your hand.
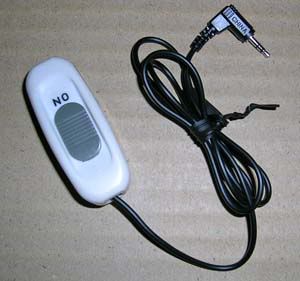
This is the picture of mine and the schematic :


Take the audio cable, usually it has 4 holes with 4 sockets (connector) but some have 3 sockets (the ground is only one) and it’s not in one row. You just need 3 sockets actually, so with your nail/knife take the inner socket to be 3 in the same row. Cut the other plastic that is not in use carefully, now you have the connector to connect to the camera, the same as in the picture above.

Cut the other end of the cable. Make 4 holes in the film tank, one in the bottom for the cable, 2 in the middle part for the push button, and one in the cap for the switch. Put all hole in the nice arrangement fits to your hand (if you have extra big hand, you can use other plastic box. Mine are the simplest thing I can found). Put the cable in, pull a little bit longer, tied once so in will not loose easily from the tank, and solder the other end as shown in the schematic. The B and C switch is connected parallel, both have the same function, but the B switch is a latching one, so you can use it for a BULB switch. For normal one, use the C push button to trigger. 5 minutes work and you have a cable for night exposure.

For CS-205 Cable, use this picture below as your reference :


If you short Meter to Common, Metering & AF system will be activated

If you short Trigger to Common, camera will be triggered to take picture/s

So, just connect the Meter & Common to one push button switch (switch A in the first picture) and Trigger & Common to the other push button (and/or latching switch – switch B & C in the first picture). It is similar with a cable switch F, just differs in the connector.

Shorting Meter to Trigger will not activated anything in the camera. Shorting both Meter, Common & Trigger will activate Metering, AF and the trigger. (Some modes in the camera will try to focus first before trigger the exposure)


My home made CS-205 Switch, without the “Bulb switch”. You can put additional latching switch for the Bulb

2.5mm stereo connector is the bottom one, the top one is 3.5mm connector (CD player, etc)

HOW TO OPERATE :

The original cable switch F is just the same circuit with only one switch (but inside there are 2 contacts, one for metering and the other one for triggering + a locking mechanism to hold them connected to the common line).

So to operate your home build cable switch, just press the Metering switch (AF will work if activated in the camera) and then press the Shutter switch if the metering & focus is fix. You can push one switch at a time, no problem. Event if you press directly the Shutter switch, the camera will take the picture (in case you set the AF of the camera to Continuous/Servo AF or Manual Focus).

To do Bulb exposure, you need to turn ON the Bulb switch which hold the shutter until you turn it OFF.

Have fun, mail me if you have problem. Sorry for the wrong spelling/grammar

BK
---
..MX is Beauty, KX is Reliability..
..DS ??? Cool !!!
 
THAT cool plastic container. thats neet. (the one in the 1st photo)
It vagly looks familular to something I once knew, but cant place it anywere. :)
 
Photo 1:


Switch on/off for focus and lock

Photo 2:


Press for shuttle release.

Don't have bulb feature though(you'll have to press and hold the brass tip if wanna shoot long time exposure).

I've been using this first week after I got my D. It's a modification of a handfree set plus a normal light switch. It's in my camera bag all the time (small and light) :)

Cheers!
--
Frank
 
The only feature I can think of that would be helpful is the bulb-hold function. I can't really think of why I want to replicate the focus + shoot functionality on a short cable. Any tips?
 
Excuse my ignorance but are all handfree kits the same? Which one did you use or have others used?

So the on/off switch is merely for focus and lock? The copper "button" on the back is for shutter release?

I'm confussed.......where does the copper button attach on the inside? Seems like there is doubling up somewhere, i.e. grey on/off button and copper button.

Thanks,

Gareth
 
Excuse my ignorance but are all handfree kits the same? Which one
did you use or have others used?

So the on/off switch is merely for focus and lock? The copper
"button" on the back is for shutter release?

I'm confussed.......where does the copper button attach on the
inside? Seems like there is doubling up somewhere, i.e. grey on/off
button and copper button.

Thanks,

Gareth
Not all the handfree kits are the same, but you'll need to find those with three sections on the jack (like the one I posted): one section is for common, the other two are for focus and shuttle release. I know most Motorola handphones have the handfree kits like the one I used here.

Three secontions means there are three wires for this handfree kit. Connect the focus wire (section) to the common wire, the camera will do focusing, connect the shuttle release wire (section) to the common wire, the camera will release the shuttle. When camera is set to AF, the shuttle will only release when the focusing section is connected to the common section.

If you don't know which section is for what purpose, just try to connect two at a time, and you'll figure it out without any problem.

And yes, there are some connections inside the switch I used above, but you can't see them there in the photos :D 
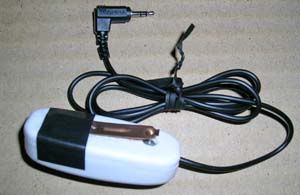
I used a black tap to cover the connecting point on the "copper button" and stick the copper section to the switch.

There are some button switches with two lock position, those are the best bet for you to make your own DIY cable release. But I couldn't seem to find one in those hardware shops. So I ended up using a spoiled switch found at home ;-p

Cheers!

--
Frank
 
Hi, I have this remote for a CD/MP3 player, and the smaller jack is the 2.5mm type. It also fits inside the Ds, despite the bigger (3.5mm) jack next to it. :


However, I am kind of affraid to check if it works, because I have no idea whether I am going to short-circuit anything in the camera (and I don't have any multimeters to check what sections of the jack get shorted when I press the buttons).
Am I too cautious?
Thanks in advance,
--
Peter

 
Call me lazy, but for $5.95 I bought the Canon RS-60E3 release that works perfectly with the DS. I was told it works right out of the box. Mine is on the way so I can't test it yet. It left by first class mail on the 17th from California.
--
Pentax ist DS+Pentax 18-55mm+Pentax 50mm 1.7+Sigma 28-200mm


Keyboard shortcuts

Back
Top