i looked around here a while and found a few IR posts dealing with floppies, but none really combining all the information that i wanted. so heres what i have found out in the past 24 hours
======================================
first of all, i found that a floppy acts as both an ND filter and an IR filter combined. i noticed some posts that claimed a floppy does not block any visible light, that it merely acts as an ND filter. i beg to differ here.
the ND "property" of the floppy is about 7 stops, give or take a bit. some shots i compared were 6, some were 7, and some were 8. i compared them by setting the camera to aperature priority and comparing the shutter speeds it picked.
the IR propery was slighlty more difficult to get.... i took a few pictures, used the eyedropper in PS CS to get the RGB values at different points, and compared them to a graph like this:

i found that my floppy blocked practically anything below 650nm, and attenuated significantly anything below about 700nm in effect it is very close to a hoya R72 (720nm)
=====================================
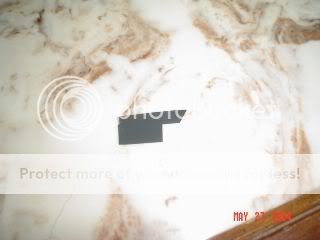
now, onto getting a floppy filter fitted for a V1. i seen posts detailing the process for a 7x7 or 828... but none for a V1. i quickly got sick of holding the floppy in place, so heres what i cut out:

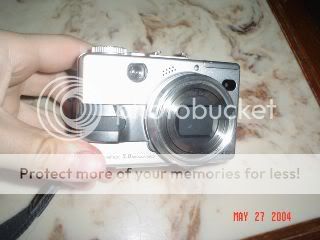
this allowed me to wedge it under the black plastic ring at the front of the lens, like so:

note that the camera is off in the above picture. i found that you can actually get the filter in place, and then freely turn the camera off and on, and the filter will not interfere with the lens sheild that opens and closes. the tab on the filter was left in place for easy removal. to get the filter in place, i found it best to slide in the far side (without the tab) first, then slide it back towards the tabbed end to get the third corner in place.
NOTE i re-made another filter, with the tab in the middle of one of the sides, giving me 4 distinct corners to hold the filter in place. unfortunately i dind't take a pic though.... just mentioned it to try
====================================
now onto the important part: how does it work? well, in short, very well.
my method is as follows: nightshot mode, ISO 100, point and click : ). ISO 100 (or 200) is important because left to its own discretion, the camera will pick any value it sees fit, right up to 3200. (yes, 3200 - sony cams do this for nightshot only).
once i got it into photoshop i simply adjusted levels manually (auto levels will work also: ctrl+shift+L), desaturated the image, and heres what i got:

the image is nothing spectacular, it needs to be processed more (i do not have anything even resembling a workflow for this yet... there are plenty of posts laying around for that though ; ). keep in mind also that the sky is VERY overcast and on the brink of rain at the moment. the subject also leaves a bit to be desired. all that said, i think the floppy did an excellent job as a filter.
=====================================
personally i will not be spending any money on filters any time soon. an i hope i may have saved someone else some money too by reading this. they say necessity is the mother of all invention - i say its lack of cash!
thanks for reading this far
i hope you found this informative or at least helpful
monky
--
a camera needs only an instant to capture things which our mind may need years to grasp
AIM: monky9000 IM's welcome ; )
======================================
first of all, i found that a floppy acts as both an ND filter and an IR filter combined. i noticed some posts that claimed a floppy does not block any visible light, that it merely acts as an ND filter. i beg to differ here.
the ND "property" of the floppy is about 7 stops, give or take a bit. some shots i compared were 6, some were 7, and some were 8. i compared them by setting the camera to aperature priority and comparing the shutter speeds it picked.
the IR propery was slighlty more difficult to get.... i took a few pictures, used the eyedropper in PS CS to get the RGB values at different points, and compared them to a graph like this:
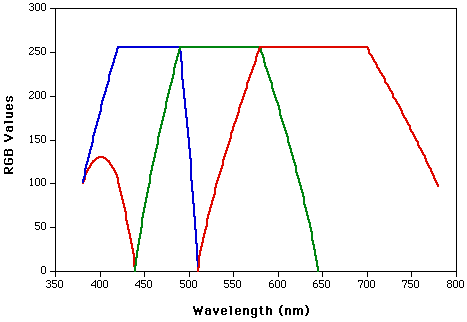
i found that my floppy blocked practically anything below 650nm, and attenuated significantly anything below about 700nm in effect it is very close to a hoya R72 (720nm)
=====================================
now, onto getting a floppy filter fitted for a V1. i seen posts detailing the process for a 7x7 or 828... but none for a V1. i quickly got sick of holding the floppy in place, so heres what i cut out:
this allowed me to wedge it under the black plastic ring at the front of the lens, like so:
note that the camera is off in the above picture. i found that you can actually get the filter in place, and then freely turn the camera off and on, and the filter will not interfere with the lens sheild that opens and closes. the tab on the filter was left in place for easy removal. to get the filter in place, i found it best to slide in the far side (without the tab) first, then slide it back towards the tabbed end to get the third corner in place.
NOTE i re-made another filter, with the tab in the middle of one of the sides, giving me 4 distinct corners to hold the filter in place. unfortunately i dind't take a pic though.... just mentioned it to try
====================================
now onto the important part: how does it work? well, in short, very well.
my method is as follows: nightshot mode, ISO 100, point and click : ). ISO 100 (or 200) is important because left to its own discretion, the camera will pick any value it sees fit, right up to 3200. (yes, 3200 - sony cams do this for nightshot only).
once i got it into photoshop i simply adjusted levels manually (auto levels will work also: ctrl+shift+L), desaturated the image, and heres what i got:

the image is nothing spectacular, it needs to be processed more (i do not have anything even resembling a workflow for this yet... there are plenty of posts laying around for that though ; ). keep in mind also that the sky is VERY overcast and on the brink of rain at the moment. the subject also leaves a bit to be desired. all that said, i think the floppy did an excellent job as a filter.
=====================================
personally i will not be spending any money on filters any time soon. an i hope i may have saved someone else some money too by reading this. they say necessity is the mother of all invention - i say its lack of cash!
thanks for reading this far
i hope you found this informative or at least helpful
monky
--
a camera needs only an instant to capture things which our mind may need years to grasp
AIM: monky9000 IM's welcome ; )


") ~
~