D70 goes IR - add your Infrared pictures to this thread

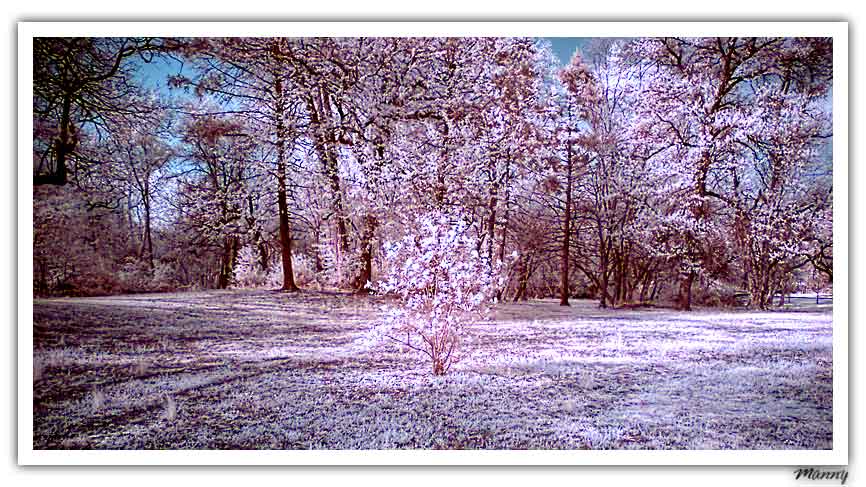
well, I much prefer your IR photos..this look like a simply color photo which has been oversaturated for the green.

how about a 100% crop of a IR photo straight out of hte camera? I am trying to decide if I will sell my Minolta D7 and go for the d70..


This are two images on two different layers.
The normal colour image has been put on a layer above the IR image.
Then this layer has been reduced to colour layer (fill method
colour).
Now some minor adjustments and that's it.

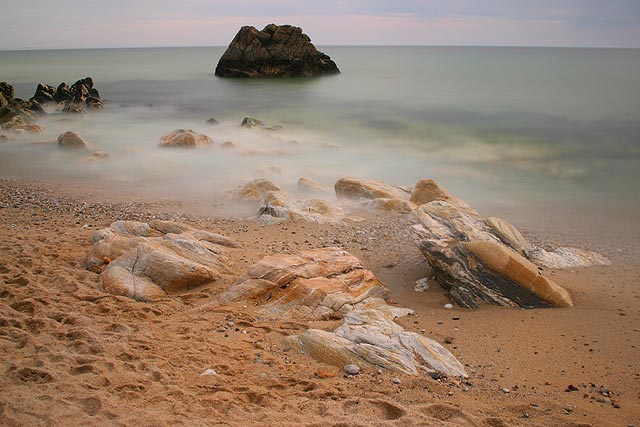
These are the original images that have been used:


--
Cheers
Dirk
http://www.nzphoto.net - Panoramic New Zealand
http://www.pbase.com/nzphoto - Nikon D70 Galleries
--
Minë Corma hostië të ilyë ar mordossë nutië të
Mornórëo Nóressë yassë i Fuini caitar.
Un thoron arart’a s’un hith mal’kemen ioke.
Saurulmaiel
 
how about a 100% crop of a IR photo straight out of hte camera? I
am trying to decide if I will sell my Minolta D7 and go for the
d70..
Here you go:


100% Crop, no postprocessing

But please remember, manual WB (through filter on green grass), at very sunny day and with Hoya R72 Filter. With other settings you will get much different results. E.g. with a much darker filter your picture will look quiet different.

The crop is from this picuture (postprocessed):


--
Cheers
Dirk
http://www.nzphoto.net - Panoramic New Zealand
http://www.pbase.com/nzphoto - Nikon D70 Galleries
 
My God this is nice and sharp! 1000 times better than what the 300d can do in IR. the castle is really sharp..I think better than with my Minolta D7.

You don't have a center bright spot either it seems...really cool :)
how about a 100% crop of a IR photo straight out of hte camera? I
am trying to decide if I will sell my Minolta D7 and go for the
d70..
Here you go:


100% Crop, no postprocessing
But please remember, manual WB (through filter on green grass), at
very sunny day and with Hoya R72 Filter. With other settings you
will get much different results. E.g. with a much darker filter
your picture will look quiet different.

The crop is from this picuture (postprocessed):


--
Cheers
Dirk
http://www.nzphoto.net - Panoramic New Zealand
http://www.pbase.com/nzphoto - Nikon D70 Galleries
--
Minë Corma hostië të ilyë ar mordossë nutië të
Mornórëo Nóressë yassë i Fuini caitar.
Un thoron arart’a s’un hith mal’kemen ioke.
Saurulmaiel
 
Or to my brother's hands for that matter lol ;)

I love it, but I was just after something like this.

D70 IR performance looks simply exceptional (even better than what I've seen from nikon before)
I would stay as I am now, because feature wise I'm o.k.
Your images are the major difference for me to switch.
thanks for your post and congrats ;) Those are really great shots
how about a 100% crop of a IR photo straight out of hte camera? I
am trying to decide if I will sell my Minolta D7 and go for the
d70..
Here you go:


100% Crop, no postprocessing
But please remember, manual WB (through filter on green grass), at
very sunny day and with Hoya R72 Filter. With other settings you
will get much different results. E.g. with a much darker filter
your picture will look quiet different.

The crop is from this picuture (postprocessed):


--
Cheers
Dirk
http://www.nzphoto.net - Panoramic New Zealand
http://www.pbase.com/nzphoto - Nikon D70 Galleries
--
http://www.davidnolla.com
 
I have a feeling my subject needs improvement. This is because I noticed that in my sample picture below, most of the subject is a bunch of the same color and therefore no interest in the final IR picture.

That aside, I have found a few interesting things.

-Even after your WB trick, I notice that if I take the color temperature all the way down to 2200 K it improves my chances if the original is not good enough. I assume after my tests, that you need LOTS OF GREEN GRASS and the sun has to be VERY BRIGHT. My image here I metered off the grass but the sun was weak and the grass was very patchy and lots of dirt showed through

-The exposure is somewhat improtant, but not really. I was able to work out a decent IR image in over exposed and underexposed shots
-Nikon is better than PS in processing raw IR images

-It must be OVERHEAD sunny right? This shot was taken when the sun was about halfway between set and midday.

-I still don't know how to do the channel swap as you say. I found an action on the internet that does this, I think, but I'd like to know how to do it so I can control it myself :-)

I have attached the RAW NEF file as well to see if you can give me further advice. Thank you sir.


RAW (big file, over 5MB)
http://manny.org/NTF/D70/tuckahoe-park-1.NEF
Thanks for your advice and help.

--
Manny
FCAS Member - http://manny.org/FCAS
http://www.pbase.com/gonzalu/
 
I have analysed your picture and here are my findings:

The image is way too dark. This is why it is so grainy - completely underexposed!

Do not use the metering. Use your camera in M Mode and playaround until you have an acceptable result on the camera monitor.

Your setting have been:
ISO 800
Fstop 8
Exposure 1/20

Now, if you have a tripod your settings should have been:
ISO 200 (less grain)
Fstop 8
Exposure 1 - 2 seconds

Now I tried my best to save your picture, and this is what I did:

Nikon Capture 4.1:
Manual WB on "gray point" (don'T know if this is the correct english expression)
Correct Exposure by +2 EV

Photoshop:
Auto Leveling
Channel Shift (as described before)
Color Reduction (0 Saturation) for:
Red Colours & Magenta
Resize and Sharpen

Result:


I have a feeling my subject needs improvement. This is because I
noticed that in my sample picture below, most of the subject is a
bunch of the same color and therefore no interest in the final IR
picture.

That aside, I have found a few interesting things.

-Even after your WB trick, I notice that if I take the color
temperature all the way down to 2200 K it improves my chances if
the original is not good enough. I assume after my tests, that you
need LOTS OF GREEN GRASS and the sun has to be VERY BRIGHT. My
image here I metered off the grass but the sun was weak and the
grass was very patchy and lots of dirt showed through
-The exposure is somewhat improtant, but not really. I was able to
work out a decent IR image in over exposed and underexposed shots
-Nikon is better than PS in processing raw IR images
-It must be OVERHEAD sunny right? This shot was taken when the sun
was about halfway between set and midday.
-I still don't know how to do the channel swap as you say. I found
an action on the internet that does this, I think, but I'd like to
know how to do it so I can control it myself :-)
I have attached the RAW NEF file as well to see if you can give me
further advice. Thank you sir.


RAW (big file, over 5MB)
http://manny.org/NTF/D70/tuckahoe-park-1.NEF
Thanks for your advice and help.

--
Manny
FCAS Member - http://manny.org/FCAS
http://www.pbase.com/gonzalu/
--
Cheers
Dirk
http://www.nzphoto.net - Panoramic New Zealand
http://www.pbase.com/nzphoto - Nikon D70 Galleries
 
nzphoto,

Your pics are amazing...I'd like to try the IR thing..but the channel shifting thing Im not sure of. Im not a photoshop wiz,,,if its not too difficult could you explain how to do that ...a little more thoroughly...for a novice...if its too much hassle I'll try to find out some other way...thanks
The image is way too dark. This is why it is so grainy - completely
underexposed!

Do not use the metering. Use your camera in M Mode and playaround
until you have an acceptable result on the camera monitor.

Your setting have been:
ISO 800
Fstop 8
Exposure 1/20

Now, if you have a tripod your settings should have been:
ISO 200 (less grain)
Fstop 8
Exposure 1 - 2 seconds

Now I tried my best to save your picture, and this is what I did:

Nikon Capture 4.1:
Manual WB on "gray point" (don'T know if this is the correct
english expression)
Correct Exposure by +2 EV

Photoshop:
Auto Leveling
Channel Shift (as described before)
Color Reduction (0 Saturation) for:
Red Colours & Magenta
Resize and Sharpen

Result:


I have a feeling my subject needs improvement. This is because I
noticed that in my sample picture below, most of the subject is a
bunch of the same color and therefore no interest in the final IR
picture.

That aside, I have found a few interesting things.

-Even after your WB trick, I notice that if I take the color
temperature all the way down to 2200 K it improves my chances if
the original is not good enough. I assume after my tests, that you
need LOTS OF GREEN GRASS and the sun has to be VERY BRIGHT. My
image here I metered off the grass but the sun was weak and the
grass was very patchy and lots of dirt showed through
-The exposure is somewhat improtant, but not really. I was able to
work out a decent IR image in over exposed and underexposed shots
-Nikon is better than PS in processing raw IR images
-It must be OVERHEAD sunny right? This shot was taken when the sun
was about halfway between set and midday.
-I still don't know how to do the channel swap as you say. I found
an action on the internet that does this, I think, but I'd like to
know how to do it so I can control it myself :-)
I have attached the RAW NEF file as well to see if you can give me
further advice. Thank you sir.


RAW (big file, over 5MB)
http://manny.org/NTF/D70/tuckahoe-park-1.NEF
Thanks for your advice and help.

--
Manny
FCAS Member - http://manny.org/FCAS
http://www.pbase.com/gonzalu/
--
Cheers
Dirk
http://www.nzphoto.net - Panoramic New Zealand
http://www.pbase.com/nzphoto - Nikon D70 Galleries
 
As I am using a german PS version, my translation of menue entries will possibly be wrong, but I'll give it a try.

In PS select menue entry "Picture" - "Settings" - "Channel Mixer"
If you can find something that sounds equal in english PS.

Now you see a window with a choice box for the channel ("red") and three slides, one for each colour (red, green, blue).

In the "red" channel the slide for "red" is on 100%. Set it to 0%. In the same channel set the "blue" channel (slide) from 0% to 100%.

In the "blue" channel the slide for "red" is on 0%. Set it to 100%. In the same channel set the "blue" channel (slide) from 100% to 0%.

Now that's it. You shifted the channels.

If the picture is "too blue", reduce the lab luminosity for blue and/or cyan. The appropriate window where to do this can be reached by pressing "ctrl-u" In that window press "Ctrl-5" to get the blue tones and move the "lab lumiosity" slide (last slide) to the left.

Hope this was detailed enought, otherwise I would suggest to get a book or an online workshop for Photoshop.
The image is way too dark. This is why it is so grainy - completely
underexposed!

Do not use the metering. Use your camera in M Mode and playaround
until you have an acceptable result on the camera monitor.

Your setting have been:
ISO 800
Fstop 8
Exposure 1/20

Now, if you have a tripod your settings should have been:
ISO 200 (less grain)
Fstop 8
Exposure 1 - 2 seconds

Now I tried my best to save your picture, and this is what I did:

Nikon Capture 4.1:
Manual WB on "gray point" (don'T know if this is the correct
english expression)
Correct Exposure by +2 EV

Photoshop:
Auto Leveling
Channel Shift (as described before)
Color Reduction (0 Saturation) for:
Red Colours & Magenta
Resize and Sharpen

Result:


I have a feeling my subject needs improvement. This is because I
noticed that in my sample picture below, most of the subject is a
bunch of the same color and therefore no interest in the final IR
picture.

That aside, I have found a few interesting things.

-Even after your WB trick, I notice that if I take the color
temperature all the way down to 2200 K it improves my chances if
the original is not good enough. I assume after my tests, that you
need LOTS OF GREEN GRASS and the sun has to be VERY BRIGHT. My
image here I metered off the grass but the sun was weak and the
grass was very patchy and lots of dirt showed through
-The exposure is somewhat improtant, but not really. I was able to
work out a decent IR image in over exposed and underexposed shots
-Nikon is better than PS in processing raw IR images
-It must be OVERHEAD sunny right? This shot was taken when the sun
was about halfway between set and midday.
-I still don't know how to do the channel swap as you say. I found
an action on the internet that does this, I think, but I'd like to
know how to do it so I can control it myself :-)
I have attached the RAW NEF file as well to see if you can give me
further advice. Thank you sir.


RAW (big file, over 5MB)
http://manny.org/NTF/D70/tuckahoe-park-1.NEF
Thanks for your advice and help.

--
Manny
FCAS Member - http://manny.org/FCAS
http://www.pbase.com/gonzalu/
--
Cheers
Dirk
http://www.nzphoto.net - Panoramic New Zealand
http://www.pbase.com/nzphoto - Nikon D70 Galleries
--
Cheers
Dirk
http://www.nzphoto.net - Panoramic New Zealand
http://www.pbase.com/nzphoto - Nikon D70 Galleries
 
Thanks nzphoto,
In photoshop CS...its image> adjustments> channel mixer.

Your instructions worked great..now when I get the filter I'll try it out..thanks alot again
In PS select menue entry "Picture" - "Settings" - "Channel Mixer"
If you can find something that sounds equal in english PS.

Now you see a window with a choice box for the channel ("red") and
three slides, one for each colour (red, green, blue).

In the "red" channel the slide for "red" is on 100%. Set it to 0%.
In the same channel set the "blue" channel (slide) from 0% to 100%.

In the "blue" channel the slide for "red" is on 0%. Set it to 100%.
In the same channel set the "blue" channel (slide) from 100% to 0%.

Now that's it. You shifted the channels.

If the picture is "too blue", reduce the lab luminosity for blue
and/or cyan. The appropriate window where to do this can be reached
by pressing "ctrl-u" In that window press "Ctrl-5" to get the blue
tones and move the "lab lumiosity" slide (last slide) to the left.

Hope this was detailed enought, otherwise I would suggest to get a
book or an online workshop for Photoshop.
The image is way too dark. This is why it is so grainy - completely
underexposed!

Do not use the metering. Use your camera in M Mode and playaround
until you have an acceptable result on the camera monitor.

Your setting have been:
ISO 800
Fstop 8
Exposure 1/20

Now, if you have a tripod your settings should have been:
ISO 200 (less grain)
Fstop 8
Exposure 1 - 2 seconds

Now I tried my best to save your picture, and this is what I did:

Nikon Capture 4.1:
Manual WB on "gray point" (don'T know if this is the correct
english expression)
Correct Exposure by +2 EV

Photoshop:
Auto Leveling
Channel Shift (as described before)
Color Reduction (0 Saturation) for:
Red Colours & Magenta
Resize and Sharpen

Result:


I have a feeling my subject needs improvement. This is because I
noticed that in my sample picture below, most of the subject is a
bunch of the same color and therefore no interest in the final IR
picture.

That aside, I have found a few interesting things.

-Even after your WB trick, I notice that if I take the color
temperature all the way down to 2200 K it improves my chances if
the original is not good enough. I assume after my tests, that you
need LOTS OF GREEN GRASS and the sun has to be VERY BRIGHT. My
image here I metered off the grass but the sun was weak and the
grass was very patchy and lots of dirt showed through
-The exposure is somewhat improtant, but not really. I was able to
work out a decent IR image in over exposed and underexposed shots
-Nikon is better than PS in processing raw IR images
-It must be OVERHEAD sunny right? This shot was taken when the sun
was about halfway between set and midday.
-I still don't know how to do the channel swap as you say. I found
an action on the internet that does this, I think, but I'd like to
know how to do it so I can control it myself :-)
I have attached the RAW NEF file as well to see if you can give me
further advice. Thank you sir.


RAW (big file, over 5MB)
http://manny.org/NTF/D70/tuckahoe-park-1.NEF
Thanks for your advice and help.

--
Manny
FCAS Member - http://manny.org/FCAS
http://www.pbase.com/gonzalu/
--
Cheers
Dirk
http://www.nzphoto.net - Panoramic New Zealand
http://www.pbase.com/nzphoto - Nikon D70 Galleries
--
Cheers
Dirk
http://www.nzphoto.net - Panoramic New Zealand
http://www.pbase.com/nzphoto - Nikon D70 Galleries
 
In the lens forum someone posted this...about the R72 filter

I just bought the Hoya R72. Using it with the Nikon Coolpix 5700, it produces a grayscale picture. Using it with the D70, it produces a monochrome red color picture. Will some one please help me explaining this discrepancy. Thank you.

What concerns me is he's claiming he gets a monochrome red picture...which is what I dont want...is it the channel mixing that takes this red away???? I want to make sure I know what im doing before I buy this filter..thanks
In PS select menue entry "Picture" - "Settings" - "Channel Mixer"
If you can find something that sounds equal in english PS.

Now you see a window with a choice box for the channel ("red") and
three slides, one for each colour (red, green, blue).

In the "red" channel the slide for "red" is on 100%. Set it to 0%.
In the same channel set the "blue" channel (slide) from 0% to 100%.

In the "blue" channel the slide for "red" is on 0%. Set it to 100%.
In the same channel set the "blue" channel (slide) from 100% to 0%.

Now that's it. You shifted the channels.

If the picture is "too blue", reduce the lab luminosity for blue
and/or cyan. The appropriate window where to do this can be reached
by pressing "ctrl-u" In that window press "Ctrl-5" to get the blue
tones and move the "lab lumiosity" slide (last slide) to the left.

Hope this was detailed enought, otherwise I would suggest to get a
book or an online workshop for Photoshop.
The image is way too dark. This is why it is so grainy - completely
underexposed!

Do not use the metering. Use your camera in M Mode and playaround
until you have an acceptable result on the camera monitor.

Your setting have been:
ISO 800
Fstop 8
Exposure 1/20

Now, if you have a tripod your settings should have been:
ISO 200 (less grain)
Fstop 8
Exposure 1 - 2 seconds

Now I tried my best to save your picture, and this is what I did:

Nikon Capture 4.1:
Manual WB on "gray point" (don'T know if this is the correct
english expression)
Correct Exposure by +2 EV

Photoshop:
Auto Leveling
Channel Shift (as described before)
Color Reduction (0 Saturation) for:
Red Colours & Magenta
Resize and Sharpen

Result:


I have a feeling my subject needs improvement. This is because I
noticed that in my sample picture below, most of the subject is a
bunch of the same color and therefore no interest in the final IR
picture.

That aside, I have found a few interesting things.

-Even after your WB trick, I notice that if I take the color
temperature all the way down to 2200 K it improves my chances if
the original is not good enough. I assume after my tests, that you
need LOTS OF GREEN GRASS and the sun has to be VERY BRIGHT. My
image here I metered off the grass but the sun was weak and the
grass was very patchy and lots of dirt showed through
-The exposure is somewhat improtant, but not really. I was able to
work out a decent IR image in over exposed and underexposed shots
-Nikon is better than PS in processing raw IR images
-It must be OVERHEAD sunny right? This shot was taken when the sun
was about halfway between set and midday.
-I still don't know how to do the channel swap as you say. I found
an action on the internet that does this, I think, but I'd like to
know how to do it so I can control it myself :-)
I have attached the RAW NEF file as well to see if you can give me
further advice. Thank you sir.


RAW (big file, over 5MB)
http://manny.org/NTF/D70/tuckahoe-park-1.NEF
Thanks for your advice and help.

--
Manny
FCAS Member - http://manny.org/FCAS
http://www.pbase.com/gonzalu/
--
Cheers
Dirk
http://www.nzphoto.net - Panoramic New Zealand
http://www.pbase.com/nzphoto - Nikon D70 Galleries
--
Cheers
Dirk
http://www.nzphoto.net - Panoramic New Zealand
http://www.pbase.com/nzphoto - Nikon D70 Galleries
 
In the lens forum someone posted this...about the R72 filter
I just bought the Hoya R72. Using it with the Nikon Coolpix 5700,
it produces a grayscale picture. Using it with the D70, it produces
a monochrome red color picture. Will some one please help me
explaining this discrepancy. Thank you.
What concerns me is he's claiming he gets a monochrome red
picture...which is what I dont want...is it the channel mixing that
takes this red away???? I want to make sure I know what im doing
before I buy this filter..thanks
This is only a matter of exposure and whitebalance. As I've mentioned before, use either Auto, Sunny or Manual WB (on sunny green grass). Now it comes to exposure. Be sure to set the camera mode to "m" for manual. This is because the metering system of the camera won't work correctly with the IR filter. Try some shots, for me the combination of ISO200, F 8 and 1-2 sec. Exposure Time works fine most of the time. Take a testshot and zoom into it on the camera display.
--
Cheers
Dirk
http://www.nzphoto.net - Panoramic New Zealand
http://www.pbase.com/nzphoto - Nikon D70 Galleries
 
What a great thread! Kudos to Roger and Dirk for sharing technique and images. I almost bought a 10D or Drebel, but as a longtime fan of IR, I'm definitely getting the D70 now.

Someone recently asked why one needs to shoot IR when it can be fudged in a monochrome channelmix. The facsimile's produced (I've tried it) are similar, but the tonal range is not as smooth.

The color/B&W blend that has been demonstrated opens up a technique that I've been playing with for some time that has very broad applications. That is to manipulate a duplicate B&W layer of a color image by blurring, curve adjust, etc, and blending to the color image.

IF you try exploring this, be prepared to burn the midnight oil in front of your computer...the possible combinations are almost limitless.

Threshold can be used for a quick conversion, then apply a heavy (25+ gaus blur). Levels on a monochrome layer for even more control.
Use Adjustment Layers for Levels and Curves adjusts to conserve RAM.

--
Brad Oaks
Pbase supporter
 
In the lens forum someone posted this...about the R72 filter
I just bought the Hoya R72. Using it with the Nikon Coolpix 5700,
it produces a grayscale picture. Using it with the D70, it produces
a monochrome red color picture. Will some one please help me
explaining this discrepancy. Thank you.
What concerns me is he's claiming he gets a monochrome red
picture...which is what I dont want...is it the channel mixing that
takes this red away???? I want to make sure I know what im doing
before I buy this filter..thanks
This is only a matter of exposure and whitebalance. As I've
mentioned before, use either Auto, Sunny or Manual WB (on sunny
green grass). Now it comes to exposure. Be sure to set the camera
mode to "m" for manual. This is because the metering system of the
camera won't work correctly with the IR filter. Try some shots, for
me the combination of ISO200, F 8 and 1-2 sec. Exposure Time works
fine most of the time. Take a testshot and zoom into it on the
camera display.
--
Cheers
Dirk
http://www.nzphoto.net - Panoramic New Zealand
http://www.pbase.com/nzphoto - Nikon D70 Galleries
The camera's histogram should tell the story in zeroing in on a correct exposure. It may be worth doing some bracketing in situations where blinky highlights are apparent but preserving shadow detail is desirable.

I can't wait to go to the coast (Pacific NW) and try some IR shots with some ocean waves in the composition. Slow shutterspeeds should yield some interesting blurring and "motion" to the composition.
--
Brad Oaks
Pbase supporter
 
Yes, correct. ND filter. My darkest one is an ND 3.0-10

It was specially made by B&W but I think you can order it with any dealer on request. There is no alternative for longtime exposures at daylight than a stron ND filter.
  • Peter
Also try some longtime exposures with grey filter (eg. 1.000x
grey). You will get stunning pictures!
Neutral Density filter (ND). Widely available in different
strengths. Also available are graduated ND filters for toning down
bright skies, but this can be done in PS as well with gradient
masks.
--
Brad Oaks
Pbase supporter
--
Cheers
Dirk
http://www.nzphoto.net - Panoramic New Zealand
http://www.pbase.com/nzphoto - Nikon D70 Galleries
 

Keyboard shortcuts

Back
Top