Classic portrait lighting with large softbox

Waldo Nell

Senior Member
Messages
1,011
Reaction score
14
Location
Surrey, CA
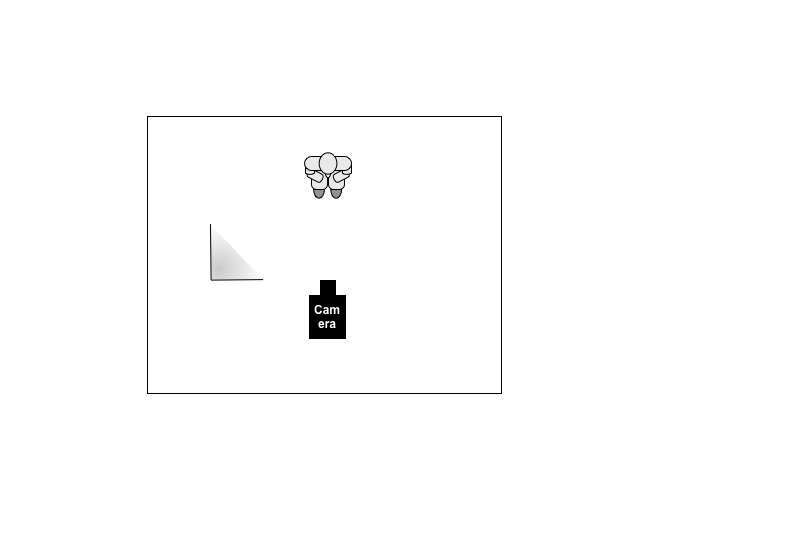
As I understand it, in the classic portrait lighting technique with one light you have this key light to the side of the subject, slightly raised. Something like (top view):


Classic lighting

Classic lighting

And the idea being to create a triangle shape on the far side of the face touching the eye and lip. However, if the light source is a very large softbox, say a 1.75m box, how would you accomplish the raising of the light? I mean, the light is too large to lift (it would bump into the ceiling) - and raising it would defeat the point of having a large light source illuminating the rest of the body as well. If it is not raised, surely the desired shadows underneath the eyes and nose will not be present?

--
Waldo Nell
 
Solution
If you can't raise the light, lower the subject or use a smaller softbox.

You can lower the subject by using a posing stool or sitting them down on the floor. If you need to take a full length portrait, then you have to work with what you got
If you can't raise the light, lower the subject or use a smaller softbox.

You can lower the subject by using a posing stool or sitting them down on the floor. If you need to take a full length portrait, then you have to work with what you got
 
Solution
Ah yes... how large would you like your portrait area?

As a general rule for me, if I'm shooting a single person I would like 14 foot ceilings, at a minimum.

The more room the better, as you are quickly discovering. The larger the boxes, the better they look from far away. If you give me a 10-foot parabolic umbrella, I might need 20-foot ceilings.
 
As I understand it, in the classic portrait lighting technique with one light you have this key light to the side of the subject, slightly raised. Something like (top view):

Classic lighting

Classic lighting

And the idea being to create a triangle shape on the far side of the face touching the eye and lip.
Ehh, not so much.
However, if the light source is a very large softbox, say a 1.75m box, how would you accomplish the raising of the light? I mean, the light is too large to lift (it would bump into the ceiling) - and raising it would defeat the point of having a large light source illuminating the rest of the body as well. If it is not raised, surely the desired shadows underneath the eyes and nose will not be present?
Well one solution is to get a larger space with a higher ceiling to work in. A possibly better solution make or purchase a large frame and scrim kit (I like the Chimera Lighting frames because they are strong and pack down to a small size: http://chimeralighting.com/products/lighting-kits/panel-frame-kits/pro-panel-kits-panel-frame-kits ) and then use your light behind it, maybe with a smaller umbrella or softball. the relative size and position of the source will depend on where you put the light behind the scrim, the angle it is to the scrim, and how close it is to the scrim.
--
Waldo Nell
 
As I understand it, in the classic portrait lighting technique with one light you have this key light to the side of the subject, slightly raised. Something like (top view):

Classic lighting

Classic lighting

And the idea being to create a triangle shape on the far side of the face touching the eye and lip. However, if the light source is a very large softbox, say a 1.75m box, how would you accomplish the raising of the light? I mean, the light is too large to lift (it would bump into the ceiling) - and raising it would defeat the point of having a large light source illuminating the rest of the body as well. If it is not raised, surely the desired shadows underneath the eyes and nose will not be present?

--
Waldo Nell
Yes sir. I know what you mean. I have often the same problem because (( I have amateur home studio)) and ceiling is not so high. And my soft-boxes are on large site. My biggest box I'm not able to use (Wafer-200) other are octagonal 5' . So if I have to raise up then most of the time I adjust them at 45 degree vertical and 45 horizontal that give me little more space. You can turn box long side parallel to ceiling that will give you little more space in some situation. With small space/room you have to be creative ;-) Yes is not perfect but I have to deal with what I have ;-) in a small room. Any way my home studio is not finish yet but it will be soon.


42d9da63340a437da08b4e196736b719.jpg
 
There's no point in getting gargantuan softboxes if you don't have room for them. It's MUCH better to get smaller softboxes and/or umbrellas and bring them closer to your subject. This way, you will get the ability to position your lights properly while still maintaining the soft quality of light.
 
As I understand it, in the classic portrait lighting technique with one light you have this key light to the side of the subject, slightly raised. Something like (top view):

Classic lighting

Classic lighting

And the idea being to create a triangle shape on the far side of the face touching the eye and lip.
Ehh, not so much.
However, if the light source is a very large softbox, say a 1.75m box, how would you accomplish the raising of the light? I mean, the light is too large to lift (it would bump into the ceiling) - and raising it would defeat the point of having a large light source illuminating the rest of the body as well. If it is not raised, surely the desired shadows underneath the eyes and nose will not be present?
Well one solution is to get a larger space with a higher ceiling to work in. A possibly better solution make or purchase a large frame and scrim kit (I like the Chimera Lighting frames because they are strong and pack down to a small size: http://chimeralighting.com/products/lighting-kits/panel-frame-kits/pro-panel-kits-panel-frame-kits ) and then use your light behind it, maybe with a smaller umbrella or softball. the relative size and position of the source will depend on where you put the light behind the scrim, the angle it is to the scrim, and how close it is to the scrim.
--
Waldo Nell
O, yes you suggestion is large space. I like that and I use to have large space but some times you have to move to small place with big soft boxes from privies place. And that is not easy. That what happen in my case ;-)
 
There's no point in getting gargantuan softboxes if you don't have room for them. It's MUCH better to get smaller softboxes and/or umbrellas and bring them closer to your subject. This way, you will get the ability to position your lights properly while still maintaining the soft quality of light.
Fair enough. However here is my motivation for using the large softbox:

I originally bought it for still life photography where I wanted to simulate natural window light - my reasoning was that if I get a softbox as large as my window, and place it vertically then it should provide the same soft light.

Knowing that the larger the softbox, the softer the light will be, I thought it would make it easier to get good lighting for portraits too. I do now understand some of the challenges faced when in a small home studio, where there is no choice of raising the ceiling.

--
Waldo Nell
The size of the light source is relative to the distance of the light source to the subject. You don't need a softbox the size of a window to create window light effect. If you move the smaller light source close enough to subject so that it becomes bigger than the subject, you get the same effect as a larger source further away. Furthermore, once the light source becomes bigger than the subject, making it even bigger won't do anything for you in terms of the quality of light. It's a case of diminishing returns.
 
Last edited:
There's no point in getting gargantuan softboxes if you don't have room for them. It's MUCH better to get smaller softboxes and/or umbrellas and bring them closer to your subject. This way, you will get the ability to position your lights properly while still maintaining the soft quality of light.
I was having big space and all my big soft-boxes did fit fine. But sometime situation force you to move to small location and what you do with this big soft-box? I'm not going to take them to dumpster ;-) Is not what you wish for but what is available in particular situation. You have to be creative and do the best what possible. I have Hensel set of studio lights perfect for big room, but unfortunately no longer have suitable room for it :( So I have to do what possible.
 
The size of the light source is relative to the distance of the light source to the subject. You don't need a softbox the size of a window to create window light effect. If you move the smaller light source close enough to subject so that it becomes bigger than the subject, you get the same effect as a larger source further away. Furthermore, once the light source becomes bigger than the subject, making it even bigger won't do anything for you in terms of the quality of light. It's a case of diminishing returns.
I agree, except when you want to try and recreate a larger scene such as a table setting including other decor than just the food / main subject. In that case, the larger light will help.
 
It's all give and take, but if you look at the studio picture that someone else posted, it's obvious that those gigantic softboxes are a liability for the size of the room, rather than an asset. It would have been better and cheaper for that person to have gotten much smaller boxes and he probably got the lights that are too powerful for that space.
Yeah that was mine... I did not realise the large softbox would be troublesome as I thought placing it vertically would mimic a window, and it is usually a good place to use for portrait photography as well. The window is not raised and tilted down, so I am a bit confused why the softbox seems to behave differently.
 
Because even though the window is parallel to the subject, the light streaming from it comes from above. So, you can't hope to place the softbox at the same angle as the window since the light source contained within the softbox doesn't stream downward. That means that the softbox has to be positioned higher and tilted downwards to mimic the light quality that you get from a window. If you don't, the light quality you get would mimic that of the setting or rising sun streaming directly through the window (albeit diffused)
Well DOH. That is so obvious I feel stupid. Thanks for pointing out the obvious :)
 
There's no point in getting gargantuan softboxes if you don't have room for them. It's MUCH better to get smaller softboxes and/or umbrellas and bring them closer to your subject. This way, you will get the ability to position your lights properly while still maintaining the soft quality of light.
Fair enough. However here is my motivation for using the large softbox:

I originally bought it for still life photography where I wanted to simulate natural window light - my reasoning was that if I get a softbox as large as my window, and place it vertically then it should provide the same soft light.

Knowing that the larger the softbox, the softer the light will be, I thought it would make it easier to get good lighting for portraits too. I do now understand some of the challenges faced when in a small home studio, where there is no choice of raising the ceiling.
 
As I understand it, in the classic portrait lighting technique with one light you have this key light to the side of the subject, slightly raised. Something like (top view):

Classic lighting

Classic lighting

And the idea being to create a triangle shape on the far side of the face touching the eye and lip. However, if the light source is a very large softbox, say a 1.75m box, how would you accomplish the raising of the light? I mean, the light is too large to lift (it would bump into the ceiling) - and raising it would defeat the point of having a large light source illuminating the rest of the body as well. If it is not raised, surely the desired shadows underneath the eyes and nose will not be present?

--
Waldo Nell
It sounds like you are trying to achieve Rembrandt lighting. Rembrandt lighting is just one variation of loop lighting.

One trick most of us forget is that even if you can't get your softbox high enough for Rembrandt lighting you have the option of tilting the subject's head to give you the right angle to the light.

One light Rembrandt lighting is good lighting for men but not very good lighting for females. The difference between the highlights and shadows is large and the angle of the light tends to cause dark shadows from skin blemishes, making them more visible. Using a fill light is almost a necessity for Rembrandt lighting with women.

Just by moving the light a few inches you can get loop lighting with more light on the far side of the face. Loop lighting is great for both male and female subjects. By feathering a large light source toward the camera properly you can get beautiful soft lighting with nice open but slightly dark shadows with a single light. You will need a reflector or fill light if you want really light shadows.

Here is an example of just how flexible loop lighting is. The subject and light are fixed, all that is changed is the camera angle. Note which shoulder the head is tilted toward. You can use the Basic head tilt with men or women but the Feminine head tilt should only be used with women. I recommend printing out this chart and studying it.

Clay Balckmore - Head PosingGuide.pdf

Here is a free video tutorial by Clay Blackmore. The production isn't very good but the info is priceless.

Clay Blackmore - YouTube - Techniques For Posing and Lighting

In this video Clay shows you have to go from loop to Rembrandt lighting with just a little adjustment of the head rotation and tilt - no adjustment of the light needed.

Clay Blackmore - How to Find Rembrant Lighting When Posing Portraits - YouTube

--
Living and loving it in Pattaya, Thailand. Canon 7D - See the gear list for the rest.
 
Last edited:

Keyboard shortcuts

Back
Top