I'm new to product photography and need to take pictures of paper products that I have letterpress printed. The printed image is recessed in the paper and it's important that I capture this detail as best as possible.
So, I'm looking for a camera/lense/lighting setup to mamimize the quality of the images for my website.
I have bought for this purpose an Olympus E-PL1 camera with an Olympus Zuiko 35mm F/3.5 Macro lense (and adapter). I am willing to upgrade to an SLR if needed but purchased this setup thinking that it will achieve what I am hoping.
For lighting, I have two clamp lights from Home Depot, each with 250W bulbs in it. They are 3,000 Kelvin approx.. I have a light box that I have built with a white interior (foam core). I am not currently diffusing the light but believe that I may need to.
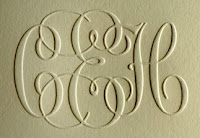
It would be greatly appreciated if you can look at the pic of the printed piece and provide feedback on how it can be improved. This is the original file without any post work.
Would diffusing the lighting help?
Would the shot be improved by getting an SLR with a macro lense? I really would like to know if I am compromising the quality of the shot by not getting an SLR. If an SLR is the way to go, which Canon or Nikon and lense do recommend?
The two lights are at (almost) the same level as the printed piece to enhance the impression of the image into the paper. Is there a better approach with the lighting to improve this effect? I have found that if I introduce any other lights at a higher level, the details of the impression are lost.
Lastly, the image feels grainy. Is this typical for macro shots? Ho
Thanks so much for any assistance with this. It is really appreciated.
Joshua


So, I'm looking for a camera/lense/lighting setup to mamimize the quality of the images for my website.
I have bought for this purpose an Olympus E-PL1 camera with an Olympus Zuiko 35mm F/3.5 Macro lense (and adapter). I am willing to upgrade to an SLR if needed but purchased this setup thinking that it will achieve what I am hoping.
For lighting, I have two clamp lights from Home Depot, each with 250W bulbs in it. They are 3,000 Kelvin approx.. I have a light box that I have built with a white interior (foam core). I am not currently diffusing the light but believe that I may need to.
It would be greatly appreciated if you can look at the pic of the printed piece and provide feedback on how it can be improved. This is the original file without any post work.
Would diffusing the lighting help?
Would the shot be improved by getting an SLR with a macro lense? I really would like to know if I am compromising the quality of the shot by not getting an SLR. If an SLR is the way to go, which Canon or Nikon and lense do recommend?
The two lights are at (almost) the same level as the printed piece to enhance the impression of the image into the paper. Is there a better approach with the lighting to improve this effect? I have found that if I introduce any other lights at a higher level, the details of the impression are lost.
Lastly, the image feels grainy. Is this typical for macro shots? Ho
Thanks so much for any assistance with this. It is really appreciated.
Joshua

")