Sander Meurs
Senior Member
Hello forum,
recently I have shot a few long exposure photos with a D700, making star trail photos, among other things.
At first I used the MC-36 to make several 5 minute exposures and I stacked those together in photoshop using the lighten mode to stack the trails onto each other. For this I would set the MC-36 to 5 minute 1 second intervals, to prevent the camera from triggering before the preceding shot had finished. This resulted in tiny breaks in the star trails.
A few days ago I used another strategy, apparently widely used, putting the MC-36 in 'hold' mode, while setting the camera on continuous shooting at 30 second exposures. This caused the tiny breaks between trailing stars to be further reduced, but the resulting trail looks very erratic seen at 100%. The lines are not smooth but very jagged, especially for stars with a little colour or twinkling to them. The only good thing to come out of this shoot, is that I was able to use all those separate frames for short interval movies.
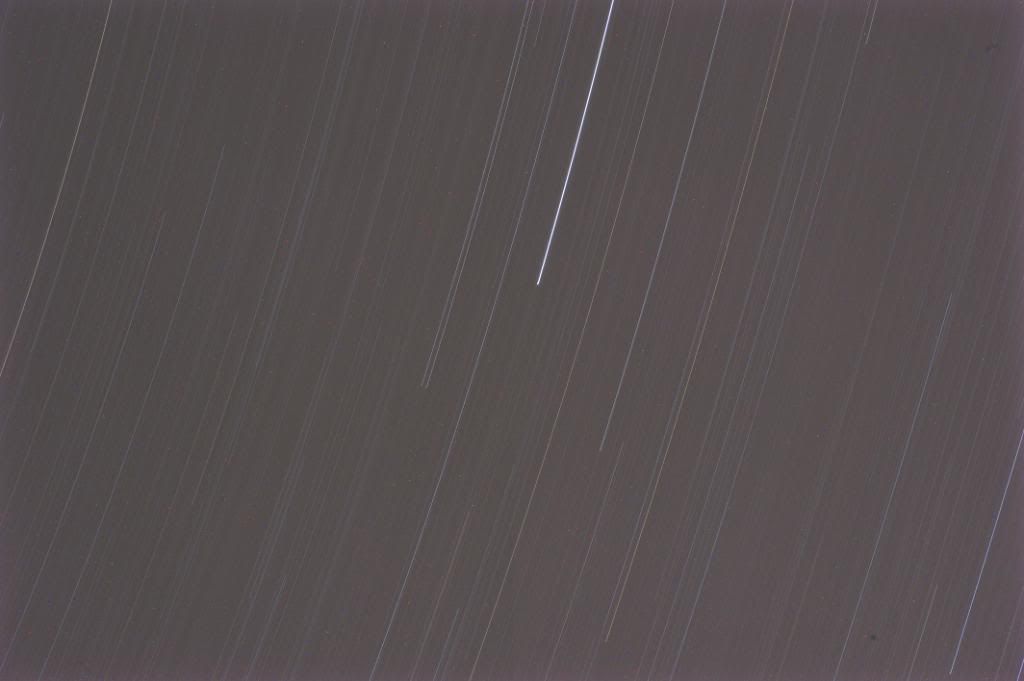
Looking for smoother star trails, I therefore decided to see how long I could expose the D700 in one single long exposure on one charge. I set it up in a dark room and shot it for 45 minutes, than for 2 hours. I knew I could expect a lot of long exposure related noise if I didn't engage the dark frame subtraction (LENR) but I wanted to see how bad it would get. After all, who wants to stay outside waiting for hours in the cold and dark (-15 last time).
The 45 minute and 2 hour shot turned out OK, but with the expected flaws. This is the 2 hour shot downsized but also in detail in a 100% crop:
These shots were converted to tiff in Raw Photo Processor, sharpening turned off.


As you can see in the photo, there is plenty of amp glow on all edges of the frame. In the 100% shot you can see the hot pixel noise. In the shorter 45 minute shot, there was no amp glow noticeable, but the hot pixels were about the same as the 2 hour shot. Some things that are visible in both shots however, are the lightened and darkened vertical bands running across both left and right side of the frame. You can see what it looks like in the 100% crop. What is this? Something to do with the readout of the sensor, what is this called?
I know that long exposure noise reduction will probably get rid of these 3 kinds of artifacts but I just wanted to see for myself how bad it would be.
I do hope the D3s sensor comes to a D700 sized body, because I have read that that sensor stays remarkably clean at multiple hour long exposures. No amp glow, no hot pixels or strange bands down the sides of the frame. Check out this story of 4 and 8 hour exposures without long exposure noise reduction: http://forum.getdpi.com/forum/showthread.php?t=12749
That is something I could use for very long exposures without hesitation or fear of image quality degradation.
By the way, the D700 had 20% charge left after the 2 hour long exposure (started with a fresh charge), it was shot at room temperature.
Sander
recently I have shot a few long exposure photos with a D700, making star trail photos, among other things.
At first I used the MC-36 to make several 5 minute exposures and I stacked those together in photoshop using the lighten mode to stack the trails onto each other. For this I would set the MC-36 to 5 minute 1 second intervals, to prevent the camera from triggering before the preceding shot had finished. This resulted in tiny breaks in the star trails.
A few days ago I used another strategy, apparently widely used, putting the MC-36 in 'hold' mode, while setting the camera on continuous shooting at 30 second exposures. This caused the tiny breaks between trailing stars to be further reduced, but the resulting trail looks very erratic seen at 100%. The lines are not smooth but very jagged, especially for stars with a little colour or twinkling to them. The only good thing to come out of this shoot, is that I was able to use all those separate frames for short interval movies.
Looking for smoother star trails, I therefore decided to see how long I could expose the D700 in one single long exposure on one charge. I set it up in a dark room and shot it for 45 minutes, than for 2 hours. I knew I could expect a lot of long exposure related noise if I didn't engage the dark frame subtraction (LENR) but I wanted to see how bad it would get. After all, who wants to stay outside waiting for hours in the cold and dark (-15 last time).
The 45 minute and 2 hour shot turned out OK, but with the expected flaws. This is the 2 hour shot downsized but also in detail in a 100% crop:
These shots were converted to tiff in Raw Photo Processor, sharpening turned off.
As you can see in the photo, there is plenty of amp glow on all edges of the frame. In the 100% shot you can see the hot pixel noise. In the shorter 45 minute shot, there was no amp glow noticeable, but the hot pixels were about the same as the 2 hour shot. Some things that are visible in both shots however, are the lightened and darkened vertical bands running across both left and right side of the frame. You can see what it looks like in the 100% crop. What is this? Something to do with the readout of the sensor, what is this called?
I know that long exposure noise reduction will probably get rid of these 3 kinds of artifacts but I just wanted to see for myself how bad it would be.
I do hope the D3s sensor comes to a D700 sized body, because I have read that that sensor stays remarkably clean at multiple hour long exposures. No amp glow, no hot pixels or strange bands down the sides of the frame. Check out this story of 4 and 8 hour exposures without long exposure noise reduction: http://forum.getdpi.com/forum/showthread.php?t=12749
That is something I could use for very long exposures without hesitation or fear of image quality degradation.
By the way, the D700 had 20% charge left after the 2 hour long exposure (started with a fresh charge), it was shot at room temperature.
Sander
")
")


