D40 WB issues - green/red tint adjustment?

Ancient_Mariner

Senior Member
Messages
1,555
Reaction score
2
Location
US
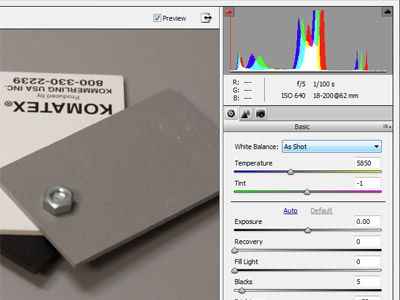
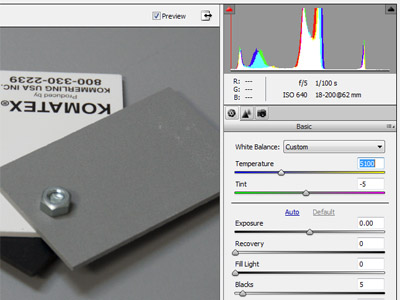
I usually set my WB on Auto because i shoot Raw and so i re-adjust it later, but in order to reduce my workload i'd like to start using it in non-Auto too. The problem is, i almost always use the green/red tint slider of CS2/Capture NX to achieve what i want. But how do you use that in-camera? The +- adjustment is for cooler/warmer fine-tuning, right?

Is it the Hue adjustment what does the trick? I find that hard to believe...Shouldn't it be in the WB menu? Even in Capture NX those are 2 different things (Hue adjustment in Picture Control menu and WB/tint in Raw/WB menu)

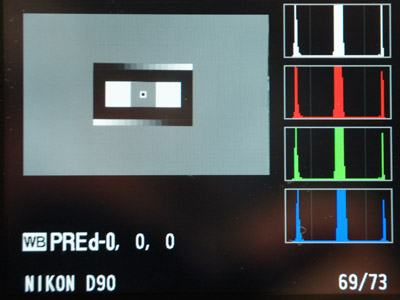
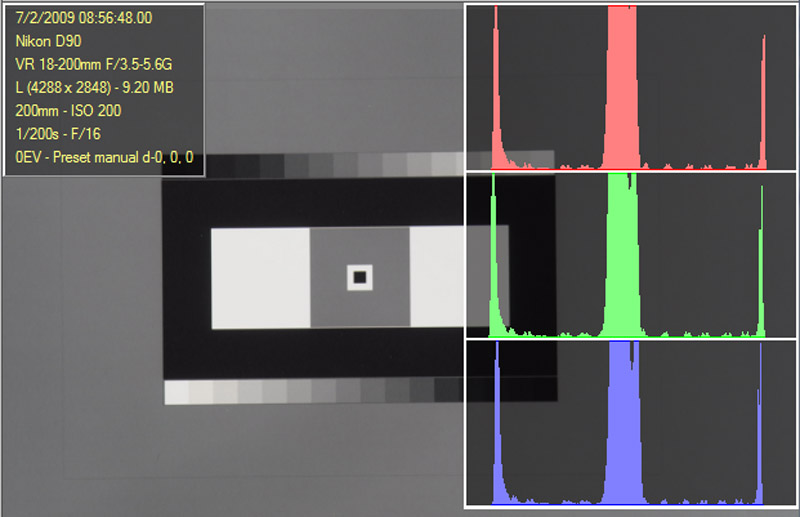
The other day i was trying to get the colors of a tree log and all settings (all daylight modes + a PRE with a grey card reading) failed. The light was the right temperature but it appeared reddish, while in reality the log had a clear green tint
 
Can't help you with your RAW tint problems. I only shoot JPEGS with my D40 with WB on Auto and colors are always perfect. Talk about reducing one's workload!
 
Glad it's working for you, but i used to think like that and i changed my mind.

After literally thousands of photos, i finally realized that Auto WB cheats - in outdoor scenes, it often over-compensates for sky blue or, alternatively, it gives everything a green tint. Only fine-tuning can give you true results.

I'm not gonna start another Raw vs JPEG thread, that's not the topic. But let me say that people who claim JPEG and AutoWB is good enough for all situations, ought to take photos in a park next to a lake, under a sky with passing cumulus :)
 
I agree. People who claimed that Auto WB works perfectly probably have not seen a picture with the "correct" WB. In fact, I find the Auto WB pretty lacking on most of the consumer Nikon bodies, and that is the reason I switched to RAW from JPEG.

This is what Auto WB does
In bright sunlight = too green
Incandescent/tungsten = too yellow
Fluroscent = too red

There are also other lighting conditions that the Auto WB gets totally wrong. Try shooting with Auto WB under a bulb with red light...
 
Can't help you with your RAW tint problems. I only shoot JPEGS with my D40 with WB on Auto and colors are always perfect. Talk about reducing one's workload!
I agree, I'm coming up on 20,000 photos taken (I know, small change when compared with others here) with my D40, most of that time I've left the AWB fine tuning to -1 or just left it set at 0.

I also agree with one of the other posters here that says the AWB in incandescent light is poor. But about everything I've shot sucks in incandescent lighting. The AWB in the D40 (w/o fine tuning) is only rated for a Kelvin range of 3500K to 8000K while the Incandescent Preset (again no fine tuning) is set at 3000K. If you're shooing mostly under these types of lights and aren't using a flash, I probably wouldn't use AWB.

--
NHT
while ( ! ( succeed = try() ) );
 
Glad it's working for you, but i used to think like that and i changed my mind.

After literally thousands of photos, i finally realized that Auto WB cheats - in outdoor scenes, it often over-compensates for sky blue or, alternatively, it gives everything a green tint. Only fine-tuning can give you true results.

I'm not gonna start another Raw vs JPEG thread, that's not the topic. But let me say that people who claim JPEG and AutoWB is good enough for all situations, ought to take photos in a park next to a lake, under a sky with passing cumulus :)
Unfortunately you have a D40, but you can work around the problem and learn to use the gray card properly. I can tell you now that if you throw it on the ground and shoot is straight up you will get sky color (blue). If you face the card to a tree you will get green light. Secondary light coming from trees, cumulus or painted walls will also give you different results but it will be correct for the light that hits the card. I could go on, but I have a three page tutorial and a free gray card that can show you not only how to set it properly, but carry evidence along with your shots so you can repair your print if you misjudged.

Use this web site for more information:

http://leongoodman.tripod.com/balance

This is what it looks like on a D90. Notice that the mid spike and the white spike align perfectly. One of the reasons you may want to use as an excuse to upgrade your body.


--
http://www.leongoodman.com/expose
http://www.pbase.com/photoleon
http://www.leongoodman.com

 
learn to use the gray card properly.
Sorry, but i don't buy the whole "gray card" argument for anything but simple studio shots. Can you tell me how a gray card helps you get the red tint that is a part of every sunset?
Congratulations! You now understand it

I use a black, white and grey card and can actually see two different colors that exist at the same time. The gray card is to neutralize the color cast.

In the sunset, you want to emphasize the cast. The cast is the image. The same is true of candle light. The cast is the charm. The digital gray card is different. It helps you see the dimensions of the tonal scale. I often think that I still want to see the warm tone on incandescent light in a home setting. The cast is part of the picture.

The digital gray card looks like this:


This "before" image shows shows that white balance was off. The three little spikes at the right edge do not align. The spikes were from white PVC signboard material used in a popular white balance product.


Using Adobe Camera Raw and Photoshop Elements the color temperature was adjusted downwards and a slight tint added to rescue the series of pictures taken in the same sequence. In order to get the white spike aligned the red/green axis was tipped at -5 to make the alignment. You can see that with the digital gray card, but not with just a gray card alone.

An outdoor daylight scene has at least two colors. There is the direct sunlight which is a nominal 5200K and the secondary light from clouds which is 6000K and the shaded areas on a blue sky day are 8000K. You get to choose how you want the picture to look.

To get back on topic, Auto WB does not work so well. A straight gray card does not work so well. The custom WB works best when you have the digital gray card and you face it to the light source you want to neutralize. If you process raw you don't even need to set the WB but you should photograph the digital gray card to have a reference that can be applied to all the images in the series.

You can not see the color histogram with a D40, but you can monitor the light color with any raw processor on the PC.

If you are concerned about sunsets, then always shoot raw. If you want to try for JPGs set WB to cloudy or shade and the red and yellow sunset will really pop.

--
http://www.leongoodman.com/expose
http://www.pbase.com/photoleon
http://www.leongoodman.com

 
It might be that i've stayed too long in the sun, but i just don't get it. I think we're talking about different things here..

You keep mentioning a gray card and how to use it as a reference etc. All that i know, but still, it doesn't remove the fact that when you use a gray card you essentially tell the camera (or Photoshop) where is the middle gray. In other words, if you place a gray card in a sunset scene and then you tell the camera/PS "this is the gray", it will remove the red/yellow cast from the card and the entire scene (and yes, the histograms will be aligned). You will get a scene that is "correct" (whatever that means), but, alas, without the red cast that makes a sunset a sunset!
 
Do color balance using cyan-red slider and yellow-blue sliders. Moving each an equal but opposite amount. I.e, towards cyan and blue for cooler colors. Towards red and yellow for warmer.

cary
 
It might be that i've stayed too long in the sun, but i just don't get it. I think we're talking about different things here..

You keep mentioning a gray card and how to use it as a reference etc. All that i know, but still, it doesn't remove the fact that when you use a gray card you essentially tell the camera (or Photoshop) where is the middle gray. In other words, if you place a gray card in a sunset scene and then you tell the camera/PS "this is the gray", it will remove the red/yellow cast from the card and the entire scene (and yes, the histograms will be aligned). You will get a scene that is "correct" (whatever that means), but, alas, without the red cast that makes a sunset a sunset!
You are absolutely correct! You have the concept. The sunset becomes the rose. The secondary ambient light becomes insignificant, but if you assume you want to compare with an ordinary day, you are entitled to lie to your camera in order not to spoil the colors that impressed you. Tell your camera it is a cloudy day and it will see the sunset as your eyes do.

Your grandfather's gray card is obsolete. Middle gray is arbitrary and it depends on many factors. The digital gray card provides you with a black point and white point and an arbitrary middle value which for my D90 in Neutral with zero values for contrast and brightness makes a bar at the mid point of the camera histogram. If you change the tone curve the relative positions on your camera histogram will shift. That is the new thing you are about to learn.

Once you start examining the color histograms, something will click in your head. Something that is really white will make a spike on the histogram for each rgb color and when the colors are all the same value for white, then you are balanced for that part of the picture. Your photo editor will allow you to select a small part of the picture so you can compare a white object in the open sun with a white object in the shade. If you have two white lawn chairs, one in the sun and one in the shade, you will be able to look at the color histogram and shift the amber/blue value until it comes into congruence. That will take care of 90% of the balance. The total adjustment will require the red/green (tint) to be adjusted, which I think was one of your original issues.

There is a distinction between finding the middle value and finding a balance between the rgb channels. A digital gray card illustrates those differences at a glance.


By the way, on a D40, you can not see those differences on the camera histogram display because you are only looking at the green channel. That is one reason why you can blow roses and sunsets so easily.

You can make your own digital gray card very easily with a white Avery label and a strip of black electrical tape and your existing gray card. Or, you could use my free one.

--
http://www.leongoodman.com/expose
http://www.pbase.com/photoleon
http://www.leongoodman.com

 
I wonder why the camera auto WB is often different than what you get in NX if you select "calculate automatically" Typically I find "as shoot" looks better than "calculate automatically" in NX. WHy is the camera (D40) making better choices here? Is the camera using some input other than the image sensor to decide?

Anyway, regarding your question, I think the + - on the various WB presets like incandescent, etc are the only way to adjust manually in camera. I wouldn't touch hue.

By far, the best way to get WB correct is to shoot RAW and balance in post processing. If you see something in your image that you know is white (or gray) you can simply select this and balance on it automatically in NX.
 
By far, the best way to get WB correct is to shoot RAW and balance in post processing. If you see something in your image that you know is white (or gray) you can simply select this and balance on it automatically in NX.
If your white is in the shade and your subject is in the sun, that will not work. Shade is bluer than sun. It is one of the subtle things that give us clues about what we are seeing. You have to find a white or gray object with exactly the same light mix as your subject.

If you intend to paint with light, you have to understand it. There are at least two different sources of light in daylight situations, the direct and the diffused. You can balance either way or split the difference. Choices, too many choices.

--
http://www.leongoodman.com/balance
http://www.pbase.com/photoleon
http://www.leongoodman.com

 
By far, the best way to get WB correct is to shoot RAW and balance in post processing. If you see something in your image that you know is white (or gray) you can simply select this and balance on it automatically in NX.
If your white is in the shade and your subject is in the sun, that will not work. Shade is bluer than sun. It is one of the subtle things that give us clues about what we are seeing. You have to find a white or gray object with exactly the same light mix as your subject.
Again, I will have to counter-argue. I took a look at your website as well, and I agree with most of the things you say, but still, what you're talking about leads to a result that shows white as white, black as black, and gray as gray. In other words, unless I have totally misunderstood you, this method removes the color cast.

Let's take a sunset scene in which there is no shade - just to simplify things. If you have a white piece of paper in the scene, and then in PS you click the WB tool, the entire scene will become flat, without the color cast.

Examples (both processed from RAW file):
WB set on Sunny. True yellow cast, exactly as my eyes saw the scene


WB set by clicking on the wall (It's a white wall). There is no color cast, and the scene is destroyed.


Copying from http://www.ronbigelow.com/articles/white/white_balance.htm :

Custom White Balance

"Rather than make assumptions about the color temperature of light (auto white balance) or fixing the color temperature at a given value (preset white balance), custom white balance actually uses the camera to measure the color of the light hitting the sensor. To make sure that the camera is measuring the color of the light source and not the color of some object from which light has been reflected, the photographer must use a neutral gray or white object to establish the white balance. Typically, the photographer will photograph a gray card, or other similar object, and use that to establish the white balance.

[...]

Therefore, custom white balance may not be a good choice if:

1. The Photographer doesn't Want Adjustments Made for the Temperature of the Light: The custom white balance will make a very accurate adjustment for the color temperature of the light, which may ruin the feel of images that depend on the color of the light to set the proper mood.
"
You are right again! You are a fast learner. I had to look carefully at Ron's clip because it looked like something I had written before either in a different post or on my site. The point I was making in my previous post was that white balance is a decision that the photographer has to make. For sunsets, you have to lie to the camera and claim it is a cloudy day when you know it is not. For a lone rose you have choices also, but you must err on underexposure to prevent the camera from being overwhelmed, clipping the red channel. You have to remember that the camera meter is almost blind to red.

Five years ago I had the yellowing lenses in my eyes replaced with crystal clear Bauch & Lombe lenses. I am now much more sensitive to the color of ambient light and have trained my brain to not make auto WB with my own eyes. I actually choose not to completely remove the amber glow of indoor shots. Your two samples indicate that you prefer the same as I. The amber cast was your subject, not an annoyance to be removed.

As you become more aware of the properties of light, you will begin to notice that you have more than one color present in many situations. I have three distinct colors of light in my kitchen and each time I shoot I have to make a choice about what to do. Painted walls in small close urban streets are a lot like slot canyons in Arizona and Utah. You as a photographer have to learn how to showcase the ambient cast instead of hiding it.

The digital gray card can help you see what is happening. When you see two white spikes on the histogram for pure white, you then know that you have to choose which one to showcase and which to suppress. We are getting to the point where words don't describe the issue. I urge you to make a quick and dirty gray card by adding black and white elements to your existing gray card and experiment.

We are more in agreement than disagreement.

--
http://www.leongoodman.com/expose
http://www.pbase.com/photoleon
http://www.leongoodman.com

 
At least this is true according to what I have read about it. I think you have to go into the fine tuning menu (for image editing) to see the R, G, and B histograms, so it takes more clicks to get there than it would on a D90, but at least you do have the option to find the information and tweak your exposure accordingly (in a situation of reasonably constant lighting), say when you're using an Ai or AIS lens on D40.
 
I looked into this again... to be more specific, to see the separate color histograms when viewing a picture, select "filter effects/color balance/ok" and you get the full RGB histogram display.

Ken Rockwell says you can do this simply by pressing the "OK" button a few times while viewing a picture.
 

Keyboard shortcuts

Back
Top