HELP with post-processing group photo

slag6078

Member
Messages
25
Reaction score
0
Location
Buffalo, NY, US
I'm working on gifts for Christmas and am planning on sending this group photo to family members from a vacation we took this summer.

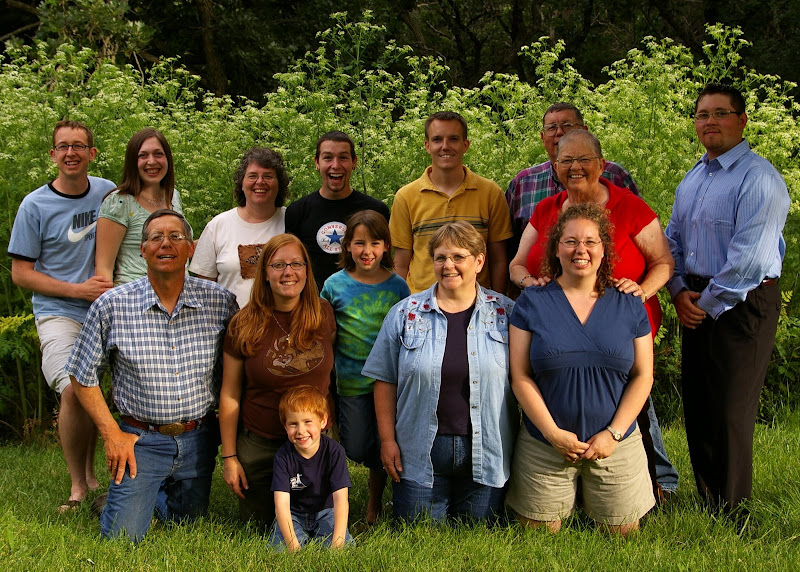
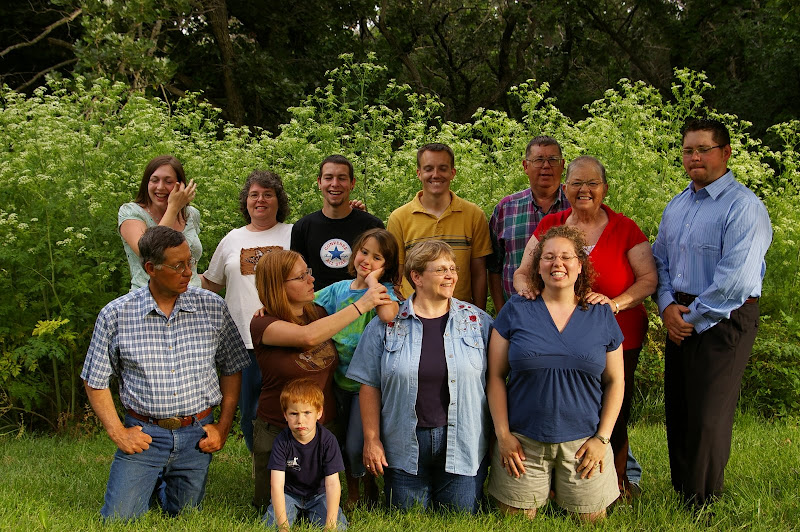
My problem is that in the best picture of the lot, my uncle is standing behind my grandmother. What I would like to do is cut a portion of another picture and lay it over the top of it.

I have Photoshop CS2 and can't figure out the best method to accomplish this. Can someone point me to the correct tool in Photoshop, or a tutorial which describes creating such a composite image?

Hidden Uncle, Good Group:


Uncle Revealed, Silly Group:


Thanks
--
--------
Travis
 
Hi Travis,

Here's a quick 10 minute fix I did in PS.


It's not perfect but it's all I could do with a lo-res file. You may have better luck by posting a hi-res file in the retouching forum. The fellows there are really good at what they do.

All I did was lay one photo on top of the other and changed the top layer to overlay and reduced the opacity a little so I could line up your uncle behind your grandmother. Then I added a layer mask to the top layer, it's at the bottom of you layers palette. Then I took a brush and started to reveal the good shot of your uncle. The color black reveals and white hides...or is it the opposite? lol..I can never remember. I kept going back and forth with black and white, revealing what was needed and hide what wasn't. I then used a clone stamp to fix his shirt because he didn't quite fit into that spot perfectly. The shirt looks all wonky but you can do better with a higher resolution file.

Give a try, it's easy. If all fails, post in the retouch forum and I'm sure someone there can help you.

Happy Holidays
--
Vania.
 
Here is the picture done in Lightroom. I added some fill light and dropped the saturation in Green, Yellow and Orange a tad, sharpened it a bit...and this what I came up with. You could do the same in PS. The best I could do with a low res photo but it's not bad for sure. It is easier to pick out the faces and it is considerably brighter. Skin tones look better on my monitor.
calibrated for Pro RGB


--
K10D and Canon G7...simply the very best!
mitch
 
Here is my first attempt!


And Leo, how do I decrease the saturation of the individual colors in PS? I liked the look of your attempt at PP this photo.

Thanks to all!
--
--------
Travis
 
I just assumed that PS, being a more advanced PP Software, would have individual colour saturation controls...Lightroom does and it is made by them. I don't have PS so I can't guide you here Travis. Big help eh! What's the old saying, Assume makes an ass of u and me! There must be a way! Sorry!

Best regards

Mitch
--
K10D and Canon G7...simply the very best!
mitch
 
Mitch-

No worries, I'm VERY unfamiliar with PS, so it is probably just something that I am overlooking.

Thanks again for your help.

--
--------
Travis
 
Thanks for the tip Russell and also for the link to that article...it looks like some advice regarding garish colours we could all use some help with.

I wonder how Travis made out with his PP now that you gave him the info he needed.
Thanks again
All the best
Mitch
--
K10D and Canon G7...simply the very best!
mitch
 
Mitch-

No worries, I'm VERY unfamiliar with PS, so it is probably just
something that I am overlooking.

Thanks again for your help.
There are two places for adjusting saturation of specific colors: Hue/Saturation adjustment, or Selective Color adjustment. Both best used as an adjustment layer. Just click on the drop-down menu at the top of each adjustment window and individual colors can be selected for work.

I prefer Selective Color because it allows more fine-tuning, but it is CMYK which might make life difficult. Yet another reason to use it as an adjustment layer so you can change, turn on and off, or delete.
 
Wow, excellent job Travis. I see you even adjusted the focal length, to make his size match the others. Good stuff :-) I'm sure your family will be pleased.
--
Vania.
 
Thank you, Vania!

It took me a little while to realize that all I needed to do was set the images on top of each other (in the correct relative position), and then cut a hole in the top image.

Being a newbie at PS means every step takes some effort.

Thanks again for your help, I sent the files off this afternoon to make 5X7s for everyone who was in the photo.
--
--------
Travis
 
Just a different version of your cut out - took advantage of the fact that Gran? had moved sideways also. This gave a bit more room for our revealed subject - fortunately Grans hands barely moved between the two shots.


Did you discover that you can use image transform on either of the layers to match the other layer? This is very useful as it gives considerable freedom in your masking.

Rod
-
My Galleries - http://rconn.zenfolio.com/


Keyboard shortcuts

Back
Top