Portrait Soft Glow Help/Challange (img)

The artifacts in the eye need sorting, if its a diffuse glow you wouldn't expect to see pixelized edges.


Andrew
 
Sorry, it was late and I didn't explain myself very well -- I used the Liquify pucker tool on her nostril, and simply erased her ear :-)

Cherilyn
 
Why thank you, I'm glad you enjoyed it, it was a nice image to work on. So few glamour shots to touch-up, it's always nice to see one as beautiful as this one, and give it a good run through photoshop. :)

I really like your earring so I cloned the fully visible earring and rotated and copied it to her other ear. I know you wanted her one ear removed (cheek line issue) but I really like the earring's look.

Thanks for the compliments.
Thank you for your kind words ... and I did love your Glamour retouch.

Reminds me of a fashion AD ... and that's a good thing.

p.s. your enhance of the Earrings did not go unnoticed :) by the
way.
Being a X-Buyer for Accessories it warmed my heart to see someone
enhance the earrings. LOL
Great shot you have here, I gave it a little glamour try, hope you
like it:

Bryan
--
Oak & Acorn

 
Ok here goes -

First, I made all necessary corrections for Color, Levels, noise, etc... I generally correct all color and remove all noise on the Color and Luminance layers of an image so I separated these layers out first and made my corrections.

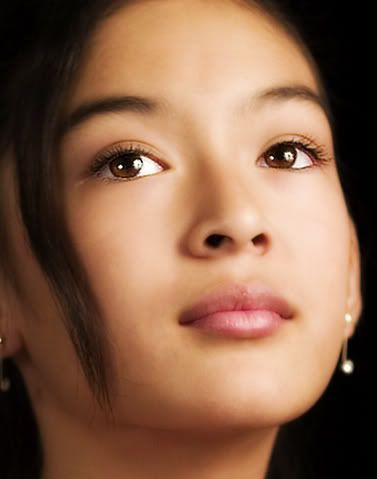
Especially on the color - there were hints of yellowish/green shadows under her lips and along the edges of her face, so I ran several Replace Color corrective steps to gradually replace these yeloow/green casts with hues that best matched her overall skin tone. These steps normally require a couple of tries as you don't want to do it all at once, it should be incremental otherwise it might look unnatural.

Using Replace Color, select the offending color, adjust the Fuzziness slidder to as minimal a level as possible, and then adjust the Hue slidder and Lightness Slidder to taste until you achieve the desired color.

I then ran Reluminate Filter (link: http://www.sd3.info/pf828/reluminate/reluminate0-1.html ) to increase the lumination of her gorgeous brown eyes. Unfortuantely, this incresed the luminance of her entire face. Obviously, I ran this filter on a duped copy, so I took this duped copy (with Relumination on it) and erased out all the excess as I only wanted only her eyes to be more illuminated.

Here is where it gets interesting. On this reluminated layer, I was erasing out all the excess - as I only wanted the eye balls to be brighter. But, I noticed as I was erasing that I really liked the 'glow' around the enitire eye (eyelids) as well. So I erased all except right around her entire eye (leaving her eye lids and just under her eyes illuminated). This left an oval of sorts of illuminated area all around the eyes. I then duped this eyeball layer, and continued to erase the rest of the illumination only leaving her irises illmuinated.

So I now have two illuminated eye layers - one for the oval area around her entire eye, and one of her irises only. I then lowered the opacity (Normal Blend) of the layer with the entire eye illuminated until if gave a nice soft brightening of the area just around her eyes, eyelids, and beneath her eyes. It really helped lighten up her whole eye area. I then lowered the iris only layer until her irises were a nice lighter shade of glowing brown.

Here is a sample of what it looks like before lowering the opacity levels. It's a lot easier to do then using the Dodge Tool and is a whole lot less destructive and more flexible than Dodging to achieve this effect:

No filter


With Filter


Filtered Layers Adjusted to Blend


You get the idea I hope. :)

From here I merged everything, converted to Lab Mode and ran USM at 100, 1, 0 on the lightness layer to sharpen things up. I then duped the final image and went about the skin smoothing process on this duped layer.

I used very light cloning in some areas, particularly around her lip area, but for the rest of her face I used the Smudge tool and Linda's Smudge Brush (see link to download: http://www.innographx.com/forum/viewtopic.php?p=65264&sid=012c57b303b11b8c5970cd82efed8259 ) at a very low opacity - 4-6%.

I find Linda's Smudge Brush to be invaluable for smudging. It makes the smudge process a lot smoother and less jerky than regular brushes.

Using the Smudge tool and Linda's Smudge Brush it was just a matter of lightly smudging her skin to smooth things always brushing in small, single strokes in one dirrection depending on the area of face. Point is, be gentle about it - nothing too heavy - undo anything as you go - don't try and redo it later.

Also, one more tip on this kind of smoothing over on skin - don't take out ALL imperfections (unless of course your shot is for a High Gloss Magazine). You want some of the subject's impurities to still be left intact - a line here, a spot there - you get the point. :)

Finally, I carefully selected the left earring using Magnetic Lasso, copied it, and pasted it onto a completely separate, blank layer that was the exact dimensions of the original image. I rotated this earring image by Flipping Horizontally to be rthe reverse of itself, then I selected it and pasted it on to the image of the woman and moved it into correct position on her right ear.

To this earring layer, I applied a slight Gaussian Blur, and then a Drop Shadow on Darken with Black color, and lowered the Opacity, as well as changed the Size and Spread of the Shadow to give the effect of the earring casting a bit of shadow darkenss on her neck.

And Poof - Done!

Bryan
--
Oak & Acorn


What a beuatiful job. Could you share your workflow, please?
Thanks,
Bruce
 
Hi Sam,

This is amazing. If you don't mind, may I have a copy of you action (DreamGlow Pro)? My email: [email protected]
Thank you so much.
--

----------------------------------------------------------------------------------
Fuji 602z, Nikon D70, Nikon d200
 
I had a really hard time keeping the definition of the cleft
(whatever it's called) from the bottom of her nose to her upper lip
while getting rid of the discoloration and poofiness of the upper
lip area on this one.
Thanks Bryan,

I 'filled in' the upper part of the lip (that was lighter) by cloning from below that area but just above the lip is an old dodge tool trick (shan canfield) where you make an outline in the middle to define the edge - an squiggle or 'm' actually. Here also Pam's Romatic 70's method adds grain which helps define some contours/tones, yet the diffusion smooths them out as well.
--
Kent

http://www.pbase.com/kentc
For prior discussions on most questions:
http://porg.4t.com/KentC.html
or d/l 'archives' at:
http://www.atncentral.com
 
Beautiful Bryan. Which B&W conversion method did you use? Also which frame did you use here and in the color version?

Thanks again,
Bruce
A little B&W rendition with some glow and film grain added (fixed
nose also):


Bryan
--
Oak & Acorn

--
http://CusinBrucie.smugmug.com/gallery/1285864/1/60412211

How I earn the EXTRA money for my camera equipment!!
http://borkofsky.ilovesuccess.net/

My Daughter's Art/Photo Site, Please have a look http://lipping.myexpose.com/gallery/
Nikon D200, 18-200mm VR lens


'I need a Shave and a Banana, NOW!!!'
 
In PS - choose Paint Brush and at the top, where it shows Brush and the pixel size of the brush, you'll see a little black arrow right next to the pixel size indicator pointing downward.

Click this black arrow - it's the arrow you click on to change which brush you want to use. Your dialogue box opens with all the various brushes listed for you to choose from. In this dialogue box is another black arrow in the top righthand corner aiming to the right - click this arrow. It will open another dialogue box giving you many options - one being Load Brushes.

Choose Load Brushes and a Search Box will open for you to search for the Linda's Brushes on your computer. Make sure you have them located some place easy for you to find. Just load them up and you're ready to go.

Once you've loaded them in, chose your brush as ususal with your drop down box, and scroll down to the bottom of the list, the Smudge Brush will be located at the very end, it is defaulted to 65 pixels. Hold you mouse over it to ensure it is the right one (it will give you a property dialogue box showing it as Smudge Brush when your mouse is over it) and double click it to make it the selected brush.

When you use it remember - low, low opacity, and change up the Blend Modes from Normal, to Darken, to Lighten dependent on the areas you are working on. It makes a real difference when smudging. I tried other Paint Brushes for smudging and ick is all I can say - they would go real slow, and take forever to finish one brush stroke, like the program was hanging or something. This smudge brush is as smooth and easy to use as can be, and really is a great alternative to the standard cloning at times. Don't know how Linda made it but kudos to her. :)

Good luck!

Bryan
--
Oak & Acorn


Fantastic & thorough tutorial Bryan, thanks so very much. I
downloaded Linda's Brushes. Is the smudge brush in there? Also how
do you load it from within Photoshop?

Thanks again
Bruce

Bruce
--
http://CusinBrucie.smugmug.com/gallery/1285864/1/60412211

How I earn the EXTRA money for my camera equipment!!
http://borkofsky.ilovesuccess.net/

My Daughter's Art/Photo Site, Please have a look
http://lipping.myexpose.com/gallery/
Nikon D200, 18-200mm VR lens


'I need a Shave and a Banana, NOW!!!'
 
When using the Smudge Brush make sure you first select the Smudge Tool located just two Icons down from the Clone tool (Smudge Tool is in the same tool set as the Blur and Sharpen Tools). This is where I initially screwed up when I first tried the Smudge Brush. You don't want to use it as a Paint Brush - you can of course, but you want to make sure you're using it as a Smudge Tool brush to get the effects I've described if that makes any sense.

Bryan

--
Oak & Acorn


Keyboard shortcuts

Back
Top