example of strange barrel distortion (1 pic)

rhlpetrus

Forum Pro
Messages
26,903
Solutions
3
Reaction score
5,419
Location
Campinas, BR
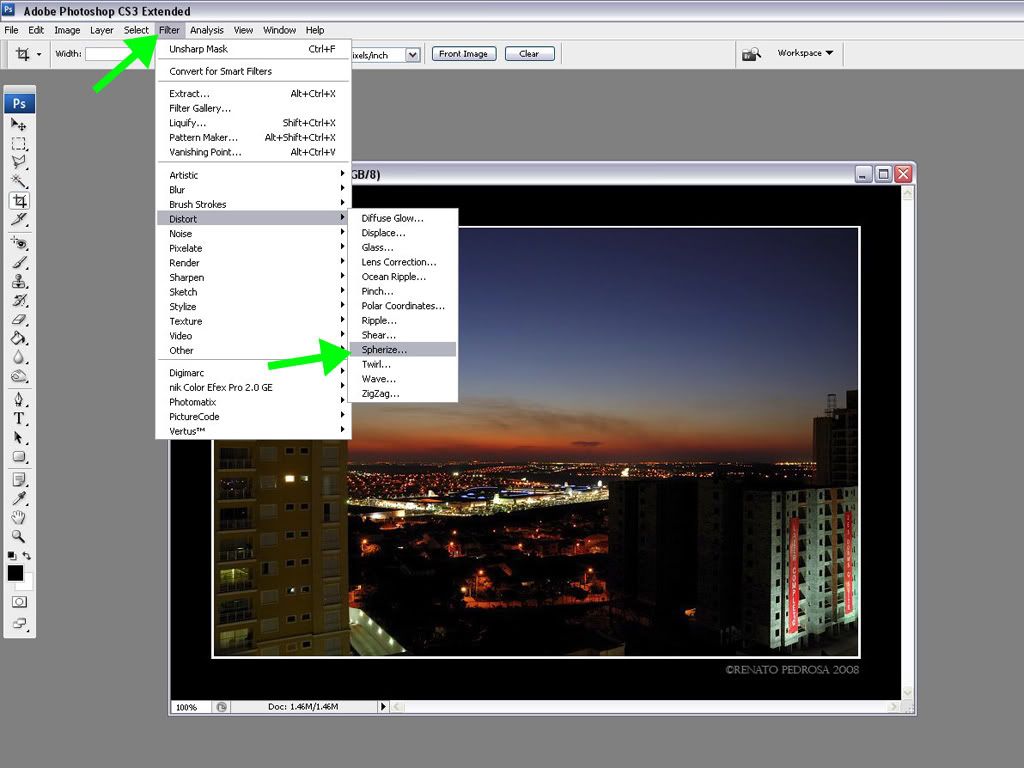
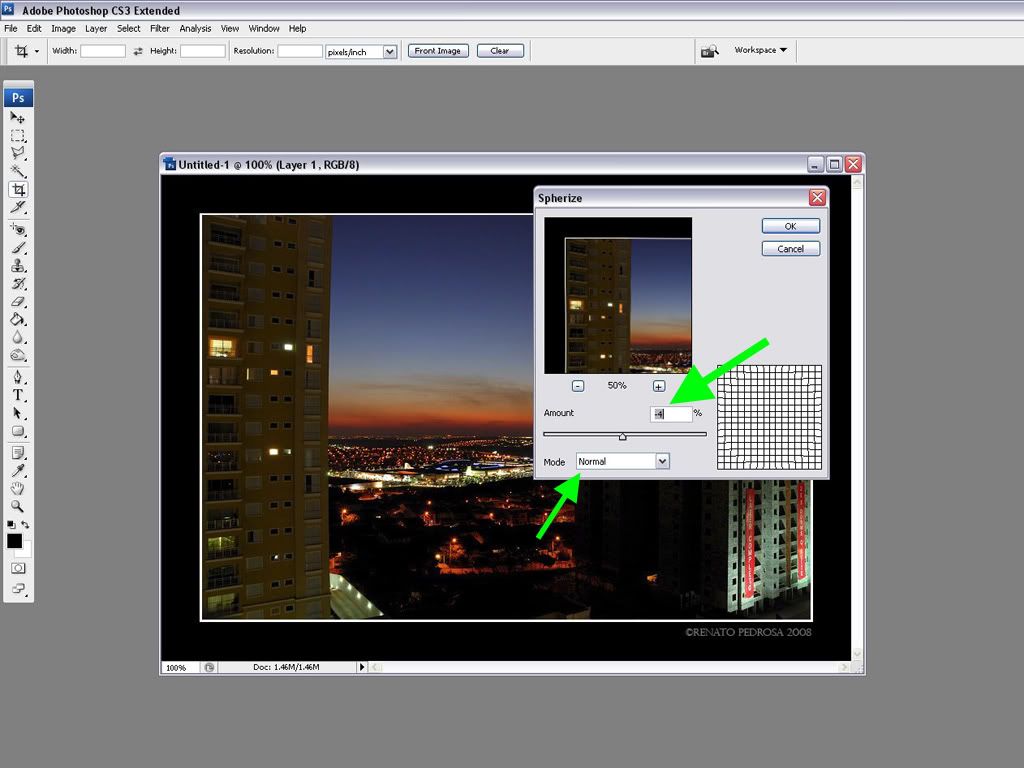
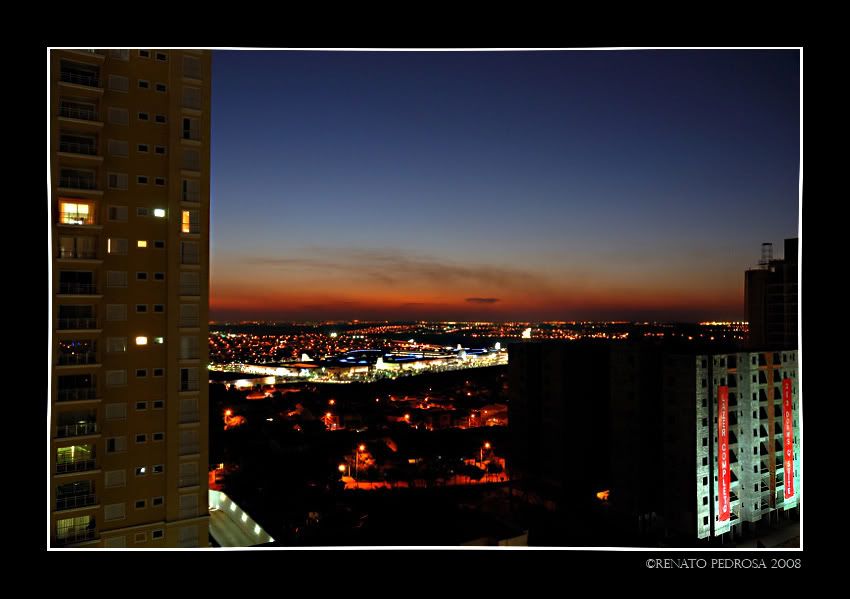
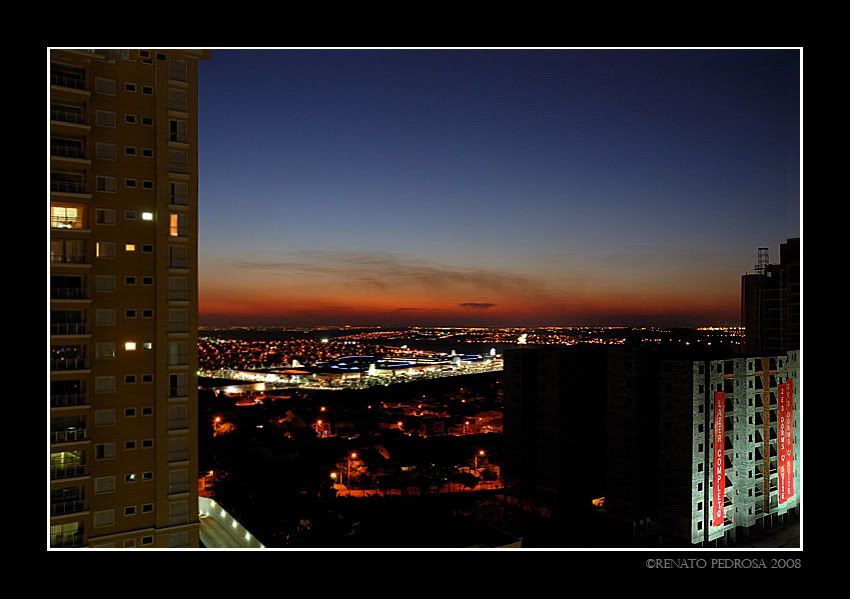
I was shooting the sight from my window (I've posted some of this series here already, for the curious, check the urbanscapes group in my Flickr account below) and included a tall building on the left part.

The result showed a strange example of barrel distortion, since it's evident on the right vertical edge, but not on the part close to the border of image. This is the 18-70mm at 18mm, f/5.6 and 2sec.


--
Regards, Renato.
http://www.flickr.com/photos/11435304@N04
OnExposure member
http://www.onexposure.net/
 
Do you mean the tall building on the left side of the image?

I see the same distortion at the left border of the image, as on the edge of the building.

--
ToeKnee44 (aka Tony)
'The Constitution only guarantees the American people the right to pursue
happiness. You have to catch it yourself.' Benjamin Franklin
 
Look at the balconies the ones at the bottom slopes up in relation to the bottom edge of the frame, but in the upper half of the photo they slope down in relation to the upper edge of the frame and that is caused by the barrel distortion. I haven't measure the lengths of the balconies but the length does not appear to be consistent from top to bottom of the frame, and they should be if there is no distortion.
--
Brooks
http://bmiddleton.smugmug.com/
 
very strange indeed...but i wouldn't worry about it much since it is a quick fix in photoshop. just highlight canvas (cntrl-A), then do a free transform (cntrl-T) with the wrap feature selected..strecth the picture where needed. then go into filters and do a smart sharpen (since the stretch will loose you some sharpness) with the settings at about 84% and 1.8 radius. should yield results like this...


I'm sure there is not necessarily an easier but I'm sure a more effective way of doing it, that will yield you better results, but im not sure i know it. dez tried explaining it to me once but i never really understood it.

--


.email.
[email protected]
.web.
http://www.flickr.com/arthurseabra
http://www.aseabra.deviantart.com
 
The only issue with that is if you look at the horizon it gets all weird looking as well. The barrel distortion on the 18-70 and 18-55 is really crazy. The 18-70 in particular has very high barrel distortions @ around 3.5%. Sometimes, I end up with a wiggly horizon.

See review here:

http://www.photozone.de/Reviews/46-nikon--nikkor-aps-c/235-nikkor-af-s-18-70mm-f35-45-g-if-ed-dx-review--test-report?start=1

In any case, Dez uses PTLens which can pretty much fix this stuff up fairly easily. But I have not seen how it does with the 18-70mm. I know it fixes 17-55.
very strange indeed...but i wouldn't worry about it much since it is
a quick fix in photoshop. just highlight canvas (cntrl-A), then do a
free transform (cntrl-T) with the wrap feature selected..strecth the
picture where needed. then go into filters and do a smart sharpen
(since the stretch will loose you some sharpness) with the settings
at about 84% and 1.8 radius. should yield results like this...

I'm sure there is not necessarily an easier but I'm sure a more
effective way of doing it, that will yield you better results, but im
not sure i know it. dez tried explaining it to me once but i never
really understood it.
--


http://photography.leung.us
 
very strange indeed...but i wouldn't worry about it much since it is
a quick fix in photoshop. just highlight canvas (cntrl-A), then do a
free transform (cntrl-T) with the wrap feature selected..strecth the
picture where needed. then go into filters and do a smart sharpen
(since the stretch will loose you some sharpness) with the settings
at about 84% and 1.8 radius. should yield results like this...


I'm sure there is not necessarily an easier but I'm sure a more
effective way of doing it, that will yield you better results, but im
not sure i know it. dez tried explaining it to me once but i never
really understood it.
That's a cool tip. What is that method called? I want to try it.

As for what I explained to you before, i think it was the Lens Correction tool? There's a way to remove or reduce distortion at various focal lengths.

PTLens plugin aslo does a nice job with this.
--
Dez

http://photos.dezmix.com

 
dez i honestly don't know what the name for this method is. when the wrap feature was introduce to photoshop i and everyone else in the marketing field fell in love with it, since it made my and im sure a lot of other people's lives a lot easier. its great for when you have to "wrap" that new "flat" shampoo bottle design around its 3D bottle. so one day i looked at a picture of a the trump taj mahal in A.C. that had this and immediately thought of using this feature to do that. hit a couple bumps along the way but developed an easy way to "quick-fix" barrel distortion. i call it the "arthur" method, since i never seen anyone using the tool for this purpose ;)

there is also another filter in photoshop called "spherize" found under filter--> Distort--> spherize.

haven't much played around with it yet because i like my method, but i keep it in the back of my mind in case wrap dosent work for whatever reason !
very strange indeed...but i wouldn't worry about it much since it is
a quick fix in photoshop. just highlight canvas (cntrl-A), then do a
free transform (cntrl-T) with the wrap feature selected..strecth the
picture where needed. then go into filters and do a smart sharpen
(since the stretch will loose you some sharpness) with the settings
at about 84% and 1.8 radius. should yield results like this...


I'm sure there is not necessarily an easier but I'm sure a more
effective way of doing it, that will yield you better results, but im
not sure i know it. dez tried explaining it to me once but i never
really understood it.
That's a cool tip. What is that method called? I want to try it.

As for what I explained to you before, i think it was the Lens
Correction tool? There's a way to remove or reduce distortion at
various focal lengths.

PTLens plugin aslo does a nice job with this.
--
Dez

http://photos.dezmix.com

--


.email.
[email protected]
.web.
http://www.flickr.com/arthurseabra
http://www.aseabra.deviantart.com
 
Ok so i messed with the Spherize tool some more to only discover that its actually a lot easier than my "wrap" method. Here is a quick break down using Renato's picture as the example.

Now keep in mind the settings i used may vary depending on which lens was used, what camera, distance from subject, angle of view etc. So feel free to experiment with the sliders to obtain optimal results.

Another note is that this was done in Photoshop CS3 Extended, but I'm sure it's regular CS3 and maybe even elements, you guys will have to let me know.
First open your file in Photoshop.
Here is Renato's original image:


Next go to Filter ---> Spherize.


Next Zoom out until you can see the portion of the image that incurred the barrel distortion (if you need hold the space bar, click the image in the Preview Window and move it around). Play around with the slider. Usually you will have to enter a negative effect as anything above +10 gets "artsy". I used -4 on Normal. If you don't know what looks right or what looks normal (a lot of times it's hard to tell whats normal after starring at a barrel distorted image for so long) just bring up the grid (CNTRL + ") and you can use this to align the vertical lines of the building.


Doing this to a photo will make it soft or decrease its sharpness. So to compensate you can use Filter --> Sharpen --> UnSharpen Mask.


In here you will have another opportunity to manipulate the results to better match that of your original file (which is a good idea to keep open separately to compare sharpness level). I used the following settings, if you need it to be sharper obviously play around with it a while until you achieve results similar to your original image.


Here is Renato's original image again compared to the end result:
Original


Corrected


This was as quick to learn as it was to do picture after picture. Hope this helps some people out there !!

Dez...this is actually really simple...try it out, let me know what you think.

Renato, I hope you don't mind me using your picture, let me know if this helps you as well.

--


.email.
[email protected]
.web.
http://www.flickr.com/arthurseabra
http://www.aseabra.deviantart.com
 

Keyboard shortcuts

Back
Top